
Android Database Tutorial
Ths chapter is about Android database. With databases we can manage application data in a structured way. Every application can create its own application data and it has complete control over it. So let us not waste our time and start our tutorial as soon as possible.
6.3.1 Introduction to SQLite
Android has a full SQLite relational database library. SQLite is a relational database management system (RDBMS). So using SQLite, an effective encapsulated relational database can be created for our application. Complex and structured application data can be easily managed with this approach. Android databases have storage in /data/data/<package_name>/databases folder of emulator or device. By default, databases are private i.e. application which creates the database only that app has control over it. SQLite is an open source, light weight, single tier and standards-compliant structure. Since SQLite is added as a library in the android software stack architecture, each SQLite database is considered as an integrated part of application. SQlite is an extremely reliable system.
We shall create a helper class which is used to encapsulate all complexities. We shall create a helper class called DBHelper. It will create, open, use and close the database system. Helper class extends SQLiteOpenHelper super class. Let us create an example to sort this out.
6.3.2 Android Database Example
Open your IDE and create a project. Name it as you like. I am naming it DBExample app. In this project we shall create two contacts. Retrieve the contacts and delete contacts as well. We shall create an adapter class and name it DbHelp. We shall create a helper class called DatabaseHelper and use the corresponding object to manage the database. Open your activity_main.xml file and code it as shown in the following listing:
<RelativeLayout xmlns:android="http://schemas.android.com/apk/res/android"
    xmlns:tools="http://schemas.android.com/tools"
    android:layout_width="match_parent"
    android:layout_height="match_parent"
    android:paddingBottom="@dimen/activity_vertical_margin"
    android:paddingLeft="@dimen/activity_horizontal_margin"
    android:paddingRight="@dimen/activity_horizontal_margin"
    android:paddingTop="@dimen/activity_vertical_margin"
    tools:context=".MainActivity" >
    <Button
        android:id="@+id/buttonRetrieve"
        style="?android:attr/buttonStyleSmall"
        android:layout_width="wrap_content"
        android:layout_height="wrap_content"
        android:layout_alignBaseline="@+id/buttonDelete"
        android:layout_alignBottom="@+id/buttonDelete"
        android:layout_alignParentLeft="true"
        android:layout_marginLeft="14dp"
        android:text="Show All" />
    <Button
        android:id="@+id/buttonDelete"
        style="?android:attr/buttonStyleSmall"
        android:layout_width="wrap_content"
        android:layout_height="wrap_content"
        android:layout_alignParentRight="true"
        android:layout_centerVertical="true"
        android:layout_marginRight="62dp"
        android:text="Delete" />
    <TextView
        android:id="@+id/textView1"
        android:layout_width="wrap_content"
        android:layout_height="wrap_content"
        android:layout_alignParentTop="true"
        android:layout_marginTop="36dp"
        android:layout_toRightOf="@+id/buttonRetrieve"
        android:text="Hello Readers!!" />
</RelativeLayout>
Figure - activity_main.xml file Android Database Example
Graphical layout should be similar to the following snapshot:
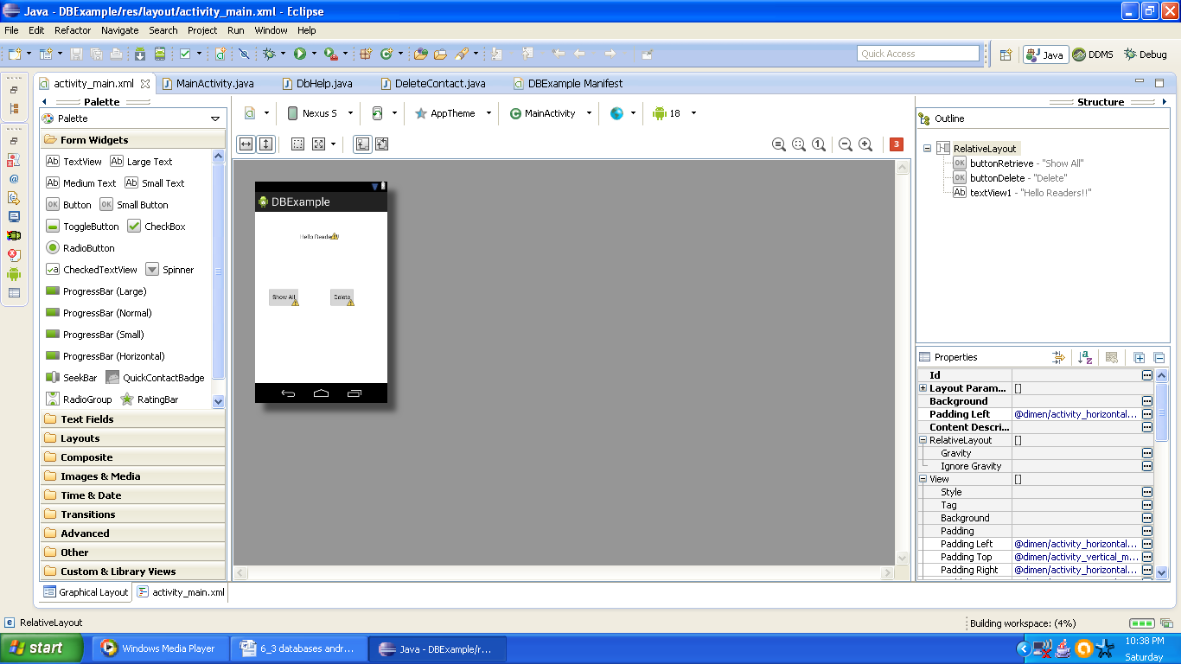
Figure - Graphical layout of Android Database Example
Open your main activity file and code it as shown in the following listing:
package com.android.tution.DB;
import android.app.Activity;
import android.content.Intent;
import android.os.Bundle;
import android.view.Menu;
import android.view.View;
import android.widget.Button;
public class MainActivity extends Activity {
    Button show,delete;
    @Override
    public void onCreate(Bundle savedInstanceState) {
        super.onCreate(savedInstanceState);
        setContentView(R.layout.activity_main);
        show = (Button) findViewById(R.id.buttonRetrieve);
        delete=(Button)findViewById(R.id.buttonDelete);
        show.setOnClickListener(new View.OnClickListener() {
            @Override
            public void onClick(View v) {
                // TODO Auto-generated method stub
                Intent i = new Intent(MainActivity.this, Allcontacts.class);
                startActivity(i);
            }
        });
delete.setOnClickListener(new View.OnClickListener() {
    @Override
    public void onClick(View v) {
        // TODO Auto-generated method stub
        Intent intent=new Intent(MainActivity.this,DeleteContact.class);
        startActivity(intent);
    }
});
        DbHelp db = new DbHelp(this);
        db.open();
        long id = db.insertContact("abc", "abc@xyz.com", "India");
        id = db.insertContact("pqr", "def@vs.com", "United States");
        db.close();
    }
    @Override
    public boolean onCreateOptionsMenu(Menu menu) {
        // Inflate the menu; this adds items to the action bar if it is present.
        getMenuInflater().inflate(R.menu.main, menu);
        return true;
    }
}
Figure - main activity file of Android Database Example
Now create a class and name it DbHelp. Code it as shown in the following snapshot:
package com.android.tution.DB;
import android.content.ContentValues;
import android.content.Context;
import android.database.Cursor;
import android.database.SQLException;
import android.database.sqlite.SQLiteDatabase;
import android.database.sqlite.SQLiteException;
import android.database.sqlite.SQLiteOpenHelper;
import android.util.Log;
public class DbHelp {
    public static final String ROWID = "_id";
    public static final String NAME = "name";
    public static final String EMAIL = "email";
    public static final String ADDRESS = "address";
    private static final String TAG = "DbHelp";
    private static final String DATABASE_NAME = "Mydb";
    private static final String DATABASE_TABLE = "contacts";
    private static final int DATABASE_VERSION = 1;
    private static final String DATABASE_CREATE = "create table contacts (_id integer primary key autoincrement, "
            + "name text not null, email text not null, address text not null);";
    private final Context context;
    private DatabaseHelper DBHelper;
    private SQLiteDatabase db;
    public DbHelp (Context con)
    {
        this.context=con;
        DBHelper=new DatabaseHelper(context);
    }
    private static class DatabaseHelper extends SQLiteOpenHelper
    {
        DatabaseHelper(Context context) {
            // TODO Auto-generated constructor stub
        super(context,DATABASE_NAME,null,DATABASE_VERSION);
        }
        @Override
        public void onCreate(SQLiteDatabase db) {
            // TODO Auto-generated method stub
            try{
                db.execSQL(DATABASE_CREATE);
            }catch(SQLException e)
            {
                e.printStackTrace();
            }
        }
        @Override
        public void onUpgrade(SQLiteDatabase db, int oldVersion, int newVersion) {
            // TODO Auto-generated method stub
            Log.w(TAG,"Upgrading database from version" + oldVersion + "to " + newVersion + ", which will destroy all old data");
        db.execSQL("DROP TABLE IF EXISTS contacts");
        onCreate(db);
        }
    }
Figure - First half of DbHelp class
Continue in the same class. Second part is as shown in the following listing:
public DbHelp open() throws SQLException
        {
            db=DBHelper.getWritableDatabase();
            return this;
        }
    public void close()
    {
        DBHelper.close();
    }
public long insertContact(String name, String email, String address)
{
ContentValues initialValues=new ContentValues();
initialValues.put(NAME,name);
initialValues.put(EMAIL, email);
initialValues.put(ADDRESS,address);
return db.insert(DATABASE_TABLE, null, initialValues);
}
public boolean deleteContact(long rowId){
    return db.delete(DATABASE_TABLE, ROWID + "=" + rowId,null) > 0;
}
public Cursor getAllContacts(){
    return db.query(DATABASE_TABLE, new String[] {ROWID,NAME,EMAIL,ADDRESS},null,null,null,null,null);
}
public Cursor getContact(long rowId) throws SQLException
{
Cursor c=db.query(true, DATABASE_TABLE, new String[] {ROWID,NAME,EMAIL,ADDRESS}, ROWID + "=" + rowId, null, null, null,null,null);
if(c!=null)
{
c.moveToFirst();
}
return c;
}
public boolean updatContact(long rowId, String name, String email, String address)
{
ContentValues cv=new ContentValues();
cv.put(NAME,name);
cv.put(EMAIL, email);
cv.put(ADDRESS, address);
return db.update(DATABASE_TABLE, cv, ROWID + "=" + rowId, null)>0;
}
}
Figure - Second half of code
Create an xml file and name it allcontacts.xml. Code it as shown in the following listing:
<?xml version="1.0" encoding="utf-8"?>
<LinearLayout xmlns:android="http://schemas.android.com/apk/res/android"
    android:layout_width="match_parent"
    android:layout_height="match_parent"
    android:orientation="vertical" >
    <TextView
        android:id="@+id/textView1"
        android:layout_width="match_parent"
        android:layout_height="wrap_content"
        android:text="Showing Contacts" />
</LinearLayout>
Figure - Second xml file of
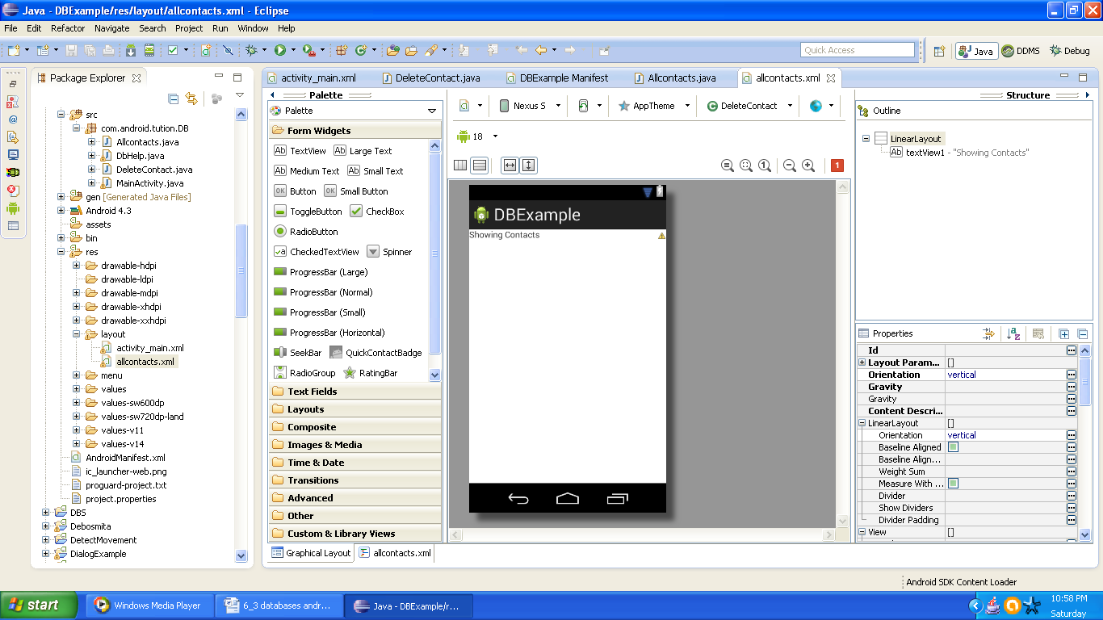
Graphical snapshot should be similar to the following snapshot:
 Android Database Example
Figure - Graphical layout of second xml file
Now create another class and name it Allcontacts. Code it as shown in the following listing:
package com.android.tution.DB;
import android.app.Activity;
import android.database.Cursor;
import android.os.Bundle;
import android.widget.Toast;
public class Allcontacts extends Activity {
    @Override
    protected void onCreate(Bundle savedInstanceState) {
        // TODO Auto-generated method stub
        super.onCreate(savedInstanceState);
        setContentView(R.layout.allcontacts);
        DbHelp db1 = new DbHelp(this);
        db1.open();
        Cursor c = db1.getAllContacts();
        if (c.moveToFirst()) {
            do {
                Display(c);
            } while (c.moveToNext());
        }
        db1.close();
    }
    public void Display(Cursor c) {
        Toast.makeText(
                this,
                "id: " + c.getString(0) + "\n" + "Name: " + c.getString(1)
                        + "\n" + "Email: " + c.getString(2) + "\n"
                        + "Address: " + c.getString(3), Toast.LENGTH_LONG)
                .show();
    }
}
Figure - Allcontacts class
Now create another java class and name it DeleteContact and code it as shown in the following listing:
package com.android.tution.DB;
import android.app.Activity;
import android.os.Bundle;
import android.widget.Toast;
public class DeleteContact extends Activity {
    @Override
    protected void onCreate(Bundle savedInstanceState) {
        // TODO Auto-generated method stub
        super.onCreate(savedInstanceState);
        setContentView(R.layout.allcontacts);
        DbHelp db2 = new DbHelp(this);
        db2.open();
        if (db2.deleteContact(1))
            Toast.makeText(this, "Delete successful", Toast.LENGTH_SHORT)
                    .show();
        else
            Toast.makeText(this, "Delete failed", Toast.LENGTH_SHORT).show();
        db2.close();
    }
}
Figure - DeleteContact class
<?xml version="1.0" encoding="utf-8"?>
<manifest xmlns:android="http://schemas.android.com/apk/res/android"
    package="com.android.tution.DB"
    android:versionCode="1"
    android:versionName="1.0" >
    <uses-sdk
        android:minSdkVersion="8"
        android:targetSdkVersion="18" />
    <application
        android:allowBackup="true"
        android:icon="@drawable/ic_launcher"
        android:label="@string/app_name"
        android:theme="@style/AppTheme" >
        <activity
            android:name="com.android.tution.DB.MainActivity"
            android:label="@string/app_name" >
            <intent-filter>
                <action android:name="android.intent.action.MAIN" />
                <category android:name="android.intent.category.LAUNCHER" />
            </intent-filter>
        </activity>
        <activity android:name=".Allcontacts" >
        </activity>
        <activity android:name=".DeleteContact" >
        </activity>
    </application>
</manifest>
Figure - manifest file of Android Database Example
So we are done. Create a suitable emulator and run the application. Output should be similar to the following snapshot:
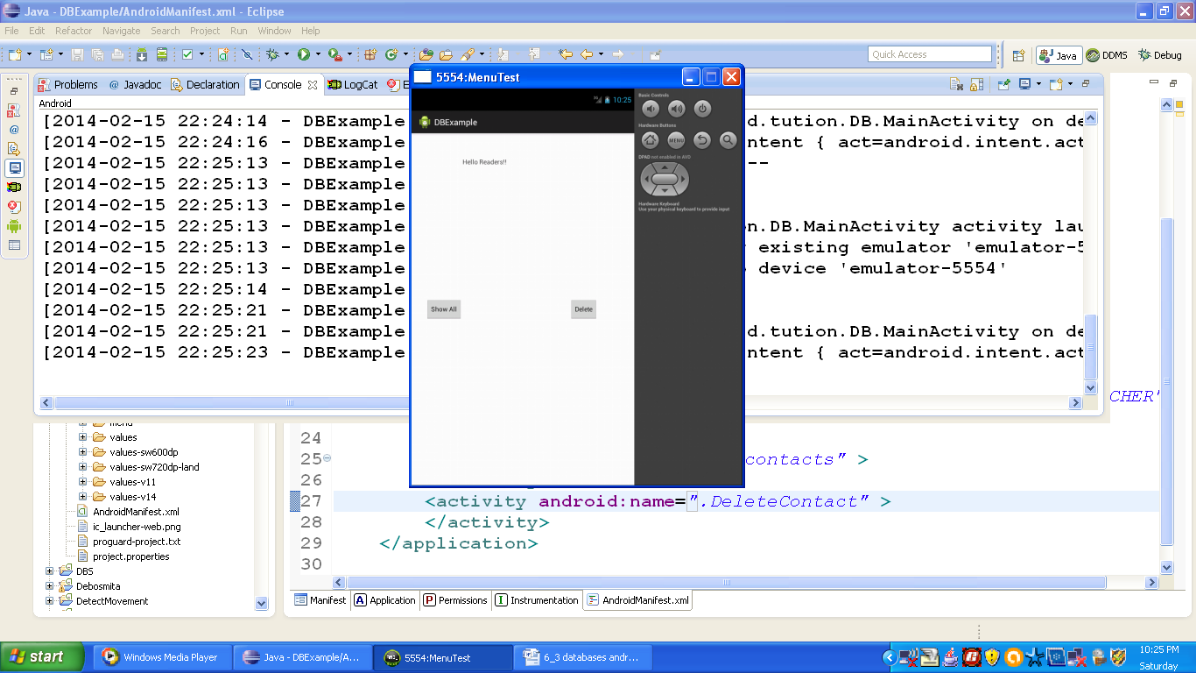
Figure - Homepage of Android Database Example
Now press the button saying show to retrieve all contacts. Output should be similar to the following snapshot:

Figure - showing the first contact
After few seconds next contact would be displayed as shown in the following snapshot:
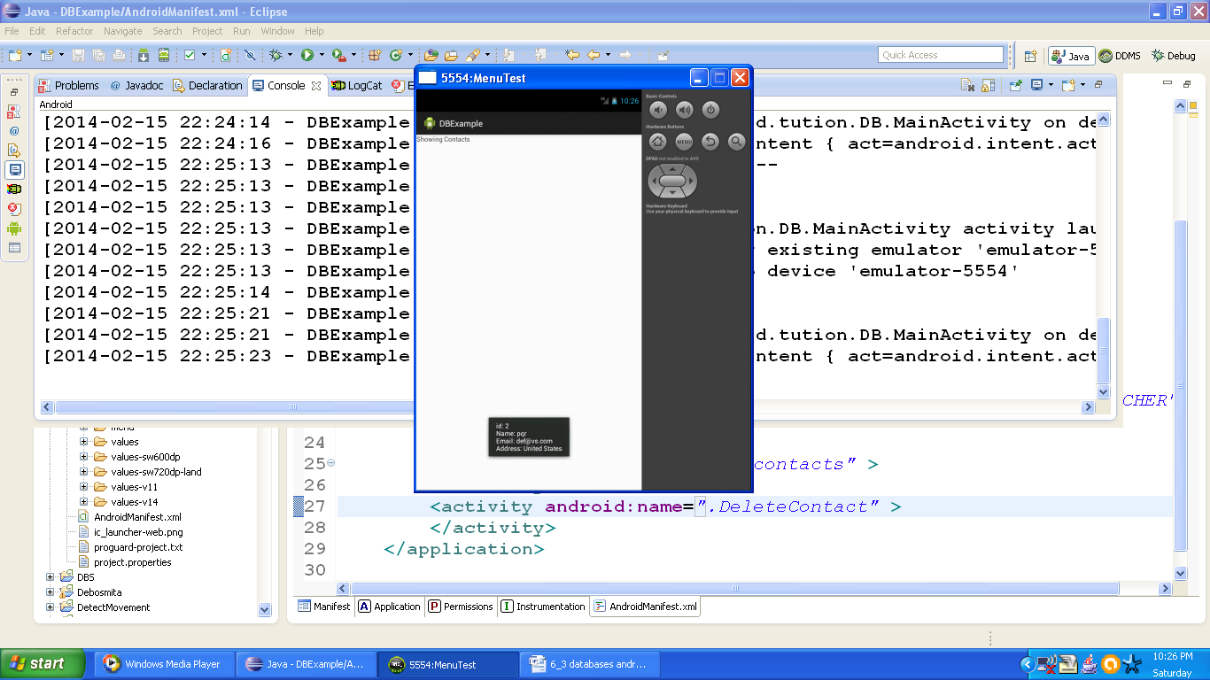
Figure - displaying second contact
Now press the back button shown on emulator. Press the button saying delete in home page of app. Output should be similar to the following snapshot:
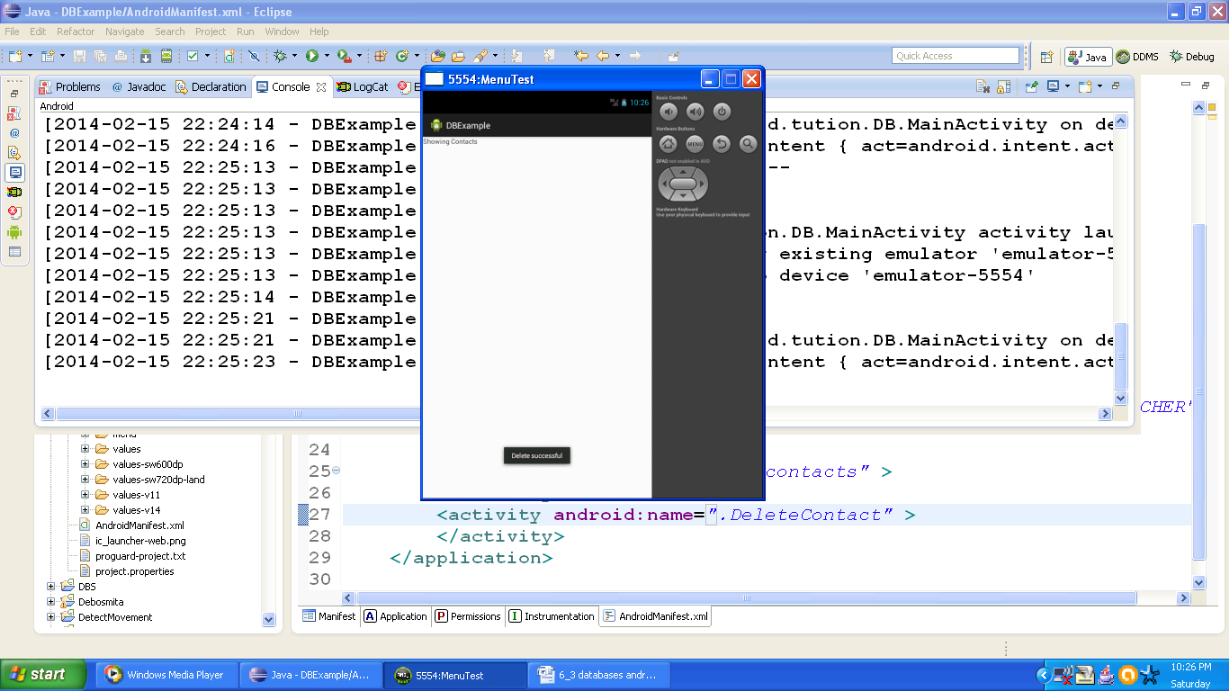
Figure - deleting a contact
Let us confirm whether contact was actually deleted or someone is fooling us. For that go back to home page and press the button saying show. You would see that toast message displays the second contact only. That means first contact was actually deleted. Output should be similar to the following snapshot:

Figure - Retrieving output after deleting first contact
Congratulations buddies!!! We are done with databases. See you in the next section with something new. Till then keep practicing. Happy App Developing!!