
Android Callback methods Implementation
It is not required to implement the super class methods like activities. A service has to extend the Service class or any of the subclasses. From various sources we can conclude that the structure of call back methods is as shown below:
public class ExampleClassService extends Service {
   int dStartMode;                        // indicates how to behave if the service is killed
   IBinder dBinder;                     // interface with which client binds
   boolean dRebind;                // determines onRebind is to be used or not, allowed or not

   @Override
   public void onCreate() {
        // service is created
   }
   @Override
   public int onStartCommand(Intent intent, int flags, int startId) {
        // unbound service is starting. onstartService() is used to start it.
        return dStartMode;
   }
   @Override
   public IBinder onBind(Intent intent) {
        // bindService() is used by client to get bonded
        return dBinder;
   }
   @Override
   public boolean onUnbind(Intent intent) {
        // With unbindService() the clients decouple the bond
        return dRebind;
   }
   @Override
   public void onRebind(Intent intent) {

        // After onUnbind() again a client in binding with the service by calling bindService()
   }
   @Override
   public void onDestroy() {
        // Service is destroyed as it is unused
   }
}
Skeleton of Android callback methods of service
3.6.2 Android Service Example
Open eclipse and create a new project and name it as you like. For me, ServiceExample will work. After creating the project we have to do something new. You might be thinking again a new thing! Don’t worry its simple and easy. Just follow the instructions and we are ready to go. Open your xml and type the code as shown below. Today we shall learn how to add buttons to our application. User interface is actually a large topic about which we have dedicated a chapter. Go to chapter 4 and you can see for reference. Just to explain the working of service this example is included. It actually does nothing but at this stage this example will satisfy the appetite. the greater part of service programming has dedicated chapters. Don’t worry, just continue learning and at the end you will definitely say “all is well”. Okay till now your IDE must have loaded itself, open the xml file and type the code:
<RelativeLayout xmlns:android="http://schemas.android.com/apk/res/android"
    xmlns:tools="http://schemas.android.com/tools"
    android:layout_width="match_parent"
    android:layout_height="match_parent"
    android:paddingBottom="@dimen/activity_vertical_margin"
    android:paddingLeft="@dimen/activity_horizontal_margin"
    android:paddingRight="@dimen/activity_horizontal_margin"
    android:paddingTop="@dimen/activity_vertical_margin"
    tools:context=".MainActivity" >

    <TextView
        android:id="@+id/textView1"
        android:layout_width="wrap_content"
        android:layout_height="wrap_content"
        android:text="Hello Readers..Congratulations!!" />

    <Button
        android:id="@+id/Startbutton"
        android:layout_width="wrap_content"
        android:layout_height="wrap_content"
        android:layout_alignLeft="@+id/textView1"
        android:layout_alignParentBottom="true"
        android:layout_marginBottom="177dp"
        android:layout_marginLeft="29dp"
        android:text="Start Service" />

    <Button
        android:id="@+id/Stopbutton"
        android:layout_width="wrap_content"
        android:layout_height="wrap_content"
        android:layout_alignBaseline="@+id/Startbutton"
        android:layout_alignBottom="@+id/Startbutton"
        android:layout_toRightOf="@+id/Startbutton"
        android:text="Stop Service" />

</RelativeLayout>
Now your graphical layout should appear like the following snapshot:
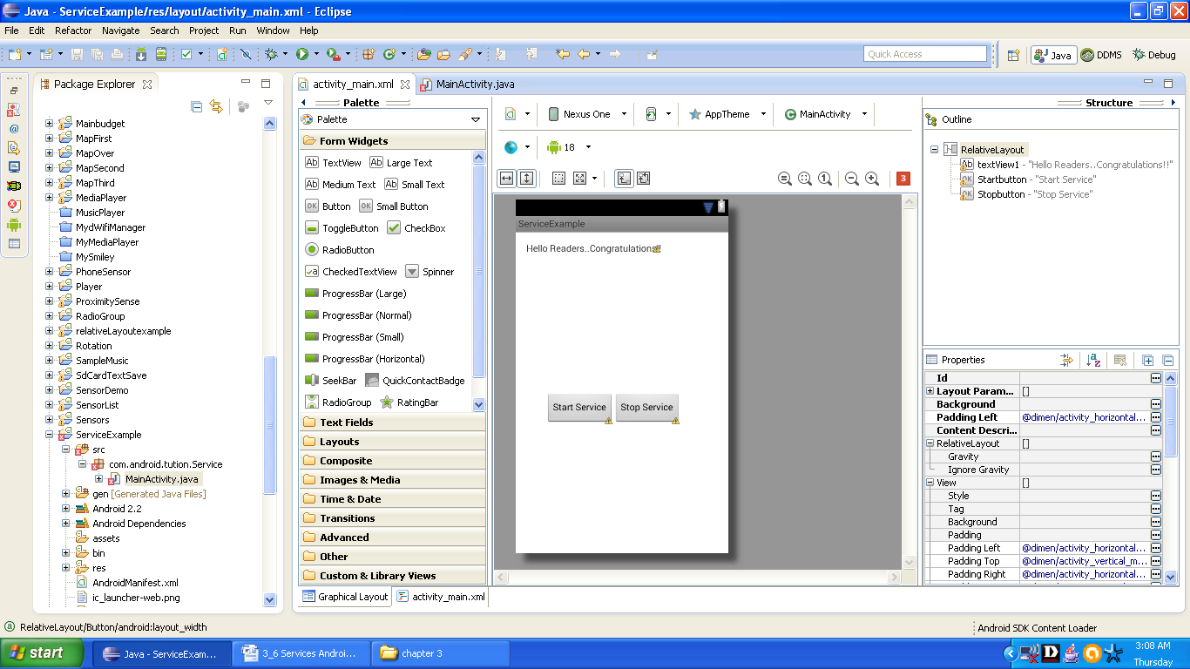
Figure Graphical layout of the Android service example
You will notice some red symbols over your project name. Don’t worry. You will shortly the resolve this problem. Now open your file saying MainActivity.java and code it as shown below:
package com.android.tution.Service;

import android.app.Activity;
import android.content.Intent;
import android.os.Bundle;
import android.view.View;
import android.widget.Button;

public class MainActivity extends Activity {

       @Override
       protected void onCreate(Bundle savedInstanceState) {
          super.onCreate(savedInstanceState);
          setContentView(R.layout.activity_main);
          Button start=(Button)findViewById(R.id.Startbutton);
          start.setOnClickListener(new View.OnClickListener() {
              @Override
              public void onClick(View v) {
              // TODO Auto-generated method stub
                startService(new Intent(getBaseContext(),ServiceEx.class));
              }
          });
         Button stop = (Button) findViewById(R.id.Stopbutton);
         stop.setOnClickListener(new View.OnClickListener() {
              @Override
              public void onClick(View v) {
                 // TODO Auto-generated method stub

              stopService(new Intent(getBaseContext(),ServiceEx.class));
              }
          });
      }
}
MainActivity.java file of ServiceExample app
Warning over the project name is because of the missing class name. This class is meant to be the service class of our app, don’t worry. It is easy to create a Java class in your project. Now right click on the package saying com.android.tution.Service listed under src folder. Select New-> class and press Enter.

Figure Adding a new java class to the project
Everything will be done for you. Just enter the name of the class ServiceEx and hit Finish. You are done. This is the class because of which we were getting so many warnings and now the problem is solved.. Notice one thing that this is the same class name we have given in intent to start the service. Both bound and unbound services are handled by intents.

Figure - New java class is created.
Now you will be presented with a new file saying ServiceEx.java which would resemble the MainActivity.java file, but they are not going to be the same thing. MainActivity.java is our application component and ServiceEx class is our service so let us start coding for this:
package com.android.tution.Service;

import android.app.Activity;
import android.content.Intent;
import android.os.Bundle;
import android.view.View;
import android.widget.Button;

public class MainActivity extends Activity {

       @Override
       protected void onCreate(Bundle savedInstanceState) {
          super.onCreate(savedInstanceState);
          setContentView(R.layout.activity_main);
          Button start=(Button)findViewById(R.id.Startbutton);
          start.setOnClickListener(new View.OnClickListener() {
              @Override
              public void onClick(View v) {
              // TODO Auto-generated method stub
                startService(new Intent(getBaseContext(),ServiceEx.class));
              }
          });
         Button stop = (Button) findViewById(R.id.Stopbutton);
         stop.setOnClickListener(new View.OnClickListener() {
              @Override
              public void onClick(View v) {
                 // TODO Auto-generated method stub

              stopService(new Intent(getBaseContext(),ServiceEx.class));
              }
          });
      }
}
Service class of Android ServiceExample App
Now a little modification is required in our manifest file and we are done. Check out the lines in bold. Now open the manifest file and edit the lines as listed below:
<?xml version="1.0" encoding="utf-8"?>
<manifest xmlns:android="http://schemas.android.com/apk/res/android"
    package="com.android.tution.Service"
    android:versionCode="1"
    android:versionName="1.0" >
    <uses-sdk
        android:minSdkVersion="8"
        android:targetSdkVersion="8" />
    <application
        android:allowBackup="true"
        android:icon="@drawable/ic_launcher"
        android:label="@string/app_name"
        android:theme="@style/AppTheme" >
        <activity
            android:name="com.android.tution.Service.MainActivity"
            android:label="@string/app_name" >
            <intent-filter>
                <action android:name="android.intent.action.MAIN" />
                <category android:name="android.intent.category.LAUNCHER" />
            </intent-filter>
        </activity>
        <service android:name=".ServiceEx" >
        </service>
     </application>
</manifest>
manifest file ServiceEx app
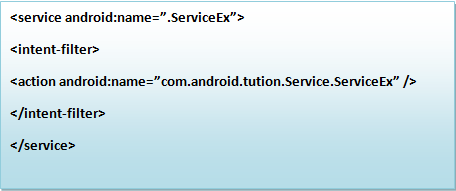
The onBind()method enables us to bind an activity to a service. This in turn enables an activity to directly access members and methods inside a service. The onStartCommand()method is called when we start the service explicitly using the startService() method. This method signifies the start of the service, and we code it to do the things as we want it to do for us in the service. In this method, we returned the constant START_STICKY so that the service sticks to current state, i.e., service will continue to run until it is explicitly stopped. The onDestroy()method is called when the service is stopped using the stopService()method. Thus we cleaned up the resources used by our service. If you want service to be available to other applications then you can add an intent filter with an action name as shown below:
If you are calling an external service, then the call to the startService()method will be as shown below:
startService(newIntent(“com.android.tution.Service.ServiceEx”));
To stop a service, use the stopService()method, as shown below:
stopService(newIntent(getBaseContext(),ServiceEx.class));