
In this chapter we will have a look at the rules that are to be followed in CSS. Let’s have a look at basic model of CSS and the necessary things to create our first CSS document.
The syntax of HTML and CSS are almost similar, so you can easily connect with the language.
For example, to change the background color of the web page we use the following line of code in HTML,
<body bgcolor=”#0000FF”>
The same thing if you want to do using CSS use the following line of code
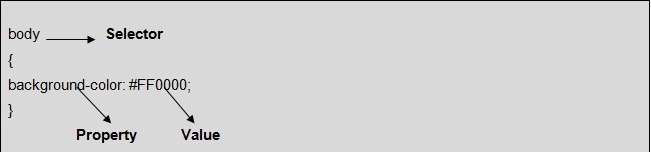
body
{
 background-color: #FF0000;
}
So, the syntax is almost similar to HTML.
Syntax of CSS
The syntax of CSS two blocks
1. Selector
Selector is any tag on which you wish to apply the styles. Examples of selectors are body, p, table etc.
2. Declaration block.
The declaration block consists of one or more property-value pairs.
Property is the property of the html element you wish to apply styles on like border, color, background-color etc.
Value is the value you wish to set like #0000FF, center, red etc.
The General syntax is :-
Selector
{
  Declaration block;
}
In the example seen above the selector is body, Property is background-color and value is #0000FF.
If the declaration block has more than one property-value pair then each pair is separated with a semi colon like in the example shown below
p
{
  color: red ;
  background-color: #FF0000;
}
Types of Selectors
There are different types of selectors in CSS. Let us have a brief look at them
1. Universal Selectors
By using universal selectors we can apply the style rules to every element rather than a single element. The asterisk symbol ‘*’ is used for this purpose.
Example:-
*{
  color: red ;
}
The above example renders every element of the page in red color.
2. Descendant Selectors
In some cases, we may want to apply some specific styling to a particular element which is inside another element, in such cases we use descendant selectors.
ol  strong{
color: red ;
}
In the above example the list item which has strong tag associated with it would be rendered in red.
3. Class Selectors
The elements which are grouped into classes can be formatted easily using Class selectors.
Example:-
.class1{
color: red ;
}
The elements of class1 are rendered in red if you use the above line of code.
If you want to be more specific then you can use element_name.class_name format like in the below example
p.class1{
   color: red ;
}
The paragraph of class1 would be rendered in red color by using above code.
4. ID Selectors
We can apply to those elements which share a common id using the ID selectors. All the elements having that id will be formatted when you apply styles using ID selectors.
Example:-
#id1{
color: green ;
}
The elements of class1 are rendered in green if you use the above line of code.
If you want to be more specific then you can use element_name.class_name format like in the below example
p.id1{
color: green ;
}
The paragraph of class1 would be rendered in green color by using above code.
5. Child Selectors
The child selectors are confused with the descendant selectors most of the times but their functionalities are different. If you want to modify a direct child element of a particular element you should use child selectors. For example,
body > ol{
color: green ;
}
The above line of code would change all the ordered lists which are direct children to body tag to green color. All the other ordered lists which are inside other elements say, inside tables or paragraphs remain unchanged.
6. Grouping Selectors:-
You can group one or more selectors and apply single block of style rules to them by separating each selector with a comma.
Example:-
table,h1,ol
{
  color: green ;
}
p
{
  text-align: left;
}
The same style rules are applied to table, h1 and ol of that particular web page. And another block is used for applying styles to a paragraph.
Comments in CSS
We use comments to make the code self explanatory to the fellow developers or as notes to ourselves. However, comments are ignored by the browsers and are not displayed.
A CSS comment starts with “/*” and ends with “*/”. We can also comment in multiple lines.
Example
table,h1,ol
{
    color: green ;
    /* This line changes the color of table, header h1 and ordered list to green color */
}
/* This comment
spans across
multiple lines
*/