
Images in HTML/CSS are not inserted into the web page, rather they’re linked. We link an image to a web page through <img> tag and it is the browser who gets the image from the specified location and displays for us each time a web page is loaded.
If the image is not found in the specified location or whenever the link is broken we see a very popular image -“no image found”.
![]()
So, we have to make sure that the image resides at the same place each time a web page loads.
Images contribute a lot to the effectiveness of the web page. When used appropriately, they give a new zeal to the concept. This powerful tool can be made more powerful using CSS.
Using CSS, we can control four properties of images namely,
- The border
- The Height
- The Width and
- The Opacity
The Image Border
We can set a border to an image using border property. We can easily apply borders in different styles using CSS.
The value to be supplied can either be in pixels or in percentages.
Zero pixels or 0 % would mean that the image has no border.
Syntax:
border: [border-width ||border-style ||border-color |inherit];
Here is an example,
<html>
<head>
<style>
#a
{
border: 0 px;
}
#b
{
border: 3px solid black;
}
#c
{
border: 5px dashed gray;
}
</style>
</head>
<body>
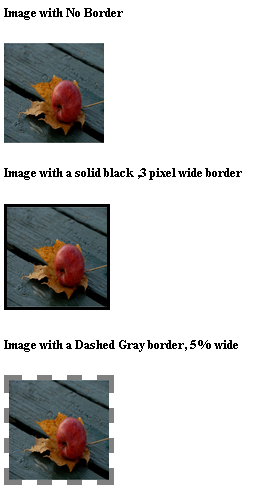
<h5>Image with No Border</h5>
<img id="a" src="Apple.jpg" height="100" width="100">
<h5>Image with a solid black ,3 pixel wide border</h5>
<img id="b" src="Apple.jpg" height="100" width="100">
<h5>Image with a Dashed Gray border, 5% wide</h5>
<img id="c" src="Apple.jpg" height="100" width="100">
</body>
</html>
The output of the above program would be,
The Image Height
The image height can be decreased or increased to suit our needs using height property of an image.
The height can be specified in pixels or numbers or percentages.
Syntax:
height: value in pixels / value in percentages / value in numbers;umbers;
An Example Program,
<html>
<head>
<style>
#a
{
border: 0 px;
height: 100;
}
#b
{
height: 200;
}
</style>
</head>
<body>
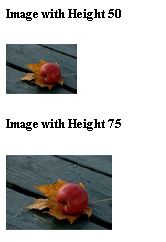
<h5>Image with Height 100</h5>
<img id="a" src="Apple.jpg">
<h5>Image with Height 200</h5>
<img id="b" src="Apple.jpg">
</body>
</html>
The output of the above program would be,
The Image Width
The image width can be decreased or increased to suit our needs using width property of an image.
The width can be specified in pixels or numbers or percentages.
Syntax:
width: value in pixels / value in percentages / value in numbers;in numbers;
An Example Program,
<html>
<head>
<style>
#a
{
width: 50;
}
#b
{
width: 75;
}
</style>
</head>
<body>
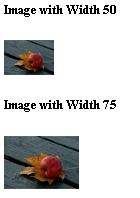
<h5>Image with Width 50</h5>
<img id="a" src="Apple.jpg">
<h5>Image with Width 75</h5>
<img id="b" src="Apple.jpg">
<br>
</body>
</html>
The output of the above program would be,
The Opacity
We can alter the opacity of the images in CSS and make them transparent. The property “ Opacity” is used for this purpose.
This property takes any value from the range 0.0 to 1.0. The less the value the more transparent the image becomes.
All the browsers except IE8 and earlier versions support this property.
For IE8 and earlier versions we use, filter:alpha(opacity=x) where x can take any value from 0-100.
Syntax:
opacity : value;
(or)
filter: alpha(opacity=value); /* For IE8 and earlier versions */
An Example Program,
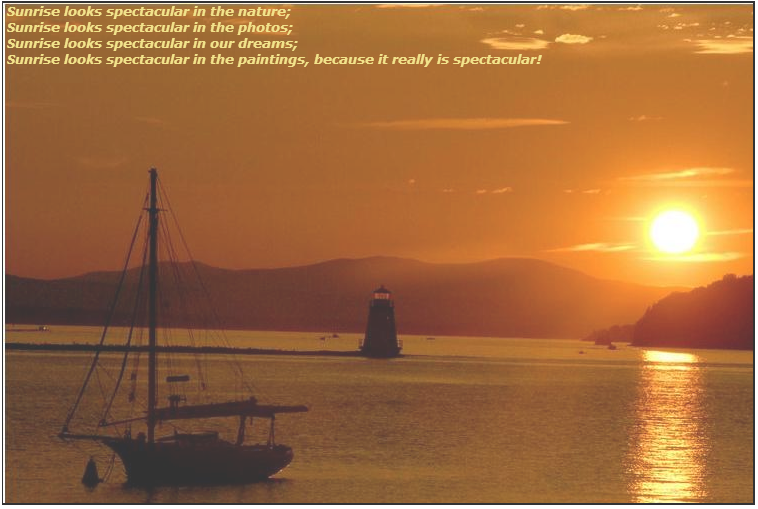
<html>
 <head>
  <style>
   #a
    {
     opacity: 0.8;
     background: url(SunnyDay.jpg);
     width: 750px;
     height: 500px;
     border: 2px solid black;
     font: oblique bolder 10pt Verdana;
     color: #EFDD6F;
    }
  </style>
 </head>
 <body>
  <pre id="a">
    Sunrise looks spectacular in the nature;
    Sunrise looks spectacular in the photos;
    Sunrise looks spectacular in our dreams;
    Sunrise looks spectacular in the paintings, because it really is spectacular!
  </pre>
 </body>
</html>
The output of the above program would be,
This is all about Images in CSS. In the next chapter we will learn more about CSS !!