
Building EJB Based JAX-WS Web Services
In this section, we will explain how we can build and consume JAX-WS Web service. The web service will be based on EJB class.
This is a simple Service with one method called sayHello. The method takes one parameter and returns the string “Hello {parameter}!”

From the file menu in eclipse, select to create a new EJB project.

Name the EJB project as HelloEJBWebServices and select to add the project to EAR called HelloEJBWebServicesEAR, then click Next

Select the check box to create and JB client JAR module.--.
Do not select ‘Generate ejb-jar.xml--.

Right click on the EJB project in the project explorer window and select to create a Session Bean class.

Give the bean name “HelloWorldJAXWS” and set to package “com.ejb3.webservice”, click finish, the following code will be generated:
package com.ejb3.webservice;

import javax.ejb.LocalBean;
import javax.ejb.Stateless;

/**
 * Session Bean implementation class HelloWorldJAXWS
 */
@Stateless
@LocalBean
public class HelloWorldJAXWS {

   /**
     * Default constructor.
     */
    public HelloWorldJAXWS() {
        // TODO Auto-generated constructor stub
    }
}
Till now we have an EJB project called HelloEJBWebServices added to EAR HelloEJBWebServicesEAR, and the EJB project has one EJB class called HelloWorldJAXWS.
To expose an EJB class to a web service, all you have to do is to annotate the EJB class with the annotation javax.jws.WebService, the web services will be exposed automatically with all the public methods declared in the class.
Add a new method to the class called sayHello like the below:
package com.ejb3.webservice;

import javax.ejb.LocalBean;
import javax.ejb.Stateless;
import javax.jws.WebService;

/**
 * Session Bean implementation class HelloWorldJAXWS
 */
@WebService
@Stateless
@LocalBean
public class HelloWorldJAXWS {

    /**
     * Default constructor.
     */
    public HelloWorldJAXWS() {
        // TODO Auto-generated constructor stub
    }

    public String sayHello(String name) {
        return "Hello " + name + "!";
    }
}
Notice that we added the @WebService annotation to our EJB class. Let’s test our code till now, using eclipse export the EAR and deploy it to JBOSS.
Start JBOSS and take a look at the Console output, look at the following lines:
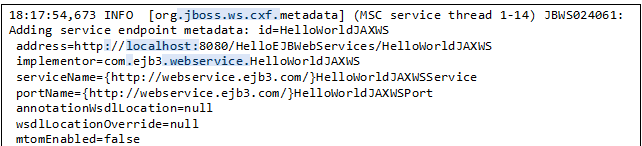
These lines indicate that JBOSS detected the EJB class and also that the EJB class annotated with @WebSerivce annotation. It should be exposed as web service, and JBOSS handled that and provides you with the URL that can be used to access the web service
http://localhost:8080/HelloEJBWebServices/HelloWorldJAXWS
We can use the URL to test the web service directly in the browser, copy the URL to the browser and append ?WSDL to the end of it (i.e. http://localhost:8080/HelloEJBWebServices/HelloWorldJAXWS?WSDL)
Now if everything worked fine with you till now, let us move to the next step, testing the web service using Java console application.
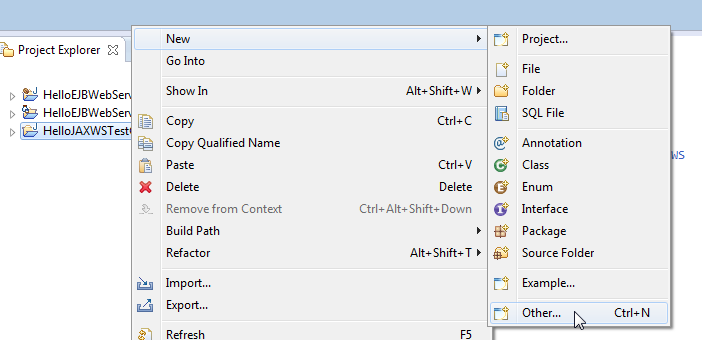
Create a new console application in eclipse called HelloJAXWSTestClient, right click on the project icon in the package viewer and select to “Other” from the “New” menu item.

From the New wizard, type in the top text area “web service” then select to create new “Web Service Client”, click next button.

In the service definition text area, type the URL of the web service that was printed by JBOSS server appended by ?WSDL (i.e. http://localhost:8080/HelloEJBWebServices/HelloWorldJAXWS?WSDL) and click finish button. This will create a client that can be used to access our HelloJAXWS web service.
This is what you should have in your package explore windows.

Now in the client project, create a new Java class called Main, with the following code inside.
package com.ejb3.webservice;

import java.rmi.RemoteException;

import javax.xml.rpc.ServiceException;

public class Main {
    public static void main(String[] args) throws ServiceException, RemoteException {
        HelloWorldJAXWSServiceLocator l = new HelloWorldJAXWSServiceLocator();
        HelloWorldJAXWS port = (HelloWorldJAXWS)l.getPort(HelloWorldJAXWS.class);
        String res = port.sayHello("Jon");
        System.out.println(res);
    }
}
Now run the class as a Java Application, the following output should be displayed in the console windows:

If this is the output you got, then everything is working fine in your environment.
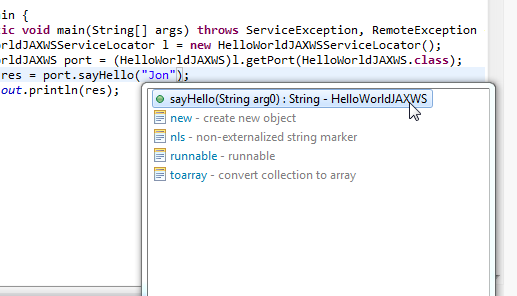
Now if you noticed, when you tried to call the method sayHello, eclipse couldn’t recognized the web service method parameter names, you got only arg0.
If you displayed the WSDL file again (http://localhost:8080/HelloWS/HelloJAXWS?WSDL) in your browser, you will notice the following lines:
<xs:complexType name="sayHello">
    <xs:sequence>
        <xs:element minOccurs="0" name="arg0" type="xs:string" />
    </xs:sequence>
</xs:complexType>
These lines describe the sayHello method, and as noted the parameter name wasn’t exposed by JBOSS, only arg0 was found, and that’s why eclipse couldn’t detect the correct names for the method parameters.
To fix that, modify the web service code with the following:
package com.ejb3.webservice;

import javax.ejb.LocalBean;
import javax.ejb.Stateless;
import javax.jws.WebMethod;
import javax.jws.WebParam;
import javax.jws.WebService;

/**
 * Session Bean implementation class HelloWorldJAXWS
 */
@WebService
@Stateless
@LocalBean
public class HelloWorldJAXWS {

    /**
     * Default constructor.
     */
    public HelloWorldJAXWS() {
        // TODO Auto-generated constructor stub
    }

    @WebMethod
    public String sayHello(@WebParam(name = "name") String name) {
        return "Hello " + name + "!";
    }
}
Notice that we annotated the method with @WebMethod annotation and also the parameter name was annotated with the @WebParam annotation and the annotation attribute name is declared with the value “name”.
Now, redeploy the web service again to JBOSS and check the WSDL file from the browser window, you will get the following lines:
<xs:complexType name="sayHello">
    <xs:sequence>
        <xs:element minOccurs="0" name="name" type="xs:string" />
    </xs:sequence>
</xs:complexType>
As noted, the WSDL file now has the correct name of the parameter. Now as the WSDL changed, our generated client must be rebuilt again. Follow the previous steps to generate the client and check the sayHello method in eclipse, you will get the following:
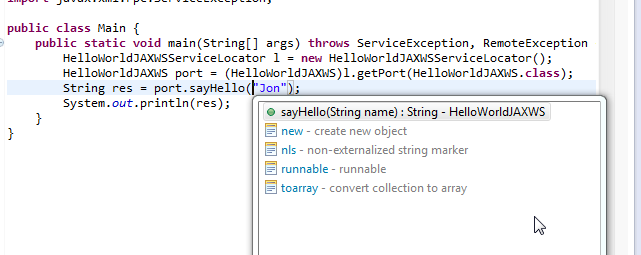
Now eclipse can detect the correct parameter name.