
Introduction
If you are facing space constraints while designing your website, you can design collapsible content panels for presenting your information. jQuery UI enables you to make such expandable and collapsible content holder (popularly known as accordion) easily and quickly using a simple method: accordion. You just have to click the headers to expand or collapse that particular section. You can also control the behavior of the element while being expanded or collapsed if you want using a number of options and methods. You need to specify the options as key/value pairs and you can directly call the methods inside the accordion method.
Syntax
The syntax of accordion method is
$(selector).accordion();
OR
$(selector).accordion({option1:value1, option2:value2,……..});
OR
$(selector).accordion("method_name", [parameters]);
The options will set the behavior of the element while being expanded or collapsed. The option and its corresponding value are set as key value pairs. While specifying actions using method names, we need to pass the method name along with its parameters (if any) to the accordion method. We will see all the popular options and methods one by one with the help of code samples. While trying the code samples, make sure that you add reference to the jQuery UI related files (one .css file and two .js files) correctly.
The accordion() Method
The accordion method declares that an HTML element and its contents are to be treated as accordion menus.
Open a new file and add the following lines of code:
<!DOCTYPE html>
<html>
  <head>
     <title>Sample Code</title>
     <link href="http://code.jquery.com/ui/1.10.4/themes/ui-lightness/jquery-ui.css" rel="stylesheet">
     <script src="jquery.js"></script>
     <script src="jquery-ui.min.js"></script>
     <script>
       $(document).ready(function(){
            $("#myAccordion").accordion();
       });
     </script>
  </head>
  <body>
    <div id="myAccordion">
      <h3>Section 1</h3>
    <div>
      <p>
         This is my first section with a list of cakes.
      </p>
      <ul>
            <li>Black Forest</li>
            <li>White Forest</li>
            <li>Chocolate</li>
            <li>Strawberry</li>
      </ul>
   </div>
   <h3>Section 2</h3>
   <div>
      <p>
         This is my second section.
      </p>
   </div>
   <h3>Section 3</h3>
   <div>
      <p>
         This is my third section asking you some inputs
      </p>
      <form id="collect">
                  User Name:<input type="text" id="uname" /><br />
                  Password:<input type="text" id="pwd" /><br />
                  <button type="submit" value="Submit" id="btnSubmit">Submit</button>
      </form>
   </div>
   </div>
</body>
</html>
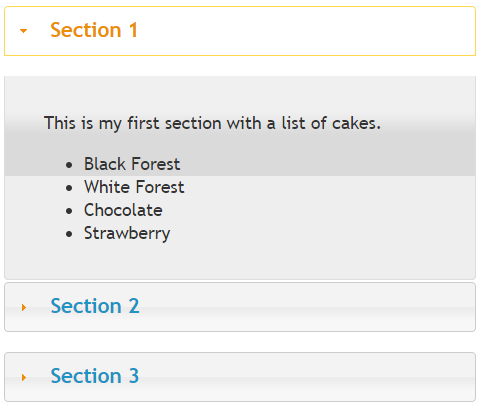
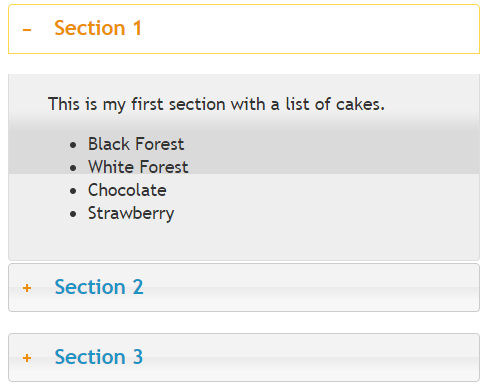
Save the file as index.html. Open it using your browser and you will get a screen like this:
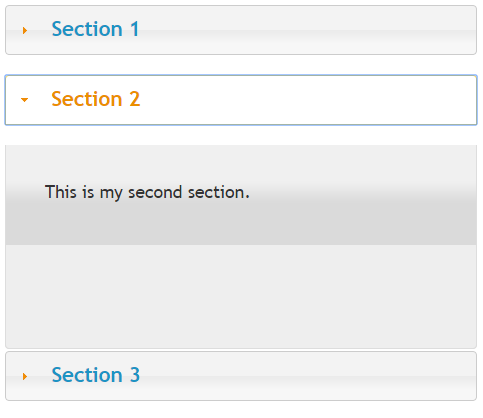
 Now if you click on Section 2, then that particular section will be expanded and the Section 1 will be collapses like this:
Setting Values to active, animate and collapsible Options
You can decide which panel should be active by setting the value of active option. If you set the value of active to false, all the panels will be collapsed. If you set the value of active to an integer, the panel with the specified index (index is zero based) becomes open. You can decide how to animate the changing panels by setting the value of animate. The value of animate can be true/false, a number that specifies the duration of animation in milliseconds, a string that specifies the name of easing or an object that specifies the animation settings with easing and duration properties.
By default, you are not allowed to collapse all sections at once. If you have already tried the default example, you might have noticed that when you click Section 1 when it is already opened, it is not getting collapsed. Section 1 gets collapsed only when you click another section and when that particular section gets expanded. In other words, at least one section is in expanded state at any point of time. But setting the value of collapsible to true, you can close all the sections at once.
Open a new file and add the following lines of code:
<!DOCTYPE html>
<html>
  <head>
    <title>Sample Code</title>
    <link href="http://code.jquery.com/ui/1.10.4/themes/ui-lightness/jquery-ui.css" rel="stylesheet">
    <script src="jquery.js"></script>
    <script src="jquery-ui.min.js"></script>
    <script>
        $(document).ready(function(){
            $("#myAccordion").accordion({collapsible:true, active:2});
            $("#btnAnimate").click(function(){
              $("#myAccordion").accordion({animate:{duration:5000, easing:"easeInOutBounce"}});
            });
       });
    </script>
  </head>
  <body>
    <div id="myAccordion">
      <h3>Section 1</h3>
      <div>
         <p>
           This is my first section with a list of cakes.
         </p>
         <ul>
            <li>Black Forest</li>
            <li>White Forest</li>
            <li>Chocolate</li>
            <li>Strawberry</li>
        </ul>
      </div>
      <h3>Section 2</h3>
      <div>
       <p>
         This is my second section.
       </p>
      </div>
      <h3>Section 3</h3>
      <div>
       <p>
         This is my third section asking you some inputs
       </p>
       <form id="collect">
                  User Name:<input type="text" id="uname" /><br />
                  Password:<input type="text" id="pwd" /><br />
                  <button type="submit" value="Submit" id="btnSubmit">Submit</button>
       </form>
      </div>
    </div>
    <button id="btnAnimate">Animate</button>
  </body>
</html>
Save the file as options1.html. Open it using your browser and you will get a screen like this:
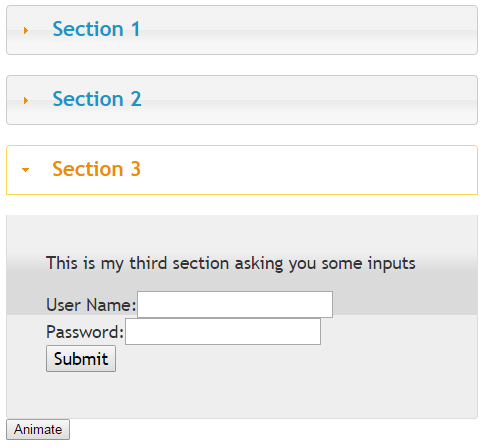
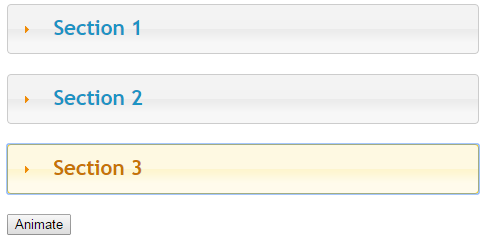
You could find that the third section is expanded by default because we set the value of active to 2 (the index of third section is 2 as the index is zero based). You will be able to collapse all the sections at once as in the following image because we have set the value of collapsible to true.
Try to expand or collapse any of the sections after clicking the Animate button. You could find some animation effects while the panel being expanded or collapsed.
Setting Values to heightStyle and icons Options
You can control the height of the accordion and each panel by setting the value of heightStyle. If you set the value of height to auto, all panels will have the height of the tallest panel. If you set the value of height to fill, panels expand to the available height based on the accordion’s height. If you set the value of height to content, each panel will be only as tall as its content.
You can set different icons for the headers to display being in the expanded and collapsed state by setting the value of icons.
Open a new file and add the following lines of code:
<!DOCTYPE html>
<html>
  <head>
    <title>Sample Code</title>
    <link href="http://code.jquery.com/ui/1.10.4/themes/ui-lightness/jquery-ui.css" rel="stylesheet">
    <script src="jquery.js"></script>
    <script src="jquery-ui.min.js"></script>
    <script>
       $(document).ready(function(){
            $("#myAccordion").accordion({heightStyle:"content", icons: {"header":"ui-icon-plus","activeHeader":"ui-icon-minus"}});
       });
    </script>
  </head>
  <body>
   <div id="myAccordion">
      <h3>Section 1</h3>
      <div>
          This is my first section with a list of cakes.
          <ul>
            <li>Black Forest</li>
            <li>White Forest</li>
            <li>Chocolate</li>
            <li>Strawberry</li>
         </ul>
      </div>
     <h3>Section 2</h3>
      <div>
            This is my second section.
      </div>
      <h3>Section 3</h3>
      <div>
        This is my third section asking you some inputs
        <form id="collect">
                  User Name:<input type="text" id="uname" /><br />
                  Password:<input type="text" id="pwd" /><br />
                  <button type="submit" value="Submit" id="btnSubmit">Submit</button>
        </form>
      </div>
   </div>
  </body>
</html>
Save the file as options2.html. Open it using your browser and you will get a screen like this:
You could see – sign for the header in the expanded state and + sign for the header in the collapsed state instead of right pointing and down pointing triangle. When you try to expand different panels, you could find that each panel is just as tall as its content because we have set the value of heightStyle to content.
Calling Methods
We can perform different actions on the accordion by passing the method that performs the action as the parameter of the accordion method. You can remove the accordion functionality completely by calling the destroy method. You can temporarily remove the accordion functionality using the disable method and then again enable the accordion functionality by calling the enable method. You can process any headers and panels that were added or removed directly in the DOM and recompute the height of the accordion panels by calling the refresh method. You can get a jQuery object containing the accordion by calling the widget method.
You can get the values of all options as an object by calling the option method without passing any parameter. You can get the value of a specific option by calling the method named option with the name of the option as parameter. You can set the value of options by calling the option method and passing the option name and its corresponding value as parameters.
Open a new file and add the following lines of code:
!DOCTYPE html>
<html>
  <head>
    <title>Sample Code</title>
    <link href="http://code.jquery.com/ui/1.10.4/themes/ui-lightness/jquery-ui.css" rel="stylesheet">
    <script src="jquery.js"></script>
    <script src="jquery-ui.min.js"></script>
    <script>
      $(document).ready(function(){
            $("#myAccordion").accordion();
            $("#btnDisable").click(function(){
                        $("#myAccordion").accordion("disable");
            });
            $("#btnEnable").click(function(){
                        $("#myAccordion").accordion("enable");
            });
            $("#btnAdd").click(function(){
                        $('#myAccordion').append('<h3>Section 4</h3><div>This is a new section</div>');
            });
            $("#btnRefresh").click(function(){
                        $("#myAccordion").accordion("refresh");
            });
        });
    </script>
  </head>
  <body>
    <div id="myAccordion">
       <h3>Section 1</h3>
      <div>
         This is my first section with a list of cakes.
          <ul>
            <li>Black Forest</li>
            <li>White Forest</li>
            <li>Chocolate</li>
            <li>Strawberry</li>
         </ul>
      </div>
      <h3>Section 2</h3>
      <div>
        This is my second section.
      </div>
      <h3>Section 3</h3>
      <div>
         This is my third section asking you some inputs
         <form id="collect">
                  User Name:<input type="text" id="uname" /><br />
                  Password:<input type="text" id="pwd" /><br />
                  <button type="submit" value="Submit" id="btnSubmit">Submit</button>
         </form>
      </div>
    </div>
    <button id="btnEnable">Enable</button>
    <button id="btnDisable">Disable</button>
    <button id="btnAdd">Add a Section</button>
    <button id="btnRefresh">Refresh</button>
  </body>
</html>
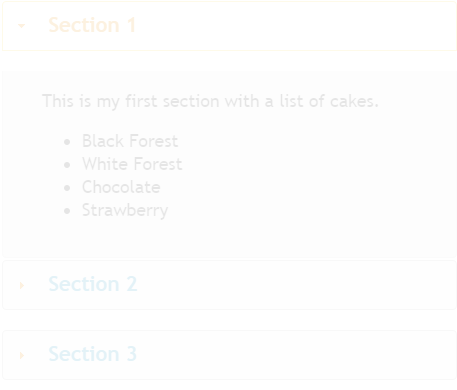
Save the file as callingmethods.html. Open it using your browser and you will be able to expand or collapse the panels until you click the Disable button. Once you click the Disable button, your screen will look like this (the image is not actually blurry, jQuery UI makes the accordion disabled like this) and you will not be able to expand or collapse the panels until you click the Enable button.
Once you click the Enable button, you will be able to expand or collapse the panels as before. Now click the Add a Section button and a new section will be added after the third section like this:
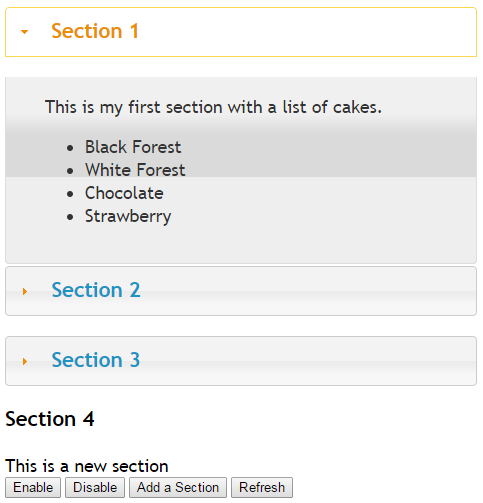
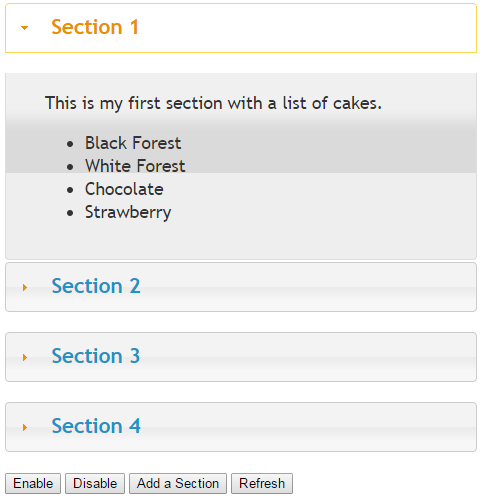
It is obvious that the fourth section is now not expandable or collapsible. Now click the Refresh button which makes the fourth section as well collapsible/expandable as in the following image:
Managing Events on Accordion
Different events get triggered in different stages of the accordion. The activate event will be triggered after a panel has been activated. The beforeActivate event will be triggered directly before a panel is activated. The create event is triggered when the accordion is created.
Open a new file and add the following lines of code:
<!DOCTYPE html>
<html>
  <head>
    <title>Sample Code</title>
    <link href="http://code.jquery.com/ui/1.10.4/themes/ui-lightness/jquery-ui.css" rel="stylesheet">
    <script src="jquery.js"></script>
    <script src="jquery-ui.min.js"></script>
    <script>
       $(document).ready(function(){
            $("#myAccordion").accordion(
            {
       create: function (event, ui) {
             alert("Created");
          },
       beforeActivate : function (event, ui) {
             alert("beforeActivate");
          },
       activate: function (event, ui) {
             alert("activate");
          }
      });
      });
    </script>
  </head>
  <body>
    <div id="myAccordion">
      <h3>Section 1</h3>
      <div>
        This is my first section with a list of cakes.
         <ul>
            <li>Black Forest</li>
            <li>White Forest</li>
            <li>Chocolate</li>
            <li>Strawberry</li>
         </ul>
      </div>
      <h3>Section 2</h3>
      <div>
           This is my second section.
      </div>
    </div>
  </body>
</html>
Save the file as eventmanagement.html. Open it using your browser. Try expanding the second panel and you will see different messages just before it gets expanded and after it is expanded.
Summary
In this tutorial, we have seen how to create an accordion with expandable and collapsible panels using jQuery UI. We have also seen a number of options, methods and events that can be used to change the behaviour of the accordion. Accordion is really useful when you have to present information in a limited amount of space.