
Introduction
Have you ever tried to implement a Google Suggest like feature in your website using JavaScript and HTML? If yes, you might be remembering the effort you had to put in and the large number of lines of code you have written to implement it. jQuery UI makes it really simple to create the AutoComplete feature with the autocomplete method. Autocomplete feature is used in most modern websites very commonly nowadays. The user will be provided with a list of suggestions for the the letter(s) that the user enters in a textbox. The user can easily select an item from the list which helps user to easily enter the inputs instead of entering the whole input.
jQuery UI’s autocomplete method creates a list of suggestions below the input element and adds new CSS classes to the involved HTML elements to make them appear almost like an HTML <select> dropdown. You can change the appearance and behavior of the element using a number of options, methods and events.
Syntax
The syntax of autocomplete method is
$(selector).autocomplete();
OR
$(selector). autocomplete ({option1:value1, option2:value2,……..});
OR
$(selector). autocomplete ("method_name", [parameters]);
Different options can be used to set the appearance and behaviour of the element with autocomplete feature. The option and its corresponding value are set as key value pairs. While specifying actions using method names, we need to pass the method name along with its parameters (if any) to the autocomplete method. We will see all the popular options and methods one by one with the help of code samples. While trying the code samples, make sure that you add reference to the jQuery UI related files (one .css file and two .js files) correctly.
The autocomplete() Method
The autocomplete feature allows users to quickly and easily find and select values from a predefined list of values as they type in with the options to search and filter. Any field that can accept an input can be converted into an Autocomplete. For example all <input> elements, <textarea> elements and elements with the contenteditable attribute can be converted into an Autocomplete. When the user enters a character into the Autocomplete, the method displays a list of matching entries to choose from. The user can still filter the list by entering more characters into the input field.
Open a new file and add the following lines of code:
<!DOCTYPE html>
<html>
   <head>
     <title>Sample Code</title>
     <link href="http://code.jquery.com/ui/1.10.4/themes/ui-lightness/jquery-ui.css" rel="stylesheet">
     <script src="jquery.js"></script>
     <script src="jquery-ui.min.js"></script>
     <script>
        $(document).ready(function(){
            var suggestions = [
        "Aaron",
        "Abel",
        "Nathan",
        "Sophia",
        "Noah",
        "Ethan",
        "James",
        "William",
        "Lucy",
        "Ruby",
        "Christopher",
        "Keira",
        "Daniel",
        "Reagan",
        "Oliver",
        "Alexander"
        ];
       $("#babynames").autocomplete({
        source: suggestions
      });
      });
     </script>
   </head>
   <body>
    <label for="babynames">Baby Names: </label>
     <input id="babynames">
   </body>
</html>
Save the file as index.html. Open it using your browser and you will get a screen like this:

Now try entering some character inside the textbox. Suppose you enter the character b, then you will get a screen like this:
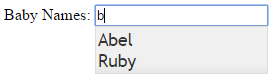
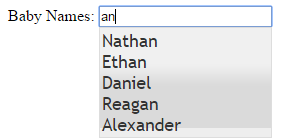
If you want any of the two listed names, you can just click the name you want so that it will be entered into the textbox automatically. Thus you are able to enter the inputs easily without entering the complete input yourself. Suppose you enter the character a in the textbox, then you will get a long list of names like this:

Suppose you want to still filter the list, enter some other character into the textbox after the letter a. Suppose you enter the character n (the input now becomes an), then you will get a screen like this: That is now the list contains only names that has the letters “an” together.
Setting Values to autoFocus, delay, minLength and position Options
You can make the first item in the list focused automatically by setting the value of autofocus to true. You can set a delay between when a keystroke occurs and when a search is performed by setting the value of delay in milliseconds. You can set the minimum number of characters a user should enter to get the output by setting the value of minLength.
You can decide where the suggestion menu should appear with respect to the input element by setting the value of position option to an object that specifies values for my, at, of and collision properties. The property my defines how to align the element horizontally and vertically with the target element in the order “horizontal vertical”. The accepted values for horizontal are left, center and right and the accepted values for vertical are top, center and bottom. So, a valid value that can be set to the my property is “center top”. The property of sets which element to position against. The collision property sets where to move the element alternatively when the positioned element overflows the window in some direction.
Open a new file and add the following lines of code:
<!DOCTYPE html>
<html>
<head>
<title>Sample Code</title>
<link href="http://code.jquery.com/ui/1.10.4/themes/ui-lightness/jquery-ui.css" rel="stylesheet">
<script src="jquery.js"></script>
<script src="jquery-ui.min.js"></script>
<script>
$(document).ready(function(){
var suggestions = [
"Aaron",
"Abel",
"Nathan",
"Sophia",
"Noah",
"Ethan",
"James",
"William",
"Lucy",
"Ruby",
"Christopher",
"Keira",
"Daniel",
"Reagan",
"Oliver",
"Alexander"
];
$("#babynames").autocomplete({
source: suggestions,
autoFocus: true,
delay: 2000,
minLength: 2
});
$("#btnPosition").click(function(){
$("#babynames").autocomplete({position: {my:"right+200 bottom+200", at: "center top"}});
});
});
</script>
</head>
<body>
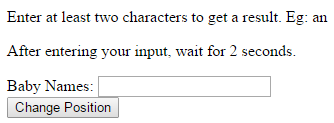
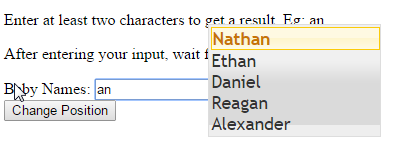
<p>Enter at least two characters to get a result. Eg: an</p>
<p>After entering your input, wait for 2 seconds.</p>
<label for="babynames">Baby Names: </label>
<input id="babynames">
<button id="btnPosition">Change Position</button>
</body>
</html>
Save the file as options1.html. Open it using your browser and you will get a screen like this:
You could find that you will get results only if you enter at least two characters. For example, if you enter just “a”, you will not get any output whereas you will get output if you enter “an” or “han”. Moreover, you will not get the result so fast because we have set the value of delay to 2 seconds. When you get a result, the first item will be automatically selected as in the following screen.
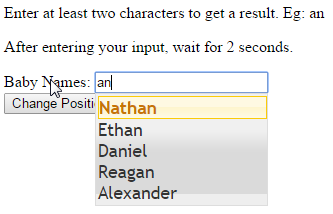
Now click the Change Position button and enter any two or more characters. Now you could find that the list appears in a different position like this because we have set the value of position option.
Setting Value to source Option
You use the source option to define the values in the list to be populated. You can set the value as a string, array or even a function. Within the array, you can set labels and values separately, so that the labels will be displayed in the list and the corresponding value of the selected label will be entered in the textbox.
Open a new file and add the following lines of code:
<!DOCTYPE html>
<html>
  <head>
    <title>Sample Code</title>
    <link href="http://code.jquery.com/ui/1.10.4/themes/ui-lightness/jquery-ui.css" rel="stylesheet">
    <script src="jquery.js"></script>
    <script src="jquery-ui.min.js"></script>
    <script>
      $(document).ready(function(){
            var suggestions = [
                  { label: "Euro", value: "EUR" },
                  { label: "United States Dollar", value: "USD" },
                  { label: "Indian Rupee", value: "INR" },
                  { label: "United Arab Emirates Dirham", value: "AED" },
                  { label: "Pound Sterling", value: "GBP" },
                  { label: "Philippine Peso", value: "PHP" },
                  { label: "Japanese Yen", value: "JPY" },
                  { label: "Canadian Dollar", value: "CAD" }
               ];
       $("#currencies").autocomplete({
       source: suggestions
       });
      });
    </script>
  </head>
  <body>
    <label for="currencies">Currencies: </label>
    <input id="currencies"><br />
  </body>
</html>
Save the file as options2.html. Open it using your browser and enter any character(s) inside the textbox. Suppose you enter the character a, then your screen will look like this:
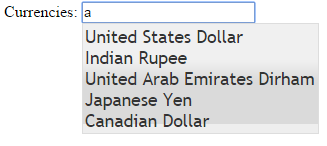
Suppose you select Japanese Yen from the list, then your textbox will have the value JPY and not Japanese Yen because we have set label and value for each item in the list and when you select a label, its corresponding value is displayed in the textbox.

Calling Methods
We can perform different actions on the Autocomplete element by passing the method that performs the action as the parameter of the autocomplete method. You can remove the autocomplete functionality completely by calling the destroy method. You can temporarily disable the autocomplete feature using the disable method and then again enable them by calling the enable method. You can close the Autocomplete menu by calling the close method. You can trigger a search event and invoke the data source if the event is not cancelled.
You can get the values of all options as an object by calling the option method without passing any parameter. You can get the value of a specific option by calling the method named option with the name of the option as parameter. You can set the value of options by calling the option method and passing the option name and its corresponding value as parameters.
Open a new file and add the following lines of code:
<!DOCTYPE html>
<html>
  <head>
   <title>Sample Code</title>
   <link href="http://code.jquery.com/ui/1.10.4/themes/ui-lightness/jquery-ui.css" rel="stylesheet">
   <script src="jquery.js"></script>
   <script src="jquery-ui.min.js"></script>
   <script>
    $(document).ready(function(){
            var suggestions = [
      "Aaron",
      "Abel",
      "Nathan",
      "Sophia",
      "Noah",
      "Ethan",
      "James",
      "William",
      "Lucy",
      "Ruby",
      "Christopher",
      "Keira",
      "Daniel",
      "Reagan",
      "Oliver",
      "Alexander"
      ];
    $("#babynames").autocomplete({
      source: suggestions
    });
    $("#btnDisable").click(function(){
                         $("#babynames").autocomplete("disable");
            });
            $("#btnEnable").click(function(){
                         $("#babynames").autocomplete("enable");
            });
            $("#btnClose").click(function(){
                         $("#babynames").autocomplete("close");
            });
     });
   </script>
  </head>
  <body>
    <button id="btnEnable">Enable</button>
    <button id="btnDisable">Disable</button>
    <button id="btnClose">Close Suggestions</button><br />
    <label for="babynames">Baby names: </label>
    <input id="babynames">
  </body>
</html>
Save the file as callingmethods.html. Open it using your browser and try clicking different buttons. The Autocomplete feature will not work if you try entering some character(s) after clicking the Disable button.
Managing Events on Autocomplete
Different events get triggered when different actions happen on the Autocomplete element. The change event is triggered when the input value is changed. The create event is triggered when an autocomplete is created. The focus event is triggered when an item is focused. The open event is triggered when the suggestion list is opened. The close event is triggered when the menu is hidden. The search event is triggered before a search is performed. The response event is triggered when the search is completed and before the suggestion list appears. The select event is triggered when an item is selected from the list.
Open a new file and add the following lines of code:
<!DOCTYPE html>
<html>
  <head>
    <title>Sample Code</title>
    <link href="http://code.jquery.com/ui/1.10.4/themes/ui-lightness/jquery-ui.css" rel="stylesheet">
    <script src="jquery.js"></script>
    <script src="jquery-ui.min.js"></script>
    <script>
       $(document).ready(function(){
            var suggestions = [
       "Aaron",
       "Abel",
       "Nathan",
       "Sophia",
       "Noah",
       "Ethan",
       "James",
       "William",
       "Lucy",
       "Ruby",
       "Christopher",
       "Keira",
       "Daniel",
       "Reagan",
       "Oliver",
       "Alexander"
       ];
      $("#babynames").autocomplete({
             source: suggestions,
       create: function (event, ui) {
             alert("create: An Autocomplete is created!!!");
          },
       close : function (event, ui) {
             alert("close: The suggestion list is closed!!!");
          },
       change: function (event, ui) {
             alert("change: The input is changed!!!");
          },
       open : function (event, ui) {
             alert("open: The suggestion list is opened!!!");
          },
       response: function (event, ui) {
             alert("response: The search is complete!!!");
          },
       select: function (event, ui) {
             alert("select: An item is selected!!!");
          },
       search : function (event, ui) {
             alert("search: The search is about to begin");
          }
      });
     });
    </script>
  </head>
  <body>
   <label for="babynames">Baby names: </label>
   <input id="babynames">
  </body>
</html>
Save the file as eventmanagement.html. Open it using your browser and try to enter some input and select an item you want so that you can see different messages based on the events getting triggered.
Summary
In this tutorial, we have seen how to create an element with Autocomplete feature using jQuery UI by writing only a couple of lines of code. We have also seen a number of options, methods and events that can be used to change the behaviour of the Autocomplete element for different settings.