
Introduction
Tabs are nothing but a single content area with multiple panels where the users are allowed to quickly flip between those panels. Tabs also help us save space like accordion. You can change the appearance of HTML elements inside a page and make them look exactly like tabs using a simple jQuery UI method: tabs. The tabs method adds new CSS classes to the involved HTML elements to make them look like tabs. You can also control the behavior of the element if you want using a number of options and methods. You need to specify the options as key/value pairs. You can directly call methods inside the tabs method.
Syntax
The syntax of tabs method is
$(selector).tabs();
OR
$(selector).tabs({option1:value1, option2:value2,……..});
OR
$(selector).tabs("method_name", [parameters]);
The options can be used to set the appearance and behaviour of the tab. The option and its corresponding value are set as key value pairs. While specifying actions using method names, we need to pass the method name along with its parameters (if any) to the tabs method. We will see all the popular options and methods one by one with the help of code samples. While trying the code samples, make sure that you add reference to the jQuery UI related files (one .css file and two .js files) correctly.
The tabs() Method
The tabs method declares that an HTML element and its content should be managed as tabs. When you define the elements, make sure that the tabs are defined in a list, either an ordered list or an unordered list. Each tab title must be defined within each <li> and wrapped by anchor tag with a valid href attribute.
Open a new file and add the following lines of code:
<!DOCTYPE html>
<html>
  <head>
    <title>Sample Code</title>
    <link href="http://code.jquery.com/ui/1.10.4/themes/ui-lightness/jquery-ui.css" rel="stylesheet">
    <script src="jquery.js"></script>
    <script src="jquery-ui.min.js"></script>
    <script>
       $(document).ready(function(){
            $("#myTab").tabs();
       });
    </script>
  </head>
  <body>
    <div id="myTab">
      <ul>
        <li><a href="#tabs1">Section 1</a></li>
        <li><a href="#tabs2">Section 2</a></li>
        <li><a href="#tabs3">Section 3</a></li>
     </ul>
     <div id="tabs1">
      <p>
         This is my first section with a list of cakes.
      </p>
      <ul>
            <li>Black Forest</li>
            <li>White Forest</li>
            <li>Chocolate</li>
            <li>Strawberry</li>
      </ul>
     </div>
     <div id="tabs2">
      This is my second section.
     </div>
     <div id="tabs3">
       <p>
         This is my third section asking you some inputs
       </p>
       <form id="collect">
                  User Name:<input type="text" id="uname" /><br />
                  Password:<input type="text" id="pwd" /><br />
                  <button type="submit" value="Submit" id="btnSubmit">Submit</button>
       </form>
     </div>
    </div>
  </body>
</html>
Save the file as index.html. Open it using your browser and you will get a screen like this:
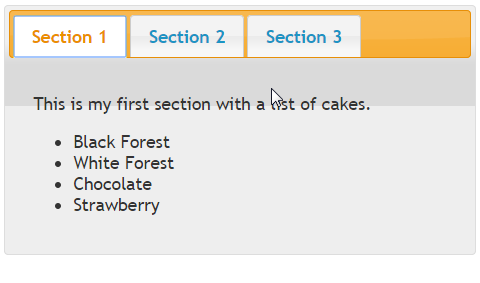 You can quickly flip between the sections Section 1, Section 2 and Section 3. You just need to click the particular section heading.
Setting Values to active, heightStyle and event Options
You can decide which tab should be currently open by setting the value of active option. If you set the value of active to false, all the tabs will be collapsed. If you set the value of active to an integer, the tab with the specified index (index is zero based) becomes open. You can control the height of the tab widget and each panel by setting the value of heightStyle. If you set the value of height to auto, all panels will have the height of the tallest panel. If you set the value of height to fill, panels expand to the available height based on the tab’s height. If you set the value of height to content, each panel will be only as tall as its content. You can set the type of event on which the tabs should be activated by setting the value of event.
Open a new file and add the following lines of code:
<!DOCTYPE html>
<html>
  <head>
   <title>Sample Code</title>
   <link href="http://code.jquery.com/ui/1.10.4/themes/ui-lightness/jquery-ui.css" rel="stylesheet">
   <script src="jquery.js"></script>
   <script src="jquery-ui.min.js"></script>
   <script>
      $(document).ready(function(){
            $("#myTab").tabs({active:1, heightStyle:"auto", event:"mouseover"});
      });
   </script>
  </head>
  <body>
   <div id="myTab">
    <ul>
      <li><a href="#tabs1">Section 1</a></li>
      <li><a href="#tabs2">Section 2</a></li>
      <li><a href="#tabs3">Section 3</a></li>
    </ul>
    <div id="tabs1">
      <p>
         This is my first section with a list of cakes.
      </p>
      <ul>
            <li>Black Forest</li>
            <li>White Forest</li>
            <li>Chocolate</li>
            <li>Strawberry</li>
      </ul>
    </div>
    <div id="tabs2">
     This is my second section.
    </div>
    <div id="tabs3">
      <p>
         This is my third section asking you some inputs
      </p>
      <form id="collect">
                  User Name:<input type="text" id="uname" /><br />
                  Password:<input type="text" id="pwd" /><br />
                  <button type="submit" value="Submit" id="btnSubmit">Submit</button>
      </form>
    </div>
   </div>
  </body>
</html>
Save the file as options1.html. Open it using your browser and you will get a screen like this:
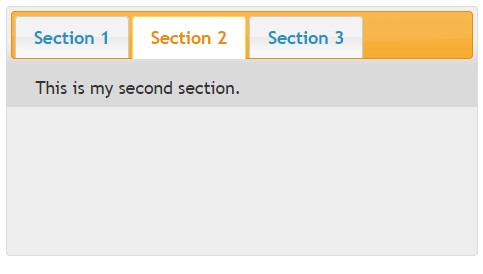
You could find that the second section (with index 1) is opened by default as we have set the value of active to 1. You do not have to click the section heading to flip between the tabs. As soon as you move the mouse over a heading, that section becomes active because we have set the value of event to mouseover. You could also find that each tab has the same height, the height of the tallest tab because we have set the value of heightStyle to auto.
Setting Values to collapsible, hide and show Options
By default, you are not allowed to collapse all the tabs at once. By setting the value of collapsible to true, you can close all the tabs at once, even the active tab. You can decide how to animate the hiding of the panel as well as the showing of the panel by setting the value of hide and show respectively. The value of hide and show can be true/false, a number that specifies the duration of animation in milliseconds, a string that specifies the name of the animation effect or an object that specifies the animation settings with effect, delay, easing and duration properties.
Open a new file and add the following lines of code:
<!DOCTYPE html>
<html>
  <head>
    <title>Sample Code</title>
    <link href="http://code.jquery.com/ui/1.10.4/themes/ui-lightness/jquery-ui.css" rel="stylesheet">
    <script src="jquery.js"></script>
    <script src="jquery-ui.min.js"></script>
    <script>
      $(document).ready(function(){
            $("#myTab").tabs({collapsible:true, hide:5000, show:{effect:"bounce", duration:2000}});
      });
    </script>
  </head>
  <body>
    <div id="myTab">
      <ul>
        <li><a href="#tabs1">Section 1</a></li>
        <li><a href="#tabs2">Section 2</a></li>
        <li><a href="#tabs3">Section 3</a></li>
      </ul>
      <div id="tabs1">
       <p>
         This is my first section with a list of cakes.
       </p>
       <ul>
            <li>Black Forest</li>
            <li>White Forest</li>
            <li>Chocolate</li>
            <li>Strawberry</li>
       </ul>
  </div>
  <div id="tabs2">
     This is my second section.
  </div>
  <div id="tabs3">
    <p>
         This is my third section asking you some inputs
      </p>
      <form id="collect">
                  User Name:<input type="text" id="uname" /><br />
                  Password:<input type="text" id="pwd" /><br />
                  <button type="submit" value="Submit" id="btnSubmit">Submit</button>
      </form>
  </div>
</div>
</body>
</html>
Save the file as options2.html. Open it using your browser and you will get a screen like this:
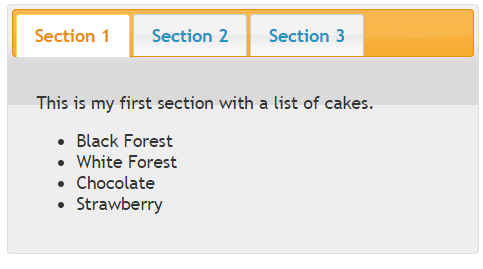 If you click the Section 1 heading, you could find that it gets collapsed and you get a screen like this:

You could see different animation effects when you hide or show the panels.
Calling Methods
We can perform different actions on the tabs by passing the method that performs the action as the parameter of the tabs method. You can remove the tabs functionality completely by calling the destroy method. You can temporarily disable the tabs using the disable method and then again enable them by calling the enable method. You can load the panel content of a remote tab by calling the load method with the zero based index of the tab to be loaded. You can process any tabs that were added or removed directly in the DOM and re-compute the height of the tab panels by calling the refresh method. The widget method returns a jQuery object containing the tabs container.
You can get the values of all options as an object by calling the option method without passing any parameter. You can get the value of a specific option by calling the method named option with the name of the option as parameter. You can set the value of options by calling the option method and passing the option name and its corresponding value as parameters.
Open a new file and add the following lines of code:
<!DOCTYPE html>
<html>
  <head>
   <title>Sample Code</title>
   <link href="http://code.jquery.com/ui/1.10.4/themes/ui-lightness/jquery-ui.css" rel="stylesheet">
   <script src="jquery.js"></script>
   <script src="jquery-ui.min.js"></script>
   <script>
     $(document).ready(function(){
            $("#myTab").tabs();
            $("#btnDisable").click(function(){
                        $("#myTab").tabs("disable");
            });
            $("#btnEnable").click(function(){
                        $("#myTab").tabs("enable");
            });
            $("#btnOption").click(function(){
                        $("#myTab").tabs("option", "active", 1);
            });
            $("#btnAdd").click(function(){
                        $('#myUl').append('<li><a href="#tabs4">Section 4</a></li>');
                        $('#myTab').append('<div id="tabs4">This is a new section.</div>');
            });
            $("#btnRefresh").click(function(){
                        $("#myTab").tabs("refresh");
            });
     });
   </script>
  </head>
  <body>
   <div id="myTab">
      <ul id="myUl">
        <li><a href="#tabs1">Section 1</a></li>
        <li><a href="#tabs2">Section 2</a></li>
        <li><a href="#tabs3">Section 3</a></li>
      </ul>
      <div id="tabs1">
        <p>
          This is my first section with a list of cakes.
        </p>
        <ul>
            <li>Black Forest</li>
            <li>White Forest</li>
            <li>Chocolate</li>
            <li>Strawberry</li>
        </ul>
      </div>
      <div id="tabs2">
        This is my second section.
      </div>
      <div id="tabs3">
        <p>
          This is my third section asking you some inputs
        </p>
        <form id="collect">
               User Name:<input type="text" id="uname" /><br />
               Password:<input type="text" id="pwd" /><br />
               <button type="submit" value="Submit" id="btnSubmit">Submit</button>
        </form>
      </div>
   </div>
    <button id="btnEnable">Enable</button>
    <button id="btnDisable">Disable</button>
    <button id="btnOption">Set Option</button>
    <button id="btnAdd">Add Tab</button>
    <button id="btnRefresh">Refresh</button>
  </body>
</html>
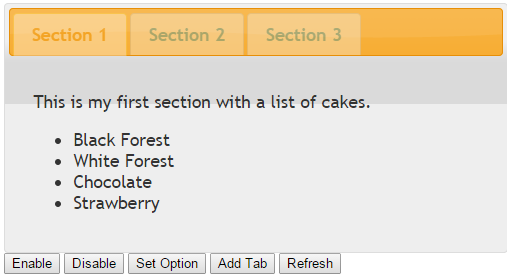
Save the file as callingmethods.html. Open it using your browser and you will get a screen like this:
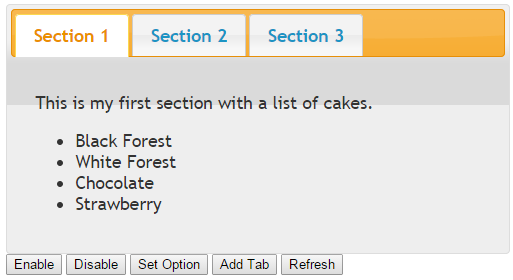
Now click the Disable button and you will get a screen like this and it is obvious that you will not be able to flip between tabs.
Click the Enable button to again enable the tabs. Now click the Set Option button and you could find that the second section becomes immediately active. This happens because on the click of the button, we called the option method and set the value of active option to 1. Click the Add Tab button to add a new tab as follows.
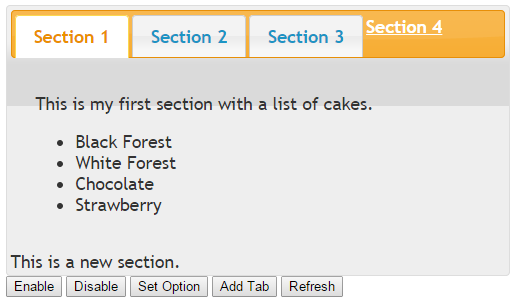
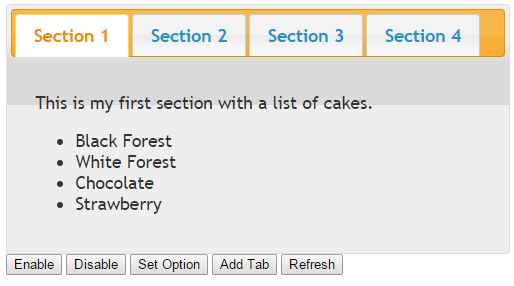
This new section will not act as a tab as of now. To add it as a tab item, click the Refresh button and it will be added as a new tab item because we call the refresh method on the click of Refresh button.
Managing Events on Tabs
Different events get triggered when different actions happen on the tab. The activate event is triggered after a tab has been activated. The beforeActivate event is triggered just before a tab is activated. The create event is triggered when the tabs are created.
Open a new file and add the following lines of code:
<!DOCTYPE html>
<html>
  <head>
   <title>Sample Code</title>
   <link href="http://code.jquery.com/ui/1.10.4/themes/ui-lightness/jquery-ui.css" rel="stylesheet">
   <script src="jquery.js"></script>
   <script src="jquery-ui.min.js"></script>
   <script>
       $(document).ready(function(){
            $("#myTab").tabs(
            {
       hide:5000, show:{effect:"bounce", duration:2000},
       create: function (event, ui) {
             alert("create");
          },
       beforeActivate : function (event, ui) {
             alert("beforeActivate");
          },
       activate: function (event, ui) {
             alert("activate");
          }
       });
     });
   </script>
  </head>
  <body>
    <div id="myTab">
     <ul id="myUl">
      <li><a href="#tabs1">Section 1</a></li>
      <li><a href="#tabs2">Section 2</a></li>
      <li><a href="#tabs3">Section 3</a></li>
     </ul>
     <div id="tabs1">
       <p>
         This is my first section with a list of cakes.
       </p>
       <ul>
            <li>Black Forest</li>
            <li>White Forest</li>
            <li>Chocolate</li>
            <li>Strawberry</li>
       </ul>
     </div>
     <div id="tabs2">
       This is my second section.
     </div>
     <div id="tabs3">
       <p>
         This is my third section asking you some inputs
      </p>
      <form id="collect">
                  User Name:<input type="text" id="uname" /><br />
                  Password:<input type="text" id="pwd" /><br />
                  <button type="submit" value="Submit" id="btnSubmit">Submit</button>
      </form>
     </div>
    </div>
  </body>
</html>
Save the file as eventmanagement.html. Open it using your browser and flip between different tabs so that you can see different messages based on the events getting triggered.
Summary
In this tutorial, we have seen how to create tabs using jQuery UI by writing only a couple of lines of code. We have also seen a number of options, methods and events that can be used to change the behaviour of the tab for different settings.