
jQuery UI Menu Widget
A themeable menu can be created using jQuery UI and it can be accessed using keyboard or mouse. As with a normal menu, a jQuery UI menu also has main menu bar with popup menus and optional sub popup menus. To create a menu using jQuery UI, HTML elements should maintain parent- child relationship. That is, the items should be added using <ul> or <ol> and each menu item should have a link attached using an anchor element.
After adding reference to the required jQuery UI files, try the code given below:
Open a new file and add the following lines of code:
<!DOCTYPE html>
<html>
  <head>
    <title>Sample Code</title>
    <link href="http://code.jquery.com/ui/1.10.4/themes/ui-lightness/jquery-ui.css" rel="stylesheet">
    <script src="jquery.js"></script>
    <script src="jquery-ui.min.js"></script>
    <style>
      .ui-menu
      {
    width: 200px;
       }
    </style>
    <script type="text/javascript">
      $(document).ready(function(){
      $("#myMenu").menu();
      });
    </script>
  </head>
  <body>
    <ul id="myMenu">
         <li><a href="#">Processor</a></li>
         <li><a href="#">Internal Memory</a>
            <ul>
               <li><a href="#">RAM</a></li>
               <li><a href="#">ROM</a></li>
            </ul>
         </li>
         <li><a href="#">Motherboard</a></li>
         <li><a href="#">Input</a>
             <ul>
               <li><a href="#">Keyboard</a></li>
               <li><a href="#">Mouse</a></li>
               <li><a href="#">Scanner</a></li>
               <li><a href="#">Microphone</a></li>
            </ul>
         </li>
         <li><a href="#">Output</a>
             <ul>
               <li><a href="#">Monitor</a></li>
               <li><a href="#">Printer</a></li>
               <li><a href="#">Speaker</a></li>
            </ul>
         </li>
      </ul>
  </body>
</html>
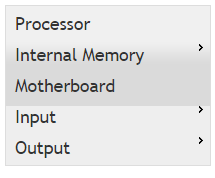
Save the file as index.html. Open it using your browser and you will get a screen like this:
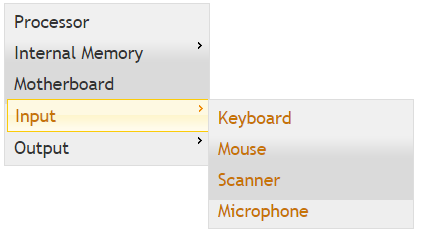
If you move your mouse over an item with submenu (right pointing arrow), then you will get a screen like this:
Of course, nothing will happen even if you click any of these items as we have not added proper links. You can disable a menu by setting the value of a disabled option to true and display icons for sub menus by setting the value of icons option to an object with submenu properties. You can decide the position of submenus in relation with the parent menu item using my and at properties.
Try this yourself:
<!DOCTYPE html>
<html>
<head>
<title>Sample Code</title>
<link href="http://code.jquery.com/ui/1.10.4/themes/ui-lightness/jquery-ui.css" rel="stylesheet">
<script src="jquery.js"></script>
<script src="jquery-ui.min.js"></script>
<style>
.ui-menu
{
    width: 200px;
}
</style>
<script type="text/javascript">
$(document).ready(function(){
$("#myMenu").menu({
               icons: {submenu: " ui-icon-circle-arrow-e"},
               position: {my: "right top", at: "right+20 top+25"}
            });
});
</script>
</head>
<body>
<ul id="myMenu">
         <li><a href="#">Processor</a></li>
         <li><a href="#">Internal Memory</a>
            <ul>
               <li><a href="#">RAM</a></li>
               <li><a href="#">ROM</a></li>
            </ul>
         </li>
         <li class="ui-state-disabled"><a href="#">Motherboard</a></li>
         <li><a href="#">Input</a>
             <ul>
               <li><a href="#">Keyboard</a></li>
               <li><a href="#">Mouse</a></li>
               <li><a href="#">Scanner</a></li>
               <li><a href="#">Microphone</a></li>
            </ul>
         </li>
         <li><a href="#">Output</a>
             <ul>
               <li><a href="#">Monitor</a></li>
               <li><a href="#">Printer</a></li>
               <li><a href="#">Speaker</a></li>
            </ul>
         </li>
      </ul>
</body>
</html>
Save the file as options.html. Open it using your browser and you will get a screen like this:
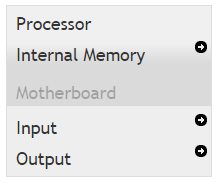
You could see a different icon which we have set using icons option. When you hover over any menu item, you could find that the submenu is appearing a bit away from the default position.
You can remove focus from a menu by calling the blur method. You can close the currently active submenu calling the collapse method and close all open submenus calling the collapseAll method. You can remove the menu functionality completely using destroy method. You can disable the menu using disable method and enable it back using enable method. You can open the submenu below the currently active item calling the expand method and activate a particular menu item calling the focus method. The isFirstItem method returns a Boolean stating whether the currently active item is the first item in the menu or not and the isLastItem to check whether it is the last item in the menu. You can use next method to move active state to the next menu item and previous method to move active state to the previous menu item.
Try this yourself:
<!DOCTYPE html>
<html>
<head>
<title>Sample Code</title>
<link href="http://code.jquery.com/ui/1.10.4/themes/ui-lightness/jquery-ui.css" rel="stylesheet">
<script src="jquery.js"></script>
<script src="jquery-ui.min.js"></script>
<style>
.ui-menu
{
    width: 200px;
}
</style>
<script type="text/javascript">
$(document).ready(function(){
$("#myMenu").menu("focus", null, $("#myMenu").menu().find("#input"));
alert("Is this the first item? " + ($("#myMenu").menu("isFirstItem")?"Yes":"No"));
alert("Is this the last item? " + ($("#myMenu").menu("isLastItem")?"Yes":"No"));
$("#myMenu").menu("expand");
});

</script>
</head>
<body>
<ul id="myMenu">
         <li><a href="#">Processor</a></li>
         <li><a href="#">Internal Memory</a>
            <ul>
               <li><a href="#">RAM</a></li>
               <li><a href="#">ROM</a></li>
            </ul>
         </li>
         <li><a href="#">Motherboard</a></li>
         <li><a href="#">Output</a>
             <ul>
               <li><a href="#">Monitor</a></li>
               <li><a href="#">Printer</a></li>
               <li><a href="#">Speaker</a></li>
            </ul>
         </li>
         <li id="input"><a href="#">Input</a>
             <ul>
               <li><a href="#">Keyboard</a></li>
               <li><a href="#">Mouse</a></li>
               <li><a href="#">Scanner</a></li>
               <li><a href="#">Microphone</a></li>
            </ul>
         </li>
      </ul>
</body>
</html>
Save the file as methods.html and open it using your browser. You could find that the last item is focused by default.
jQuery UI Tooltip Widget
Tooltips are used to display additional information without wasting space. You can create themeable, customizable tooltips using jQuery UI tooltip method. Tooltips can be attached to any element. When you hover the element with your mouse, the title attribute is displayed in a little box next to the element.
After adding reference to the required jQuery UI files, try the code given below:
Open a new file and add the following lines of code:
<!DOCTYPE html>
<html>
  <head>
    <title>Sample Code</title>
    <link href="http://code.jquery.com/ui/1.10.4/themes/ui-lightness/jquery-ui.css" rel="stylesheet">
    <script src="jquery.js"></script>
    <script src="jquery-ui.min.js"></script>
    <script type="text/javascript">
      $(document).ready(function(){
      $("#secret").tooltip();
      });

   </script>
  </head>
  <body>
    <div id="secret" title="Here comes the secret message: WELCOME!!!">SECRET!SECRET!</div>
  </body>
</html>
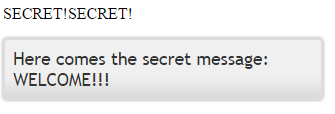
Save the file as index.html. Open it using your browser and you will get a message “SECRET!SECRET!”. Hover over the message to get a screen like this:
You can change the content of your tooltip using content option. You can animate the hiding of your tooltip using hide option and showing of your tooltip using show option. You can decide where your tooltip should appear using the position options. You can decide whether the tooltip should follow the mouse using track option.
Try this yourself:
<!DOCTYPE html>
<html>
  <head>
   <title>Sample Code</title>
   <link href="http://code.jquery.com/ui/1.10.4/themes/ui-lightness/jquery-ui.css" rel="stylesheet">
   <script src="jquery.js"></script>
   <script src="jquery-ui.min.js"></script>
   <script type="text/javascript">
     $(document).ready(function(){
     $("#secret").tooltip({
     content: "<strong>Welcome!!!</strong>",
     track:true,
     hide: {effect: "fold", duration: 2000},
     show: { effect: "explode", duration: 2000 }
     });
     });
   </script>
  </head>
  <body>
    <div id="secret" title="Here comes the secret message: WELCOME!!!">SECRET!SECRET!</div>
  </body>
</html>
Save the file as options.html. Open it using your browser and you will get a message “SECRET!SECRET!”. Hover over the message to see different effects.
You can close a tooltip calling the close method. You can remove the tooltip functionality completely calling the destroy method. You can disable the tooltip calling the disable method and enable it again using the enable method. You can open a tooltip programmatically using the open method.
Try this yourself:
<!DOCTYPE html>
  <html>
   <head>
    <title>Sample Code</title>
    <link href="http://code.jquery.com/ui/1.10.4/themes/ui-lightness/jquery-ui.css" rel="stylesheet">
    <script src="jquery.js"></script>
    <script src="jquery-ui.min.js"></script>
    <script type="text/javascript">
      $(document).ready(function(){
      $("#secret").tooltip({hide: {effect: "pulsate", duration: 1500},
                        show: {effect: "explode", duration: 1500}});
      $("#btnOpen").click(function(){
      $("#secret").tooltip("open");
      });
     $("#btnClose").click(function(){
     $("#secret").tooltip("close");
     });
     });
   </script>
  </head>
  <body>
    <button id="btnOpen">Open</button>
    <button id="btnClose">Close</button><br /><br />
    <div id="secret" title="Here comes the secret message: WELCOME!!!">SECRET!SECRET!</div>
  </body>
</html>
Save the file as methods.html and open it using your browser. Click the Open and Close buttons to open and close the tooltip without hovering the mouse over it.
The create event is triggered when a tooltip is created, open event is triggered when a tooltip is opened and the close event is triggered when a tooltip is closed.
Try this yourself:
<!DOCTYPE html>
  <html>
   <head>
     <title>Sample Code</title>
     <link href="http://code.jquery.com/ui/1.10.4/themes/ui-lightness/jquery-ui.css" rel="stylesheet">
     <script src="jquery.js"></script>
     <script src="jquery-ui.min.js"></script>
     <script type="text/javascript">
       $(document).ready(function(){
       $("#secret").tooltip({
             position: {my: 'right bottom', at: 'center bottom' },
             create: function(){$("#result").append("Tooltip created<br />")},
             open: function(){$("#result").append("Tooltip opened<br />")},
             close: function(){$("#result").append("Tooltip closed <br />")}
        });
        });

     </script>
  </head>
  <body>
    <div id="secret" style="margin:10px;" title="Here comes the secret message: WELCOME!!!">SECRET!SECRET!</div>
    <div id="result"></div>
  </body>
</html>
Save the file as events.html and open it with your browser. You could find different events getting triggered when you hover over the message.