
Bitmaps Tutorial
Bitmaps sounds interesting something like bits and maps. It is actually related to bits and mapping.As you know digitally we have two bits, 0 and 1. Digital signals are also represented by binary bits .In this section we are not going to teach about bitmapping but we will introduce you to this new friend of yours which will make your application fantastic. So let us not waste time and start the quest about bitmaps and the connection with android.
7.4.1 Introduction to Bitmaps
Bitmap can be rightly defined as mapping from domain to bits. Domain can be anything for instance it can be a set of integers. They are mapped to the bit values i.e., 0 and 1. When we talk about bitmaps in computer graphics we have a rectangle which is indexed by two co-ordinates and this rectangle is the domain of interest. We store binary images. Images are represented by any two colors or usually the most commonly used colors are black and white. We can say one bit per pixel. Some of you may not be aware of pixel. Pixel stands for Picture Element. It is the basic unit of composition of an image. And whereas bitmap is on focus it can be roughly said as the image file formatwhich is used to store digital image. Anyways now we should move our focus towards android.
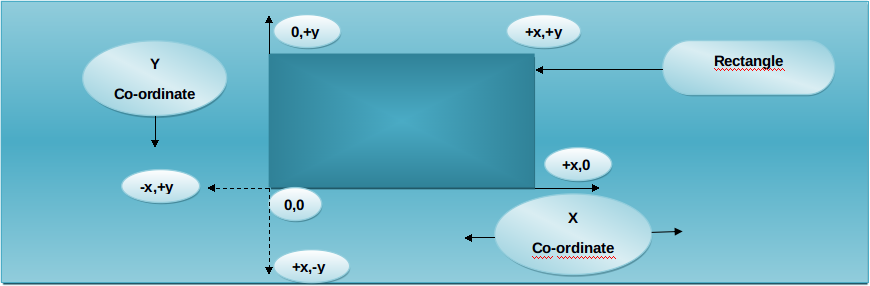
Figure - rectangle and co-ordinates
7.4.2 Android and bitmaps
We already know the usage of bitmap and have come across in the previous session. But it is better to have a crystal understanding of every concept. Bitmaps takes a lot of memory when we deal with high resolution images. And application’s user interface requires many bitmaps to be loaded at once. We should have a clear understanding of bitmap load so let us do a short example and then we are done with this session.
BitmapFactory is a public class. It creates bitmaps from varied sources including files, byte-arrays and streams.
7.4.3 Bitmap Example
Create a project and name it as you like. I am naming it BitmapExample app. We shall store an image in the drawable folder which would be loaded as bitmap on our emulator screen. For that open the main activity file and code it as shown in the following listing:
packagecom.android.tution.BitmapExample;
importandroid.app.Activity;
importandroid.graphics.Bitmap;
importandroid.graphics.BitmapFactory;
importandroid.os.Bundle;
importandroid.view.Menu;
importandroid.view.View;
publicclassMainActivityextends Activity {
    @Override
    protectedvoidonCreate(Bundle savedInstanceState) {
        super.onCreate(savedInstanceState);
        // setContentView(R.layout.activity_main);
        setContentView(newBitmapView(this));
    }
    @Override
    publicbooleanonCreateOptionsMenu(Menu menu) {
        // Inflate the menu; this adds items to the action bar if it is present.
        getMenuInflater().inflate(R.menu.main, menu);
        returntrue;
    }
}
Figure - main activity file of bitmap example
Now you have to create a class. Do it as you were instructed to do in initial tutorials. Name it BitmapView. Populate class with the following lines of code:
packagecom.android.tution.BitmapExample;
importandroid.content.Context;
importandroid.graphics.Bitmap;
importandroid.graphics.BitmapFactory;
importandroid.graphics.Canvas;
importandroid.view.View;
publicclassBitmapViewextends View {
    publicBitmapView(Context context) {
        super(context);
        // TODO Auto-generated constructor stub
    }
    @Override
    protectedvoidonDraw(Canvas canvas) {
        // TODO Auto-generated method stub
        super.onDraw(canvas);
        Bitmap mybit = BitmapFactory.decodeResource(getResources(),
                R.drawable.roger);
        canvas.drawBitmap(mybit, 0, 0, null);
    }
}
Figure - BitmapView class of bitmap example
Now the activity_main.xml file should be as it is. For instance it would look like the following listing:
<RelativeLayoutxmlns:android="http://schemas.android.com/apk/res/android"
xmlns:tools="http://schemas.android.com/tools"
android:layout_width="match_parent"
android:layout_height="match_parent"
android:paddingBottom="@dimen/activity_vertical_margin"
android:paddingLeft="@dimen/activity_horizontal_margin"
android:paddingRight="@dimen/activity_horizontal_margin"
android:paddingTop="@dimen/activity_vertical_margin"
tools:context=".MainActivity">
<TextView
android:layout_width="wrap_content"
android:layout_height="wrap_content"
android:text="@string/hello_world"/>
</RelativeLayout>
Figure - activity_main.xml file of of bitmap example
Open your manifest file and cross check with the following listing:
<?xmlversion="1.0"encoding="utf-8"?>
<manifestxmlns:android="http://schemas.android.com/apk/res/android"
package="com.android.tution.BitmapExample"
android:versionCode="1"
android:versionName="1.0">
<uses-sdk
android:minSdkVersion="8"
android:targetSdkVersion="18"/>
<application
android:allowBackup="true"
android:icon="@drawable/ic_launcher"
android:label="@string/app_name"
android:theme="@style/AppTheme">
<activity
android:name="com.android.tution.BitmapExample.MainActivity"
android:label="@string/app_name">
<intent-filter>
<actionandroid:name="android.intent.action.MAIN"/>
<categoryandroid:name="android.intent.category.LAUNCHER"/>
</intent-filter>
</activity>
</application>
</manifest>
Figure - manifest file
Now create a suitable emulator and run your application. Output would be different as whatever image you store in the drawable folder will be the image displayed on emulator screen but anyways for your satisfaction I will show the output of this project with image named as roger. So output of the above listed project is as follows:
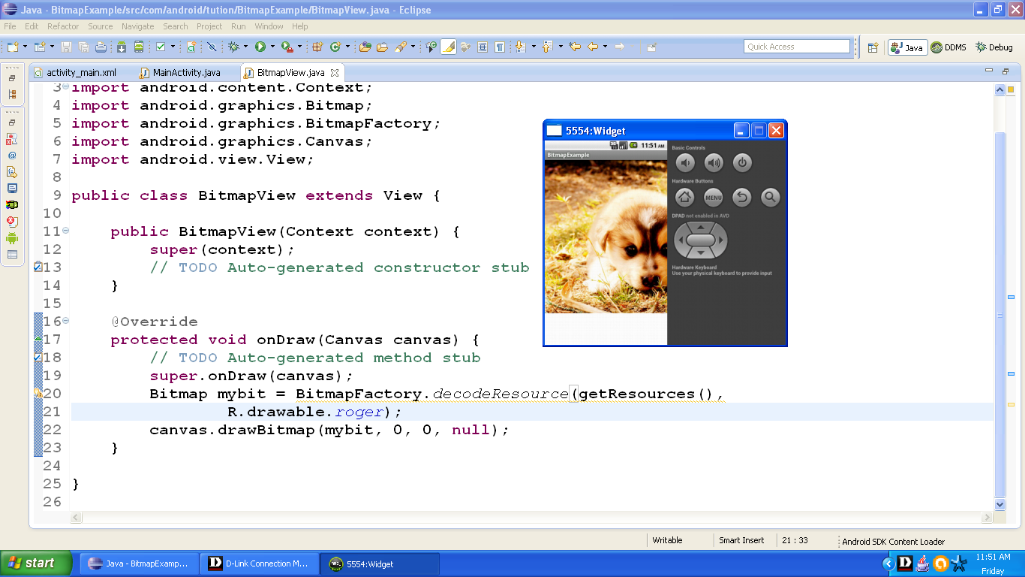
Figure - Output of BitmapExample App
Congratulations buddiesJ!! We are done with bitmaps. Hope you enjoyed this tutorial. See you in the next section. Till then keep practicing. Happy App Developing!!