
7.1.1 Introduction to Android Canvas
Framework of android provides 2D APIs which we can render on to screen. For 2D graphics we usually opt for any of the two following options:
- Graphics or animation object is drawn into View object from layout.
- We can draw graphics directly onto the canvas.
Android Canvas class encapsulates the bitmaps used as surface. It exposes the draw methods which can be used for designing. Let us first clear the following terms:
- Bitmap: The surface being drawn on.
- Paint: It lets us specify how to draw the primitives on bitmap. It is also referred to as “Brush”.
- Canvas: It supplies the draw methods used to draw primitives on underlying bitmap.
Each drawing object specifies a paint object to render. Let us see the available list of drawing objects and they are as follows:
- drawArc: This draws an arc between the two angles bounded by an area of rectangle.
- drawBitmap: It draws an bitmap on canvas.
- drawRGB/drawARGB/drawColor: This fills the canvas with a single color.
- drawBitmapMesh: It draws a bitmap using a mesh. It manipulates the appearance of target by moving points on it.
- drawCircle: This draws a circle on a specified radius centered on a given point.
- drawLine(s):it draws a line (or series of lines) between points.
- drawOval: it draws an oval which is bounded by the area of rectangle.
- drawPaint: It fills the entire canvas with a specific paint.
- drawPath: It draws a path as per specification.
- drawPicture: It draws a picture specified on a rectangular area.
- drawPosText: it draws a text string specifying the offset of each character.
- drawRect: It draws a rectangle.
- drawRoundRect: it draws a rectangle with round edges.
- drawText: It draws a text string on canvas.
The Paint class consists of a paint brush and a palette. It lets us choose how to render the primitives drawn into canvas by draw methods. We can control the color, style, font, special effects etc can be modified by modifying the paint object. For instance, setColor method can be used to select the color of Paint. Paint class supports transparency so it can be used to control variety of shades or effects, etc. Let us create a simple example and see the basic usage of canvas and paint.
7.1.2 Android Canvas Example
Open your IDE and create a project. Name it as you like. I am naming it CanvasEx application. You don’t have to modify your xml file at all. For reference cross check with following code:
<RelativeLayout xmlns:android="http://schemas.android.com/apk/res/android"
    xmlns:tools="http://schemas.android.com/tools"
    android:layout_width="match_parent"
    android:layout_height="match_parent"
    android:paddingBottom="@dimen/activity_vertical_margin"
    android:paddingLeft="@dimen/activity_horizontal_margin"
    android:paddingRight="@dimen/activity_horizontal_margin"
    android:paddingTop="@dimen/activity_vertical_margin"
    tools:context=".MainActivity" >
    <TextView
        android:layout_width="wrap_content"
        android:layout_height="wrap_content"
        android:text="@string/hello_world" />
</RelativeLayout>
Figure - activity_main.xml file of Android canvas example
Now open the main activity file and code it as shown in the following listing:
package com.android.tution.Graphics;
import android.os.Bundle;
import android.app.Activity;
import android.view.Menu;
public class MainActivity extends Activity {
    @Override
    protected void onCreate(Bundle savedInstanceState) {
        super.onCreate(savedInstanceState);
        setContentView(new CanvasView(this));
    }
    @Override
    public boolean onCreateOptionsMenu(Menu menu) {
        // Inflate the menu; this adds items to the action bar if it is present.
        getMenuInflater().inflate(R.menu.main, menu);
        return true;
    }
}
Figure - main activity file Android canvas example
Create another class and name it CanvasView.java and it is going to be the canvas of your application. You don’t need any corresponding xml file for this. Just copy any image in your drawable folder so that it can be referenced in the code.So code it as shown in the following listing:
package com.android.tution.Graphics;
import android.content.Context;
import android.graphics.Bitmap;
import android.graphics.BitmapFactory;
import android.graphics.Canvas;
import android.graphics.Color;
import android.graphics.Matrix;
import android.graphics.Paint;
import android.graphics.Paint.Style;
import android.view.View;
public class CanvasView extends View {
    public CanvasView(Context context) {
        super(context);
    }
    @Override
    protected void onDraw(Canvas canvas) {
        // TODO Auto-generated method stub
        super.onDraw(canvas);
        drawCirle(canvas);
        drawRotateImage(canvas);
    }
    private void drawRotateImage(Canvas canvas) {
        // TODO Auto-generated method stub
        Bitmap bitmap = BitmapFactory.decodeResource(getResources(),
                R.drawable.picture);
        bitmap = Bitmap.createScaledBitmap(bitmap, 100, 100, false);
        Matrix matrix = new Matrix();
        matrix.postRotate(70);
        matrix.postTranslate(200, 180);
        canvas.drawBitmap(bitmap, matrix, null);
    }
    private void drawCirle(Canvas canvas) {
        // TODO Auto-generated method stub
        Paint paint = new Paint();
        paint.setAntiAlias(true);
        paint.setColor(Color.YELLOW);
        paint.setStyle(Style.FILL);
        canvas.drawCircle(50, 60, 50, paint);
        paint.setStyle(Style.STROKE);
        canvas.drawCircle(200, 60, 50, paint);
    }
}
Figure - CanvasView Class of Android canvas example
As you always do please cross check the manifest file with the following listing:
<?xml version="1.0" encoding="utf-8"?>
<manifest xmlns:android="http://schemas.android.com/apk/res/android"
    package="com.android.tution.Graphics"
    android:versionCode="1"
    android:versionName="1.0" >
    <uses-sdk
        android:minSdkVersion="8"
        android:targetSdkVersion="18" />
    <application
        android:allowBackup="true"
        android:icon="@drawable/ic_launcher"
        android:label="@string/app_name"
        android:theme="@style/AppTheme" >
        <activity
            android:name="com.android.tution.Graphics.MainActivity"
            android:label="@string/app_name" >
            <intent-filter>
                <action android:name="android.intent.action.MAIN" />
                <category android:name="android.intent.category.LAUNCHER" />
            </intent-filter>
        </activity>
    </application>
Figure - manifest file of Android canvas example
Now you are done with coding part. Create a suitable emulator and run the application. Output should be similar to the following snapshot:
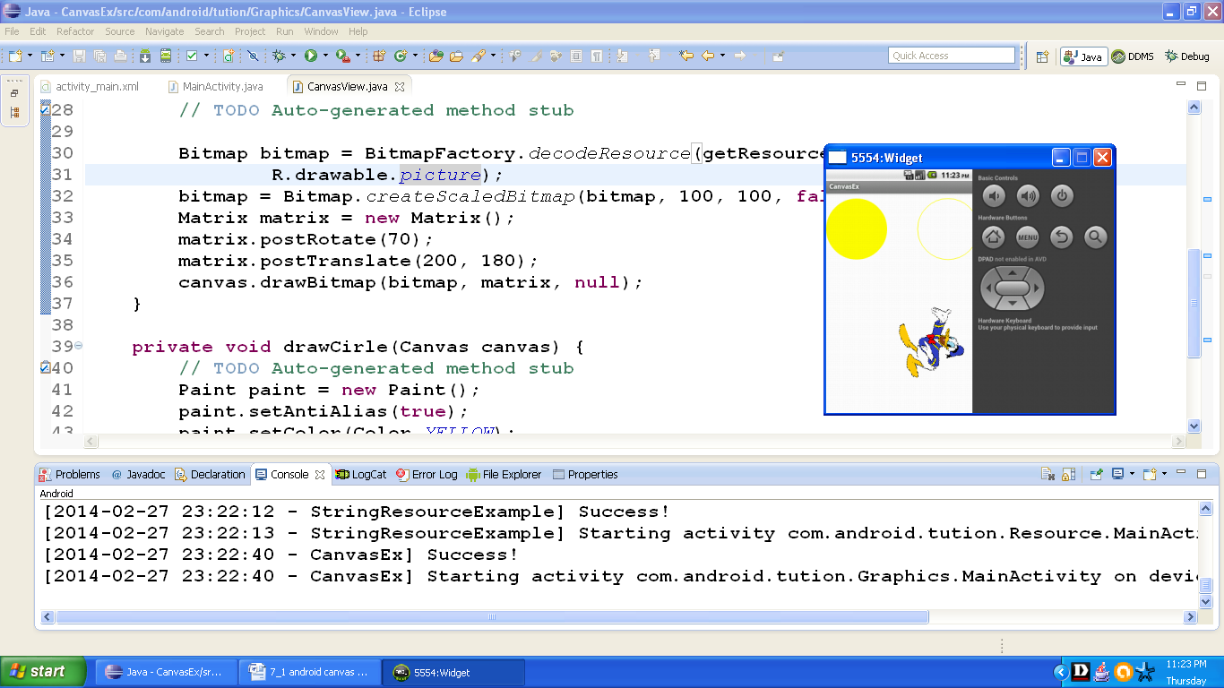
Figure - Output of CanvasEx app
CongratulationsJ buddies!!! We are done with canvas. Hope you enjoyed this tutorial. Keep practicing. See you in the next section. Happy App Developing!!!