
4.5.1 Menus in Android
Android Menu is a user interface component. Generally, Menu APIs are used to provide options or are programmed so that they appear similar to the users. With advancement in android technology, a dedicated menu button is removed from device. When Android 3.0 was launched, this menu button was removed from most of the devices. Nowadays action bars are used for this purpose. Don’t worry we shall know about action bar but before that we should know about menus. Semantics are preserved with respect to Menu API’s so we have to do thisJ. Generally we have three types of menus with which users are provided to perform some actions. They are as follows:
- Android Options Menu
- Android Context Menu
- Android Pop-up menu
4.5.2 Android Options Menu
It is the main or primary collection of menu items meant for a particular activity. Actions having global effect are placed here. It displays information corresponding to present activity. Pressing Menu Button activates this.
From 3.0, options menu is presented with action bars. Before 3.0, we had dedicated menu button for this purpose. Devices were equipped with a menu button. Nowadays, devices don’t even come with menu button if you have one, you are lucky.
To display options menu we need to override two methods:
- onCreateOptionsMenu(): When we press the MENU button, this method is called. A handler method is called to display the menu
- onOptionsItemSelected(): This method is called when any item in the menu is selected. In this case we have to call a different handler method which is responsible for displaying individual items respectively.
4.5.2.1 Android Options Menu Example
Open your IDE and create a project. Name it as you like. I am naming it as OptionsMenuExample App. Open your xml file and code it as shown below:
<RelativeLayout xmlns:android="http://schemas.android.com/apk/res/android"
    xmlns:tools="http://schemas.android.com/tools"
    android:layout_width="match_parent"
    android:layout_height="match_parent"
    android:paddingBottom="@dimen/activity_vertical_margin"
    android:paddingLeft="@dimen/activity_horizontal_margin"
    android:paddingRight="@dimen/activity_horizontal_margin"
    android:paddingTop="@dimen/activity_vertical_margin"
    tools:context=".MainActivity" >
    <TextView
        android:layout_width="wrap_content"
        android:layout_height="wrap_content"
        android:text="HELLO READERS!! PRESS MENU BUTTON" />
</RelativeLayout>
Figure - xml file of Android options menu example
Now the graphical layout should be similar to the following snapshot:
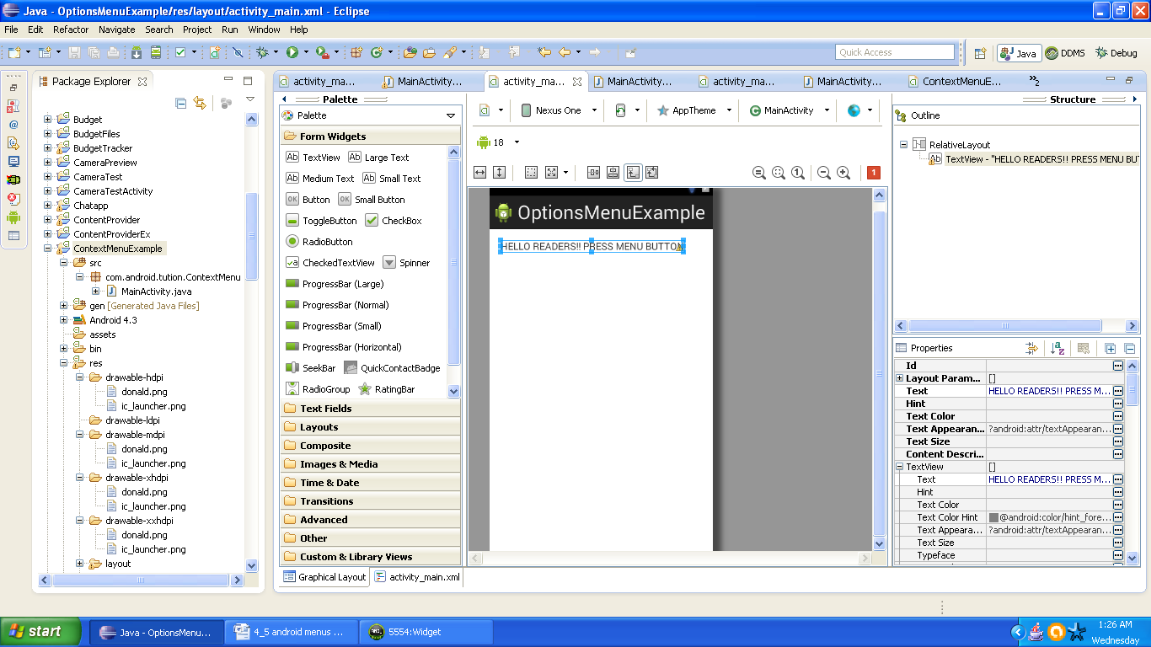
Figure - graphical layout of Android options menu example
Now open your main activity file and code it. I am breaking the code in parts but you have to follow the sequence as shown in the listings:
package com.adnroid.tution.OptionsMenu;
import android.app.Activity;
import android.os.Bundle;
import android.view.Menu;
import android.view.MenuItem;
import android.widget.Toast;
public class MainActivity extends Activity {
    @Override
    protected void onCreate(Bundle savedInstanceState) {
        super.onCreate(savedInstanceState);
        setContentView(R.layout.activity_main);
    }
    @Override
    public boolean onCreateOptionsMenu(Menu menu) {
        // Inflate the menu; this adds items to the action bar if it is present.
        // getMenuInflater().inflate(R.menu.main, menu);
        super.onCreateOptionsMenu(menu);
        CreateMenu(menu);
        return true;
    }
    @Override
    public boolean onOptionsItemSelected(MenuItem item) {
        // TODO Auto-generated method stub
        return MenuChoice(item);
    }
Figure First Half of graphical layout of Android options menu example code
Now we have the helper method which is responsible for handling individual item clicks.
private boolean MenuChoice(MenuItem item) {
        // TODO Auto-generated method stub
        switch (item.getItemId()) {
        case 0:
            Toast.makeText(this, "Item 1 is clicked", Toast.LENGTH_LONG).show();
            return true;
        case 1:
            Toast.makeText(this, "Item 2 is clicked", Toast.LENGTH_LONG).show();
            return true;
        case 2:
            Toast.makeText(this, "Item 3 is clicked", Toast.LENGTH_LONG).show();
            return true;
        case 3:
            Toast.makeText(this, "Item 4 is clicked", Toast.LENGTH_LONG).show();
            return true;
        case 4:
            Toast.makeText(this, "Item 5 is clicked", Toast.LENGTH_LONG).show();
            return true;
        case 5:
            Toast.makeText(this, "Item 6 is clicked", Toast.LENGTH_LONG).show();
            return true;
        case 6:
            Toast.makeText(this, "Item 7 is clicked", Toast.LENGTH_LONG).show();
            return true;
        case 7:
            Toast.makeText(this, "Item 8 is clicked", Toast.LENGTH_LONG).show();
            return true;
        case 8:
            Toast.makeText(this, "Item 9 is clicked", Toast.LENGTH_LONG).show();
            return true;
        }
        return false;
    }
Figure - Handler method responding to each item clicked on menu
Next handler method is responsible for displaying the menu. So please maintain the continuity in the same activity and in same sequence. Third part of code is as shown below:
private void CreateMenu(Menu menu) {
        // TODO Auto-generated method stub
        MenuItem menu1 = menu.add(0, 0, 0, "Item 1");
        {
            menu1.setAlphabeticShortcut('d');
            menu1.setIcon(R.drawable.ic_launcher);
        }
        MenuItem menu2 = menu.add(0, 1, 1, "Item 2");
        {
            menu2.setAlphabeticShortcut('w');
            menu2.setIcon(R.drawable.ic_launcher);
        }
        MenuItem menu3 = menu.add(0, 2, 2, "Item 3");
        {
            menu3.setAlphabeticShortcut('m');
            menu3.setIcon(R.drawable.ic_launcher);
        }
        MenuItem menu4 = menu.add(0, 3, 3, "Item 4");
        {
            menu4.setAlphabeticShortcut('u');
            menu4.setIcon(R.drawable.ic_launcher);
        }
        MenuItem menu5 = menu.add(0, 4, 4, "Item 5");
        {
            menu5.setAlphabeticShortcut('o');
            menu5.setIcon(R.drawable.ic_launcher);
        }
        MenuItem menu6 = menu.add(0, 5, 5, "Item 6");
        {
            menu6.setAlphabeticShortcut('b');
            menu6.setIcon(R.drawable.ic_launcher);
        }
        MenuItem menu7 = menu.add(0, 6, 6, "Item 7");
        {
            menu7.setAlphabeticShortcut('c');
            menu7.setIcon(R.drawable.ic_launcher);
        }
        MenuItem menu8 = menu.add(0, 8, 8, "Item 8");
        {
            menu8.setNumericShortcut('8');
            menu8.setIcon(R.drawable.ic_launcher);
        }
        MenuItem menu9 = menu.add(0, 9, 9, "Item 9");
        {
            menu9.setNumericShortcut('9');
            menu9.setIcon(R.drawable.ic_launcher);
        }
    }
}
Figure - Handler displaying the list
Now open your manifest and cross check the things with the following listing:
<?xml version="1.0" encoding="utf-8"?>
<manifest xmlns:android="http://schemas.android.com/apk/res/android"
    package="com.adnroid.tution.OptionsMenu"
    android:versionCode="1"
    android:versionName="1.0" >
    <uses-sdk
        android:minSdkVersion="8"
        android:targetSdkVersion="18" />
    <application
        android:allowBackup="true"
        android:icon="@drawable/ic_launcher"
        android:label="@string/app_name"
        android:theme="@style/AppTheme" >
        <activity
            android:name="com.adnroid.tution.OptionsMenu.MainActivity"
            android:label="@string/app_name" >
            <intent-filter>
                <action android:name="android.intent.action.MAIN" />
                <category android:name="android.intent.category.LAUNCHER" />
            </intent-filter>
        </activity>
    </application>
</manifest>
Figure - manifest file of graphical layout of Android options menu example
Now create a suitable emulator and run the app. Output should be similar to the following snapshot:
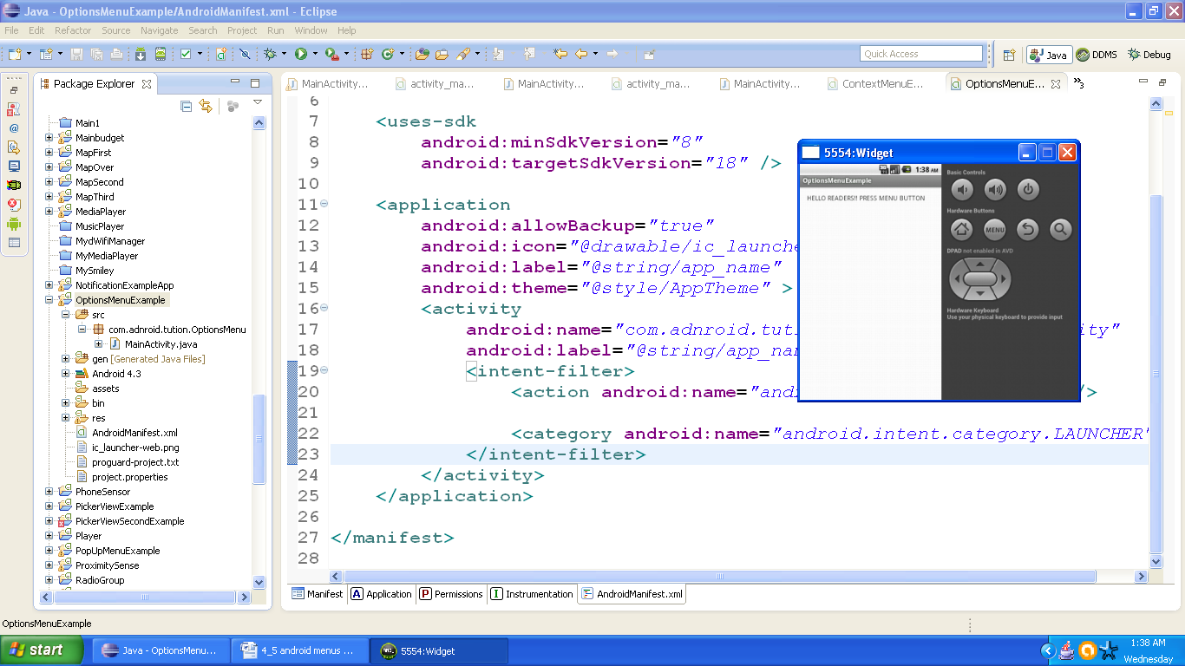
Figure- Output after first run
Now press the MENU button and output should be similar to the following snapshot:

Figure - Menu is displayed
Now you must be thinking we had ten items in list but only five items are displayed. For other options you have to press the icon saying more. If you press that icon your output should be similar to the following snapshot:
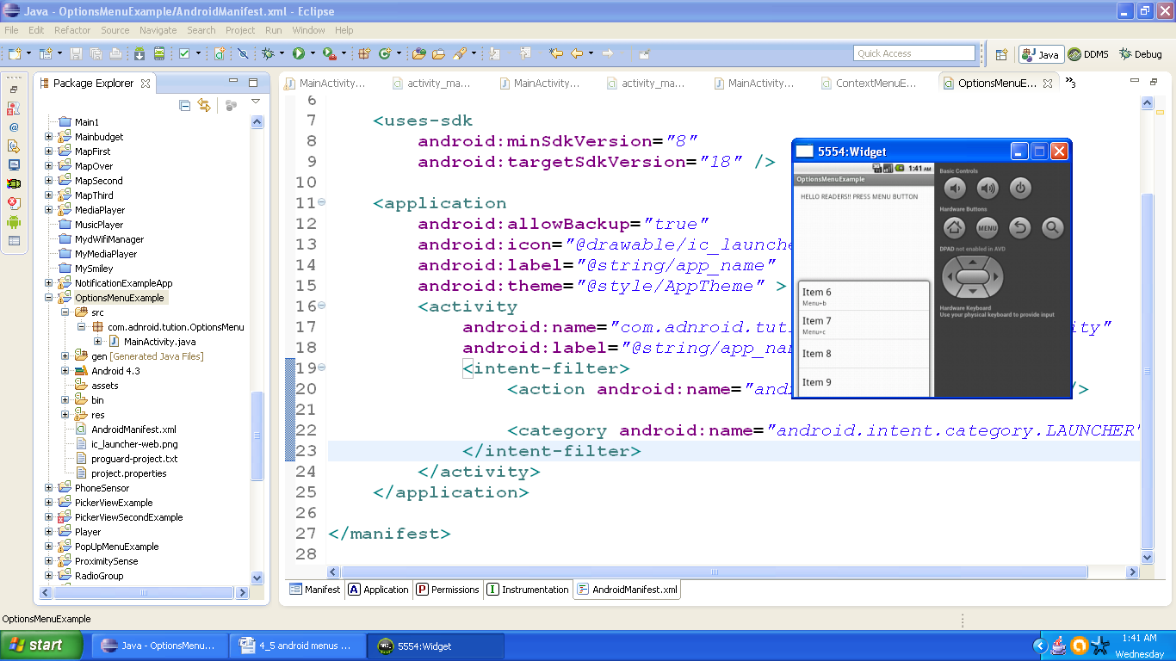
Figure - Output after pressing icon saying more
Now you can press any item on the menu and you will be prompted about your selection. So output should be similar to the following snapshot:

Figure - Output after selecting an item
So my dear friends you are done with options menu. Congratulations!! Let’s move to next menu.