
4.5.3 Android Context Menu
It displays information about a particular view on an activity. To activate a context menu user have to tap and hold an item on screen. In other words, it is a floating menu. It appears when user taps for long i.e., a long click on item is going to activate the menu. Actions are not system wide. They are meant to perform action on a specified or particular context.
When we develop for devices powered with Android 3.0 or higher versions, we should work out the contextual action mode. This mode enables action on selected content. In this case actions are presented at top of the screen in a bar like structure.
4.5.3.1 Android context Menu Example
Open your IDE and create a project. Name it as you like. I am naming it as ContextMenuExample App. For a context menu we need to have a view associated with it. So open your xml file and code it as shown in the following listing:
<RelativeLayout xmlns:android="http://schemas.android.com/apk/res/android"
    xmlns:tools="http://schemas.android.com/tools"
    android:layout_width="match_parent"
    android:layout_height="match_parent"
    android:paddingBottom="@dimen/activity_vertical_margin"
    android:paddingLeft="@dimen/activity_horizontal_margin"
    android:paddingRight="@dimen/activity_horizontal_margin"
    android:paddingTop="@dimen/activity_vertical_margin"
    tools:context=".MainActivity" >
    <TextView
        android:id="@+id/textView1"
        android:layout_width="wrap_content"
        android:layout_height="wrap_content"
        android:text="HELLO READERS!! PRESS THE BELL" />
    <ImageButton
        android:id="@+id/imageButton1"
        android:layout_width="wrap_content"
        android:layout_height="wrap_content"
        android:layout_alignLeft="@+id/textView1"
        android:layout_below="@+id/textView1"
        android:layout_marginLeft="80dp"
        android:layout_marginTop="109dp"
        android:src="@android:drawable/ic_popup_reminder" />
</RelativeLayout>
Figure - xml file of Android context Menu example
Graphical layout should be similar to the following snapshot:
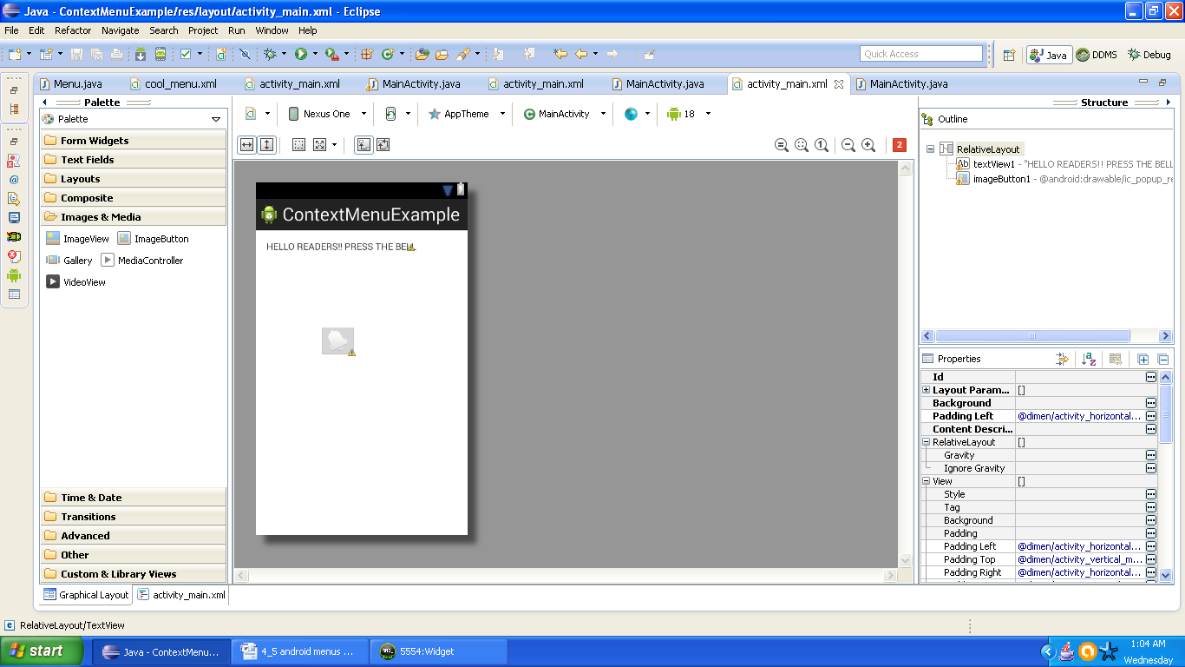
Figure - Graphical layout of Android context Menu example
Now open your main activity file and code it as shown in the following listing:
package com.android.tution.ContextMenu;
import android.os.Bundle;
import android.app.Activity;
import android.view.ContextMenu;
import android.view.ContextMenu.ContextMenuInfo;
import android.view.Menu;
import android.view.MenuItem;
import android.view.View;
import android.widget.ImageButton;
import android.widget.Toast;
public class MainActivity extends Activity {
    @Override
    protected void onCreate(Bundle savedInstanceState) {
        super.onCreate(savedInstanceState);
        setContentView(R.layout.activity_main);
        ImageButton image = (ImageButton) findViewById(R.id.imageButton1);
        image.setOnCreateContextMenuListener(this);
    }
    @Override
    public boolean onCreateOptionsMenu(Menu menu) {
        // Inflate the menu; this adds items to the action bar if it is present.
        // getMenuInflater().inflate(R.menu.main, menu);
        super.onCreateOptionsMenu(menu);
        CreateMenu(menu);
        return true;
    }
    @Override
    public boolean onOptionsItemSelected(MenuItem item) {
        // TODO Auto-generated method stub
        return MenuChoice(item);
    }
    @Override
    public void onCreateContextMenu(ContextMenu menu, View v,
            ContextMenuInfo menuInfo) {
        // TODO Auto-generated method stub
        super.onCreateContextMenu(menu, v, menuInfo);
        CreateMenu(menu);
    }
    @Override
    public boolean onContextItemSelected(MenuItem item) {
        // TODO Auto-generated method stub
        // return super.onContextItemSelected(item);
        return MenuChoice(item);
    }
Figure - First half of the Android context Menu example code
Till now our skeleton menu is created. Now we have to implement the helper methods. Continue in the same activity file. Second part of code is shown in the following listing:
private boolean MenuChoice(MenuItem item) {
        // TODO Auto-generated method stub
        switch (item.getItemId()) {
        case 0:
            Toast.makeText(this, "Item 1 is clicked", Toast.LENGTH_LONG).show();
            return true;
        case 1:
            Toast.makeText(this, "Item 2 is clicked", Toast.LENGTH_LONG).show();
            return true;
        case 2:
            Toast.makeText(this, "Item 3 is clicked", Toast.LENGTH_LONG).show();
            return true;
        case 3:
            Toast.makeText(this, "Item 4 is clicked", Toast.LENGTH_LONG).show();
            return true;
        case 4:
            Toast.makeText(this, "Item 5 is clicked", Toast.LENGTH_LONG).show();
            return true;
        case 5:
            Toast.makeText(this, "Item 6 is clicked", Toast.LENGTH_LONG).show();
            return true;
        case 6:
            Toast.makeText(this, "Item 7 is clicked", Toast.LENGTH_LONG).show();
            return true;
        case 7:
            Toast.makeText(this, "Item 8 is clicked", Toast.LENGTH_LONG).show();
            return true;
        case 8:
            Toast.makeText(this, "Item 9 is clicked", Toast.LENGTH_LONG).show();
            return true;
        }
        return false;
    }
Figure - Handler method responsible for displaying individual item
private void CreateMenu(Menu menu) {
        // TODO Auto-generated method stub
        MenuItem menu1 = menu.add(0, 0, 0, "Item 1");
        {
            menu1.setAlphabeticShortcut('d');
            menu1.setIcon(R.drawable.ic_launcher);
        }
        MenuItem menu2 = menu.add(0, 1, 1, "Item 2");
        {
            menu2.setAlphabeticShortcut('w');
            menu2.setIcon(R.drawable.ic_launcher);
        }
        MenuItem menu3 = menu.add(0, 2, 2, "Item 3");
        {
            menu3.setAlphabeticShortcut('m');
            menu3.setIcon(R.drawable.ic_launcher);
        }
        MenuItem menu4 = menu.add(0, 3, 3, "Item 4");
        {
            menu4.setAlphabeticShortcut('u');
            menu4.setIcon(R.drawable.ic_launcher);
        }
        MenuItem menu5 = menu.add(0, 4, 4, "Item 5");
        {
            menu5.setAlphabeticShortcut('o');
            menu5.setIcon(R.drawable.ic_launcher);
        }
        MenuItem menu6 = menu.add(0, 5, 5, "Item 6");
        {
            menu6.setAlphabeticShortcut('b');
            menu6.setIcon(R.drawable.ic_launcher);
        }
        MenuItem menu7 = menu.add(0, 6, 6, "Item 7");
        {
            menu7.setAlphabeticShortcut('c');
            menu7.setIcon(R.drawable.ic_launcher);
        }
        MenuItem menu8 = menu.add(0, 8, 8, "Item 8");
        {
            menu8.setNumericShortcut('8');
            menu8.setIcon(R.drawable.ic_launcher);
        }
        MenuItem menu9 = menu.add(0, 9, 9, "Item 9");
        {
            menu9.setNumericShortcut('9');
            menu9.setIcon(R.drawable.ic_launcher);
        }
    }
}
Figure - Handler method responsible for displaying a list of items
Please make sure that you don’t mess up. Just go in sequence as shown in the tutorial. You don’t have to make any alteration. Just type the code as it is presented to you. Open your manifest file and cross check the manifest of your app:
<?xml version="1.0" encoding="utf-8"?>
<manifest xmlns:android="http://schemas.android.com/apk/res/android"
    package="com.android.tution.ContextMenu"
    android:versionCode="1"
    android:versionName="1.0" >
    <uses-sdk
        android:minSdkVersion="8"
        android:targetSdkVersion="18" />
    <application
        android:allowBackup="true"
        android:icon="@drawable/ic_launcher"
        android:label="@string/app_name"
        android:theme="@style/AppTheme" >
        <activity
            android:name="com.android.tution.ContextMenu.MainActivity"
            android:label="@string/app_name" >
            <intent-filter>
                <action android:name="android.intent.action.MAIN" />
                <category android:name="android.intent.category.LAUNCHER" />
            </intent-filter>
        </activity>
    </application>
Figure - manifest of Android context Menu example
Now create a suitable emulator and run your app. Your first output should be similar to the following snapshot:
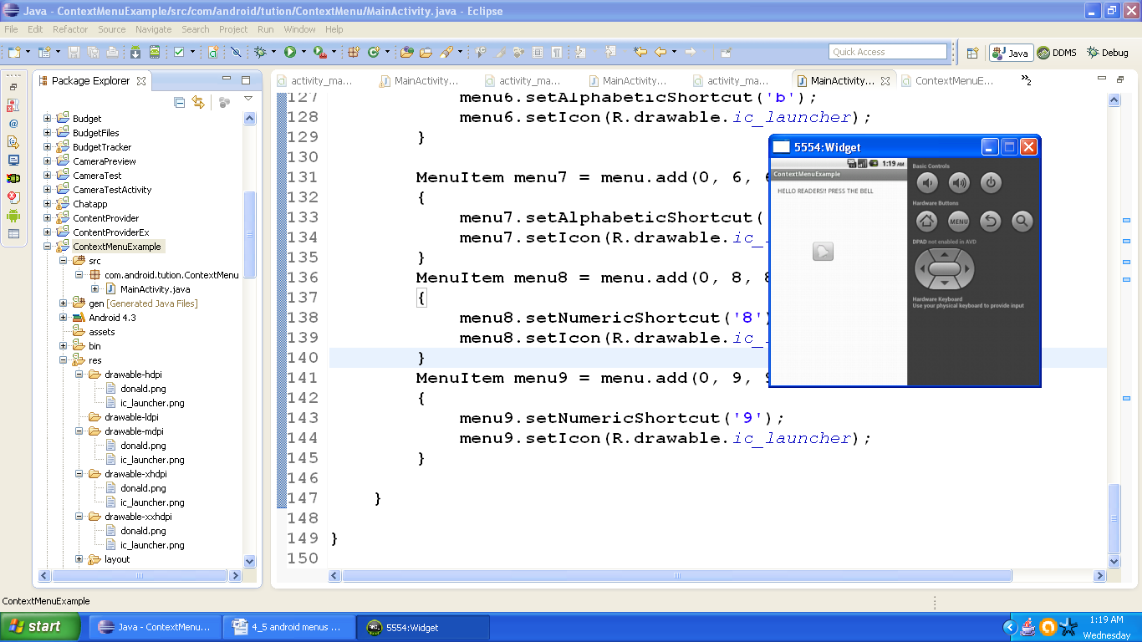
Figure - Output of Android context Menu app
Now press the bell for few seconds as it will respond to long click. After that output should be similar to the following snapshot:
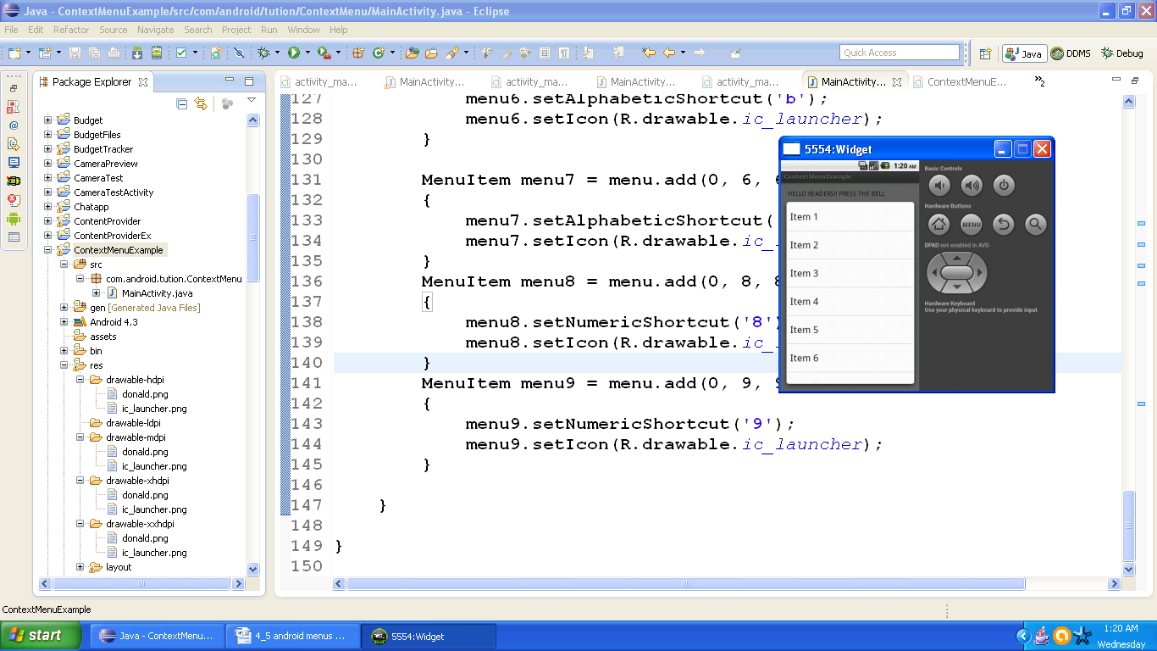
Figure - Output after a long click on the bell
Now press any item and you will be notified about your selection. And control goes back to the home page. It should be similar to the following snapshot:
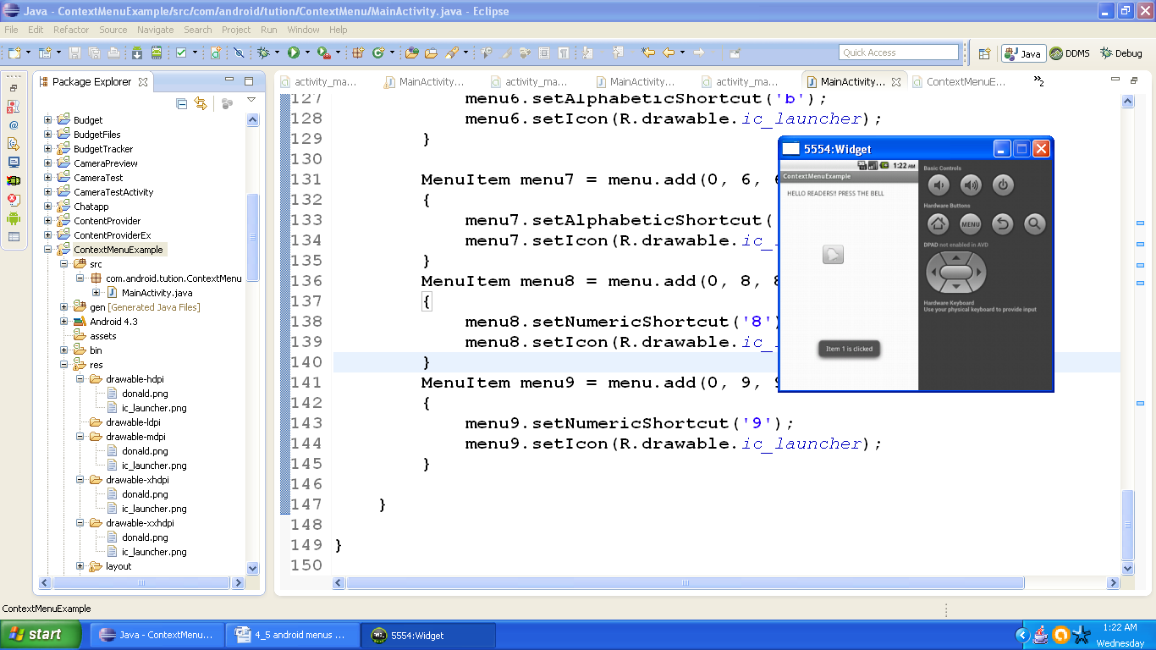
Figure - Output after selecting an item
Congratulations for the second time buddies!! You have successfully created a context menu. Now let us move to next menu
4.5.3 Android Popup Menu
Android popup menu displays a vertical list of items. It is anchored by the view which fires the menu. For a particular content or for options to provide a second part of command it s better to provide an overflow of actions respectively. A popup menu is not going to directly perform any action on a particular content. It is meant for additional or extended actions related to content in our activity.
4.5.3.1 Android Popup Menu Example
Let us create a popup menu and find out what is the difference between these tree types of menus. For this, open your IDE and create a project. Name it as you like. I am naming it as PopUpMenuExample App. Open your xml and code it as shown in the following listing:
<RelativeLayout xmlns:android="http://schemas.android.com/apk/res/android"
    xmlns:tools="http://schemas.android.com/tools"
    android:layout_width="match_parent"
    android:layout_height="match_parent"
    android:paddingBottom="@dimen/activity_vertical_margin"
    android:paddingLeft="@dimen/activity_horizontal_margin"
    android:paddingRight="@dimen/activity_horizontal_margin"
    android:paddingTop="@dimen/activity_vertical_margin"
    tools:context=".MainActivity" >
    <TextView
        android:id="@+id/textView2"
        android:layout_width="wrap_content"
        android:layout_height="wrap_content"
        android:layout_alignParentTop="true"
        android:layout_centerHorizontal="true"
        android:layout_marginTop="16dp"
        android:text="Hello Readers" />
    <TextView
        android:id="@+id/textViewExample"
        android:layout_width="wrap_content"
        android:layout_height="wrap_content"
        android:layout_below="@+id/textView2"
        android:layout_marginTop="36dp"
        android:text="Press the ImageButton to pop up the menu"
        android:textAppearance="?android:attr/textAppearanceLarge" />
</RelativeLayout>
Figure - xml file of Android popup menu example
Graphical layout should be similar to the following snapshot:
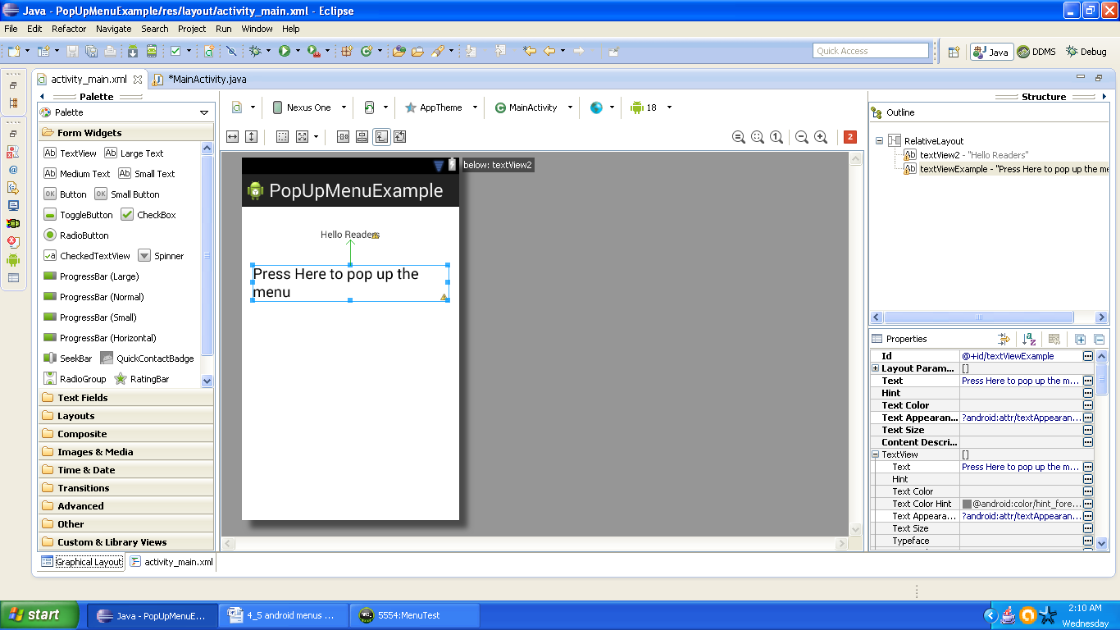
Figure - Graphical layout of Android popup menu example
Now open your main activity file and code it as shown in the following listing:
import android.os.Bundle;
import android.app.Activity;
import android.view.Menu;
import android.view.MenuItem;
import android.view.View;
import android.view.View.OnClickListener;
import android.widget.ImageButton;
import android.widget.PopupMenu;
import android.widget.PopupMenu.OnMenuItemClickListener;
import android.widget.Toast;
public class MainActivity extends Activity implements OnClickListener,
        OnMenuItemClickListener {
    private PopupMenu popUpMenu;
    private static final int APPLE = 1;
    private static final int ORANGE = 2;
    private static final int BANANA = 3;
    private static final int GRAPES = 4;
    private static final int CHERRY = 5;
    private static final int MANGO = 6;
    private static final int POMEGRANATE = 7;
    private static final int JACKFRUIT = 8;
    private static final int CUSTARD_APPLE = 9;
    private static final int GUAVA = 10;
    @Override
    public void onCreate(Bundle savedInstanceState) {
        super.onCreate(savedInstanceState);
        setContentView(R.layout.activity_main);
        popUpMenu = new PopupMenu(this, findViewById(R.id.textViewExample));
        popUpMenu.getMenu().add(Menu.NONE, APPLE, Menu.NONE, "Item 1");
        popUpMenu.getMenu().add(Menu.NONE, ORANGE, Menu.NONE, "Item 2");
        popUpMenu.getMenu().add(Menu.NONE, BANANA, Menu.NONE, "Item 3");
        popUpMenu.getMenu().add(Menu.NONE, GRAPES, Menu.NONE, "Item 4");
        popUpMenu.getMenu().add(Menu.NONE, CHERRY, Menu.NONE, "Item 5");
        popUpMenu.getMenu().add(Menu.NONE, MANGO, Menu.NONE, "Item 6");
        popUpMenu.getMenu().add(Menu.NONE, POMEGRANATE, Menu.NONE, "Item 7");
        popUpMenu.getMenu().add(Menu.NONE, JACKFRUIT, Menu.NONE, "Item 8");
        popUpMenu.getMenu().add(Menu.NONE, CUSTARD_APPLE, Menu.NONE, "Item 9");
        popUpMenu.getMenu().add(Menu.NONE, GUAVA, Menu.NONE, "Item 10");
        popUpMenu.setOnMenuItemClickListener(this);
        findViewById(R.id.textViewExample).setOnClickListener(this);
    }
    @Override
    public boolean onCreateOptionsMenu(Menu menu) {
        // Inflate the menu; this adds items to the action bar if it is present.
        getMenuInflater().inflate(R.menu.main, menu);
        return true;
    }
Figure - First half of Android popup menu example code
Second half of code is as shown in the following listing. Please maintain the continuity of code in same activity in same sequence as shown in the consecutive listings:
package com.android.tution.PopUpMenu;
@Override
    public boolean onMenuItemClick(MenuItem item) {
        // TODO Auto-generated method stub
    switch (item.getItemId()) {
        case APPLE:
            Toast.makeText(this, "APPLE SELECTED", Toast.LENGTH_SHORT).show();
            return true;
        case ORANGE:
            Toast.makeText(this, "ORANGE SELECTED", Toast.LENGTH_SHORT).show();
            return true;
        case BANANA:
            Toast.makeText(this, "BANANA SELECTED", Toast.LENGTH_SHORT).show();
            return true;
        case GRAPES:
            Toast.makeText(this, "GRAPES SELECTED", Toast.LENGTH_SHORT).show();
            return true;
        case CHERRY:
            Toast.makeText(this, "CHERRY SELECTED", Toast.LENGTH_SHORT).show();
            return true;
        case MANGO:
            Toast.makeText(this, "MANGO SELECTED", Toast.LENGTH_SHORT).show();
            return true;
        case POMEGRANATE:
            Toast.makeText(this, "POMEGRANATE SELECTED", Toast.LENGTH_SHORT)
                    .show();
            return true;
        case JACKFRUIT:
            Toast.makeText(this, "JACKFRUIT SELECTED", Toast.LENGTH_SHORT)
                    .show();
            return true;
        case CUSTARD_APPLE:
            Toast.makeText(this, "CUSTARD_APPLE SELECTED", Toast.LENGTH_SHORT)
                    .show();
            return true;
        case GUAVA:
            Toast.makeText(this, "GUAVA SELECTED", Toast.LENGTH_SHORT).show();
            return true;
        }
        return false;
    }
    @Override
    public void onClick(View v) {
        // TODO Auto-generated method stub
        popUpMenu.show();
    }
}
Figure - Second half of Android popup menu example code
<?xml version="1.0" encoding="utf-8"?>
<manifest xmlns:android="http://schemas.android.com/apk/res/android"
    package="com.android.tution.PopUpMenu"
    android:versionCode="1"
    android:versionName="1.0" >
    <uses-sdk
        android:minSdkVersion="11"
        android:targetSdkVersion="18" />
    <application
        android:allowBackup="true"
        android:icon="@drawable/ic_launcher"
        android:label="@string/app_name"
        android:theme="@style/AppTheme" >
        <activity
            android:name="com.android.tution.PopUpMenu.MainActivity"
            android:label="@string/app_name" >
            <intent-filter>
                <action android:name="android.intent.action.MAIN" />
                <category android:name="android.intent.category.LAUNCHER" />
            </intent-filter>
        </activity>
    </application>
</manifest>
Figure - manifest of Android popup menu example
Now everything is ready. Create a suitable emulator and run the app. After first run your output should be similar to the following snapshot:
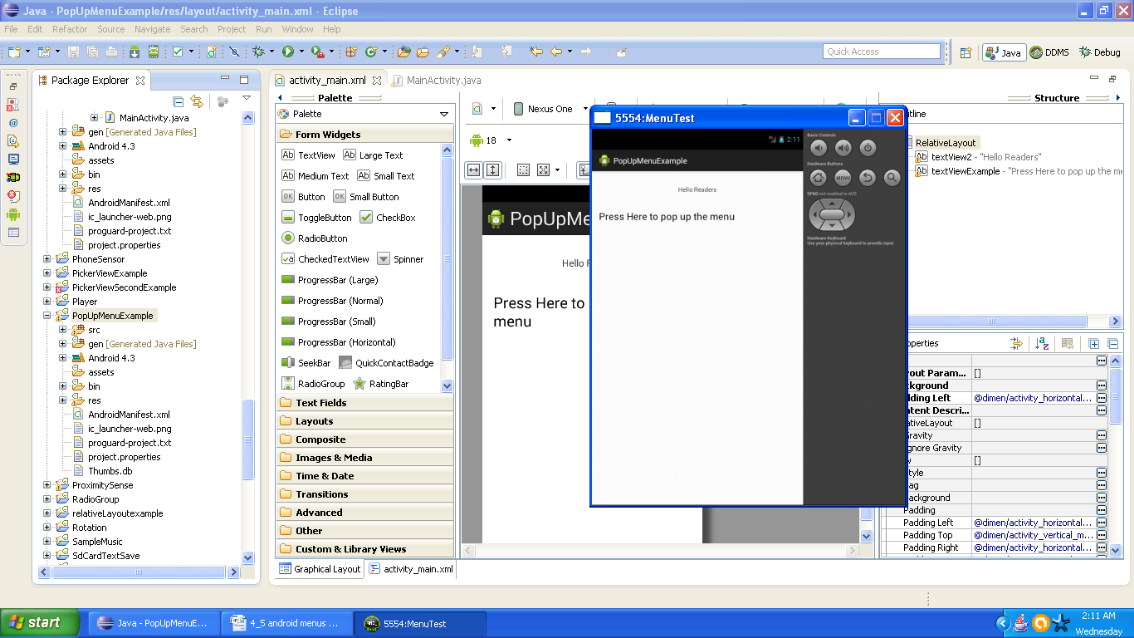
Figure - Output of Android popup menu example
Now press the text area saying press here to pop up the menu. You would be displayed with a list of items when you press here or click here. Output should be similar to the following snapshot:

Figure - After pressing the screen of Android popup menu example
Now you can select any item and item would refer to a hidden content associated with that item. For instance when we press item 4, it is displayed Grapes selected. Output should be similar to the following snapshot:
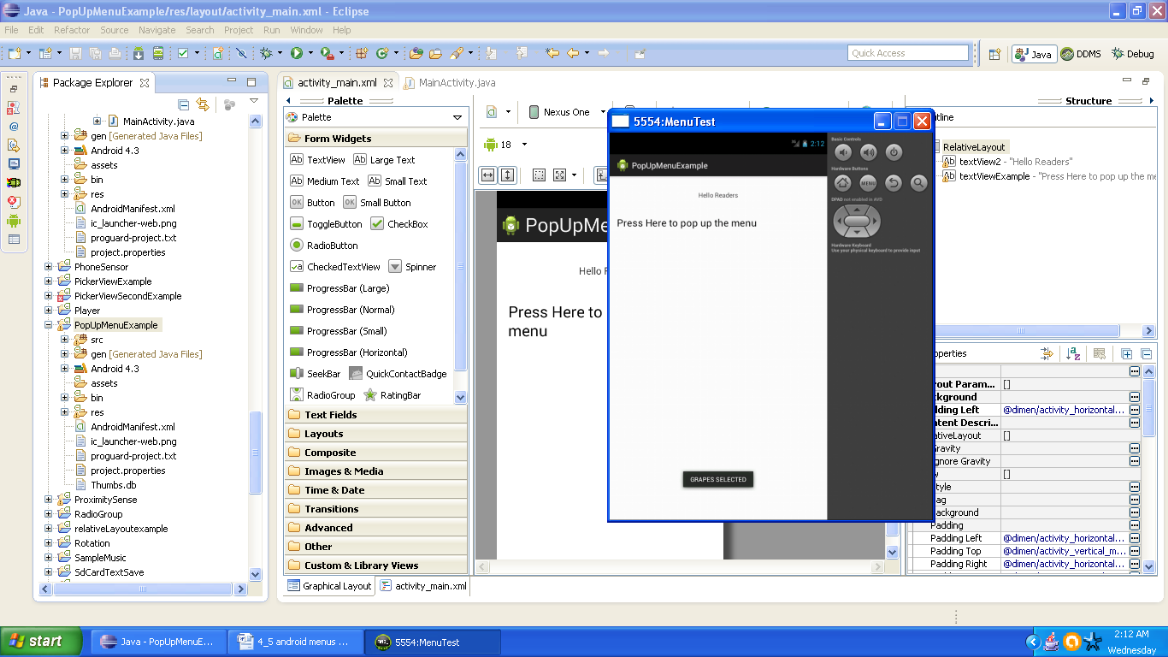
Figure - After selecting item on menu of Android popup menu example
Congratulations once again!! We are done with menus. Hope you enjoyed the tutorial. Have fun. See you in the next sub section. Till then keep practicing and a very Happy App developing!!