
18.1 Introduction of Authentication and Authorization
Authentication is the process of validating the identity of a user to allow or deny the user request. It involves accepting user credentials from the user and validating against the user. The system checks for the verification the user is legal for the system.
When the user request for specific request it comes to the IIS. The IIS authenticates the user requesting the resource. The process will decide whether to impersonate the authenticated user by the IIS or not. If the impersonation is enabled, the configuration settings in the Web.config file, the ASP.NET server impersonates the authenticated user.
Authorization is the process of ensuring users with valid identity are allowed to access the specific resources in the system. Depending on the roles assign to the user the authorization is provided. If the user has Administrator authorization, access throughout the application is possible. It can create or delete users depending on the requirement.
18.2 Form Based Authentication
Form based authentication is used to secure application by using custom authentication model with cookie support. It does not depend on the session management. The form based authentication allows the user to redirect the unauthenticated users to login page. The user is requested to enter proper user credentials. If the login is successful, ASP.NET issues a cookie to user and redirects to the specific resource. With the cookie, user can revisit the page without repeated login.
The pictorial representation of the form based authentication is as shown below:
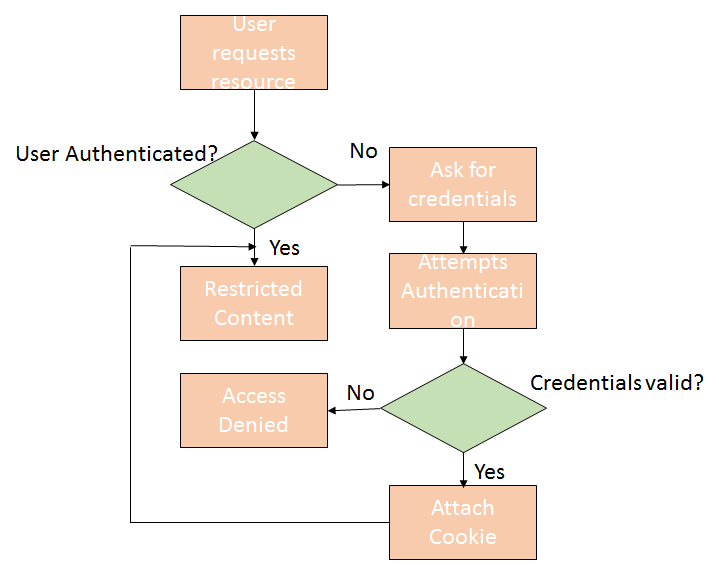
In the figure above, the user requests the restricted resource in the system. The request goes to the IIS and it authenticates the user. If the anonymous access is enabled in the IIS or it is authenticated user the request is send to the application. ASP.NET checks if the valid authentication cookie is attached to the request. If it has a cookie attached it will perform the authorization check.
If the user is authorized to access the access will be granted else denied. If it does not have a cookie attached, ASP.NET redirects the user to the login page and resubmits the page for authentication. If the user is authenticated, ASP.NET will attach the authentication ticket in the form of cookie to the response.
The steps to create form based authentication are as shown below:
1) Enable anonymous access in IIS as most of the user are considered as non-Windows users.
2) User must configure <authentication> section in the Web.config file. The code snippet for forms based authentication is as shown below:
<authentication mode=”Forms”>
  <forms name=”Login”
  loginURL=”Data1.aspx”
  protection=”All”
  timeout=”10”
  path=”/” />
</authentication>
In the above example, name attribute is the name of the HTTP cookie. The loginURL attribute is used to set the particular web page in an application. The cookie protection is set to ‘All’ allowing ASP.NET to encrypt and validate the cookie contents.
The timeout attribute is used to set the duration after which the cookie will expire. The path attribute is used to refer the path of cookie to be sent to the client. The ‘/’ means the cookie path is the root directory.
3) Add the authorization section in the Web.config file. The <authorization> tag is used to perform the functionality. A code snippet is as shown below:
<configuration>
   <system.web>
     <authorization>
    <allow users=”John” />
    <deny user=”*” />
     </authorization>
   </system.web>
</configuration>
In above example, the authorization will deny access to all users except John.
4) The last step is to redirect unauthenticated users by providing credentials for login. Valid username an passwords can be set in the Web.config file. The code snippet is as shown below:
<credentials passfordFormat=”Clear” >
   <username=”John” password=”Joh”>
   <username=”Mick” password=”Mic”>
   <username=”Flora” password=”Flo”>
</credentials>
Advantages of Forms based Authentication
1) User can configure Forms based authentication for different parts of the website as Web.config file is an XML document.
2) The administrator and developer can change the scheme quickly and easily in the Web.config file
3) The administration is centralized because all the authentication entries are in one file.
18.3 Role based Authentication
The Role based authentication for applying the authentication rules depending on the role of the user. It is useful when the security of data is required in an application. The role can be assigned to a specific group of users or individual user in an application.
The Role framework is configured through <roleManager> element in an application in the Web.config file. To enable it, set the <roleManager> element to true. The syntax to add the role manager is as shown below:
<?xml version=”1.0”?>
<configuration>
  <system.web>
     <roleManager enabled=”true” />
  </system.web>
</configuration>
The role configuration markup in the Web.config file is as shown below:
<roleManager>
  <providers>
    <add name=”SqlRoleProvider”
    connectionStringName=”SqlServer1”
    applicationName=”/”
    type=”System.Web.Security.SqlRoleProvider,System.Web,
    Version=2.0.0.0, Culture=neutral” />
   </providers>
</roleManager>
The connectionStringName attribute is used to specify the role store used in an application. The applicationName is the root application.
The new role can be created by using the createRole method in an application. The method to create a new role in the application is as shown below:
<b>Create a new Role: </b>
<asp:TextBox ID=”txt1” runat=”server”></asp:TextBox>
<br/>
<asp:Button ID=”btn1” runat=”server” Text=”Create” />
The method to create a new role is as shown below:
protected void btn1_Click(object sender, EventArgs e)
{
  string newRole=RoleName.Text.Trim();
  if(!Roles.RoleExists(newRoleName))
  Roles.CreateRole(newRoleName);
  RoleName.Text = string.Empty;
}
18.4 Windows and Basic Authentication
Windows authentication is the easiest to implement in an application. It makes use of the authentication capabilities and used with all authentication methods provided by the IIS. It is implemented when the users are part of windows. The code is executed with the same security as that of windows.
When the user requests a specific request, it goes to the IIS. IIS authenticates the user and attaches the token to it. It passes the authentication request and security token to ASP.NET. The token is verified by the ASP.NET in the <authorization> section of the Web.config file. If the access is granted, the resources are sent through the IIS or else an error message is sent to the user.
The windows authentication can be implemented by setting the authentication mode to Windows and deny access to the anonymous users. The Web.config code is as shown below:
<authentication mode=”Windows”>
</authentication>
   <authorization>
   <deny users=”?” />
</authorization>
Basic Authentication: The authentication is used for instructing the browser to send the user credentials over HTTP. The user is authenticated against the windows credentials. The user has an account on the server domain. To enable the basic authentication, set the authentication mode to ‘windows’ in the Web.config file.
The working of basic authentication is as mentioned below:
1) User send the request to the server in an application. The server returns 401 response that contains authenticate header supporting basic authentication.
2) User sends another request with the client credentials in the authorization header.
The advantages of the basic authentication are as follows:
1) It provides an internet standard for authentication
2) It is supported by all browsers
3) It is a simple protocol that can be used in an application
The code snippet to enable the basic authentication is as shown below:
<system.web>
   <authentication mode=”Windows” />
</system.web>
18.5 ASP.NET Impersonation
ASP.NET impersonation is used to control the execution of the code in authenticated and authorized client. It is not a default process in the ASP.NET application. It is used for executing the local thread in an application. If the code changes the thread, the new thread executes the process identity by default.
The impersonation can be enabled in two ways as mentioned below:
1) Impersonation enabled: ASP.NET impersonates the token passed to it by IIS, can be an authenticated user or an internet user account. The syntax for enabling is as shown below:
<identity impersonate=”true” />
2) Impersonation enabled for a specific identity: ASP.NET impersonates the token generated using the identity specified in the Web.config file.
<identity impersonate=”true”
userName=”domain\user”
password=”password” />
<identity impersonate=”false” />