
Introduction
We are now ready with the PhoneGap development environment. Yes, we are going to develop our first PhoneGap Android app. In other words, we are going to develop our first mobile app for Android platform using PhoneGap.
Note: I will be demonstrating the whole tutorial on my Mac system. You can try the same on your PC. I will just specify the equivalent terms in brackets for those who work on a PC.
Create an Android App
Open your terminal window (command prompt) and navigate to the location where you have the PhoneGap folder downloaded and extracted. Move to the subfolder lib/android/bin within the PhoneGap folder. You might have to use the cd command multiple times. For example, if your PhoneGap folder is within the Documents/MobileAppDevelopment folder with the name phonegap (normally, the version details also will be there along with the name like phonegap-2.9.0), then open the terminal window and enter the command like this:
cd /Users/apple/Documents/MobileAppDevelopment/phonegap-2.9.0/lib/android/bin (Here apple is my user name and phonegap-2.9.0 is the name of the phonegap folder).
(For Windows users, it could be C:\MobileAppDevelopment\........ depending on where you have your PhoneGap folder.)
Next we have to use the ./create command to create an application. The format of the create command is
./create <project_path><package_name><project_name>
Here project_path is the location to keep the project, package_name is the name of the package and project_name is the name of the project.
Enter the following command in the terminal window.
./create /Users/apple/Desktop/AndroidHelloWorld com.learn.AndroidHelloWorld AndroidHelloWorld
Here /Users/apple/Desktop/AndroidHelloWorld is the location where I want to save my project. You can create your project wherever you want. Make sure that there is no folder named AndroidHelloWorld already existing in the specified location. Next, com.learn.AndroidHelloWorld is the package name and it is usually specified following the reversed domain style. You need not worry at all even if you do not have a website learn.com. It is just the convention of specifying a package name. The last one, that is AndroidHelloWorld, is the name of the project. Here also, you can name your project the way you want.
(The Windows equivalent command is create C:\Users\pc\Desktop\AndroidHelloWorld com.learn.AndroidHelloWorld AndroidHelloWorld where pc is my user name)
After entering the above specified command, if you press the Enter key on your keyboard, you will find a folder named AndroidHelloWorld on your Desktop. Now we need to take our project into the Android Development Environment. So, open Eclipse by double clicking the eclipse symbol in the eclipse folder within the adt bundle (adt bundle is the one you extracted and unzipped). You will get a screen that asks you to set your workspace.
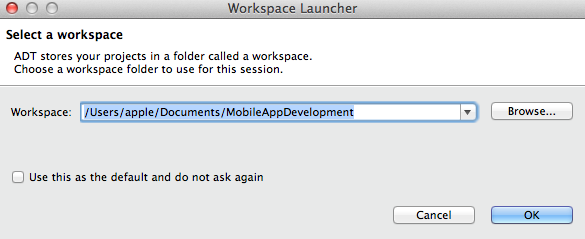
You can choose any location you plan to keep all your projects.
Go to File → New -->Project to get a screen like this:
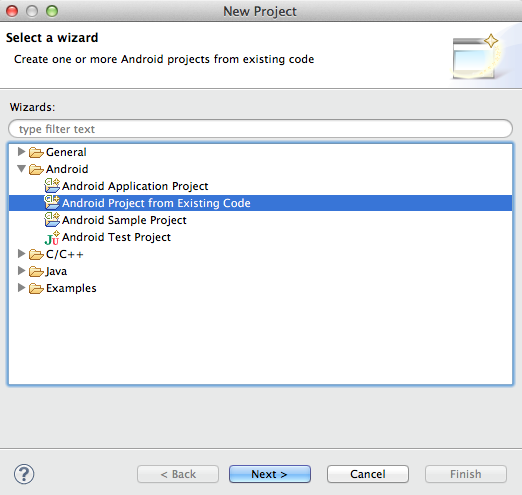
Select “Android Project From Existing Code” in the “Android” section and click the Next button. You will get a screen like this:

Click the Browse button and select the project we created from the Desktop.
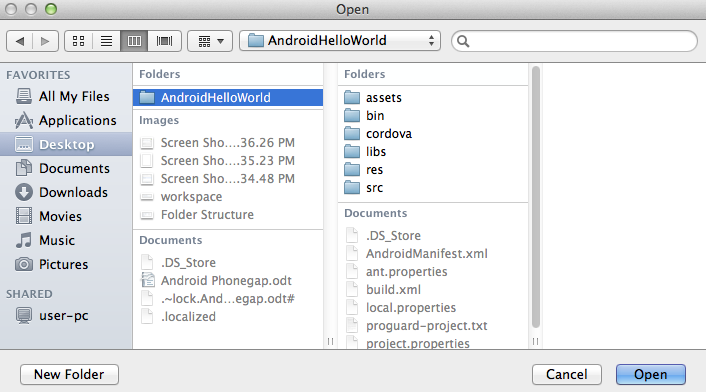
After selecting the project, click the Open button and now your screen will look like this.
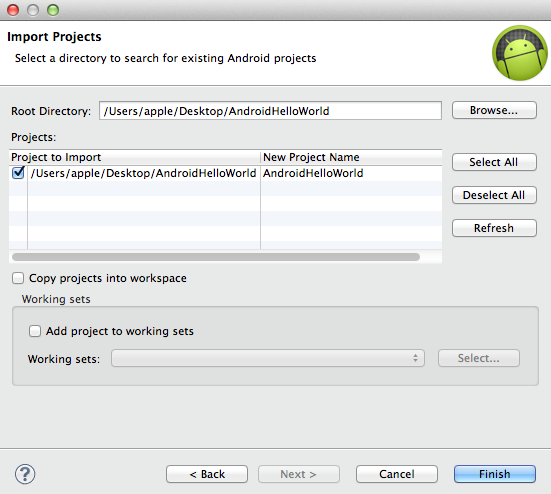
Now the project is opened in the Eclipse.