
Introduction
Event handling is simply handling the events. In other words, the flow of the program will be changed based on the occurrence of events like button click, key press, window close and so on. For example, you might have to display a particular message if the user clicks a specific button or moves the mouse over to a restricted area. All these events are to be handled somehow. An event handler runs a segment of code when certain events occur. If you are familiar with JavaScript, you might have already used event handlers including onClick, onLoad, onChange, onSubmit etc. Similarly, PhoneGap also offers a number of event handlers to handle different events.
Some of the most required and often used PhoneGap events are deviceready, online, offline, resume, pause etc. Among these events, deviceready is the most important and must-have event in all our applications.
The deviceready event
Before accessing any PhoneGap API through JavaScript or before calling any function associated with an event, we need to ensure that our device is ready. The deviceready event gets fired only after PhoneGap is fully loaded. So, you are supposed to call all your PhoneGap JavaScript functions only after the device becomes ready. How can we do this? You can add the following lines of code inside the <head> section within your index.html file.
<script>
    window.onload = function()
    {
    document.addEventListener("deviceready", init, false);
    }
    function init()
    {
        //PhoneGap is fully loaded and you can access any of the PhoneGap APIs now safely
    }
</script>
Here, we have created an anonymous function on the load of the document. This function is anonymous because it does not have any name and it gets invoked only when the window loads (from nowhere else). Within the anonymous function, we have attached an event listener to the deviceready event so that when the deviceready event gets triggered, it will invoke the init function. The name “init” has no relevance. You can name it the way you want.
You should have the habit of creating a function on the deviceready event and doing all the initializations inside that function because this function is invoked only when the device is ready.
Create an app that handles the button click event
Now we are going to create a mobile app that handles the button click event. It does not matter whether we create the app for Android or iOS phone. By now you might have realized that the structure of the www folder is almost the same in both iOS and Android projects. The main differences between iOS and Android in terms of app development are
a. While creating an Android project, we should point to the android folder in the lib of phonegap folder (cd /Users/apple/Documents/MobileAppDevelopment/phonegap-2.9.0/lib/android/bin) whereas we need to point to the ios folder in the lib of phonegap folder (cd /Users/apple/Documents/MobileAppDevelopment/phonegap-2.9.0/lib/ios/bin) while creating an iOS project.
b. While opening the Android project, we should first open the Eclipse and then bring our project into the environment whereas we just need to double click the xcodeproj icon in the project folder to launch the iOS project.
The process of changing the main index.html file is exactly the same regardless of whether the app is for Android or iOS platform. So, you can create this app for any platform. Here, I am creating an app for iOS platform.
Open your terminal window and point to the ios/bin folder by entering the following command.
cd /Users/apple/Documents/MobileAppDevelopment/phonegap-2.9.0/lib/ios/bin (Of course, there could be changes based on where you have the phonegap folder)
Enter the following command to create a project named iOSEvents on the desktop.
./create /Users/apple/Desktop/iOSEvents com.learn.iOSEvents iOSEvents
Once the project is created on the desktop, open the folder and double click the iOSEvents.xcodeproj icon to launch the project. Now the project is opened in the XCode environment. Again go back to the project folder on the desktop, open the www folder and open the index.html file using your favourite text editor.
Now clean up the index.html file as we did before. Remove the long comment, remove the line that links to the style sheet, move the line that links to the cordova.js file from <body> section to the <head> section. Remove everything else inside the <body> tag. You can also change the title to make it more relevant.
Add the following line inside the <body> tag.
<button id="btnClick">Click Me!!!</button>
Now your index.html file will look like this:
<!DOCTYPE html>
<html>
    <head>
        <meta charset="utf-8" />
        <meta name="format-detection" content="telephone=no" />
        <meta name="viewport" content="user-scalable=no, initial-scale=1, maximum-scale=1, minimum-scale=1, width=device-width, height=device-height, target-densitydpi=device-dpi" />
        <script type="text/javascript" src="cordova.js"></script>
        <title>Event Handling</title>
    </head>
    <body>
        <button id="btnClick">Click Me!!!</button>
    </body>
</html>
Now we have to handle the button click event. But before that we need to ensure that our device is ready. So, add the following lines of code in the <head> section.
<script>
    window.onload = function()
    {
        document.addEventListener("deviceready", init, false);
    }
</script>
Next we need to create the init function. Add the following lines of code inside the <script> tag after the window.onload method.
function init()
{
    var myButton = document.getElementById("btnClick");
    myButton.addEventListener("click", clicked, false);
}
function clicked()
{
    alert("You clicked a button.");
}
As you see, we accessed the button using getElementById and then attached an event on the click of the button. Once the button is clicked (the button click event is triggered), it will invoke the function named “clicked” within which we added the code to display an alert message. If you make the changes correctly, your <script> section will look like this:
<script>
window.onload = function()
{
    document.addEventListener("deviceready", init, false);
}
function init()
{
    var myButton = document.getElementById("btnClick");
    myButton.addEventListener("click", clicked, false);
}
function clicked()
{
    alert("You clicked a button.");
}
</script>
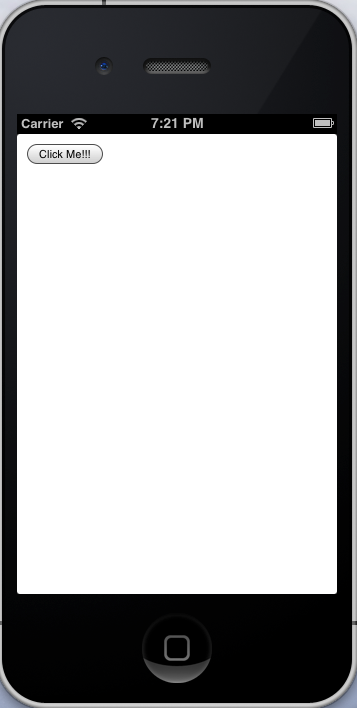
Now we are done with the required changes. Save the index.html file and go to the XCode environment where we have our project already opened. Select your simulator from the list and click the Run button. You will first get a screen like this:
If you click the button, you will get a message like this:

You can click the OK button and the message will disappear.
Summary
In this tutorial, we have created an iOS app that handles the button click event. Likewise, you can trigger a function when the user moves the mouse over a link or a button. You can trigger a function when the user presses a specific key on the keyboard and so on. In short, you can handle all kinds of events in your app to suit your needs.