
Introduction:
- Displaying Hello World! to user in Struts 2 was very simple. But, we will now make the programs more interactive.
- That is, we will take required inputs from user, process them according to users need, revert them and display the output in the most effective way.
- This tutorial will help you to design Prime number application.
- The number of inputs from the user is one and the output is the result of the determination of whether the input number is prime or not.
Requirements are:
- The tools and software’s we will be using are:
- Installed version of Java 1.7 (i.e. jdk 1.7)
- Installed version of Java Runtime Environment (i.e. jre 1.7)
- Installed NetBeans: version above 7.0 (because the versions below 7.0 do not provide much flexibility with Struts 2 Framework).
Prime Number Application:
Steps for creating Web Application:
Start NetBeans IDE 8.0.1(this is my installed version) and click on New Project.
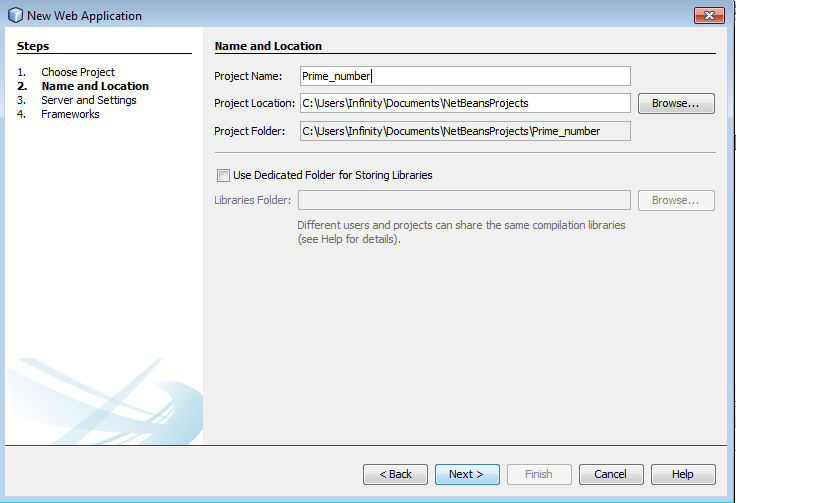
Figure : Creating new Project in NetBeans 8.0 (II) – Naming and saving project.
- Select the first option (i.e. Web Application). (Note : the second option is to be selected when you already have a developed project and you want to add some extra features to it. And the third option creates a Web Application without any framework, which is not useful t us presently).
- Then click on next and give your project a title. The default title is normally set to “Web Application 1” and it increments so on and so forth accordingly.
- The default saving location of your project is in the Users -> My Documents folder. It is a good habit to save the projects in Drives other than C Drive.
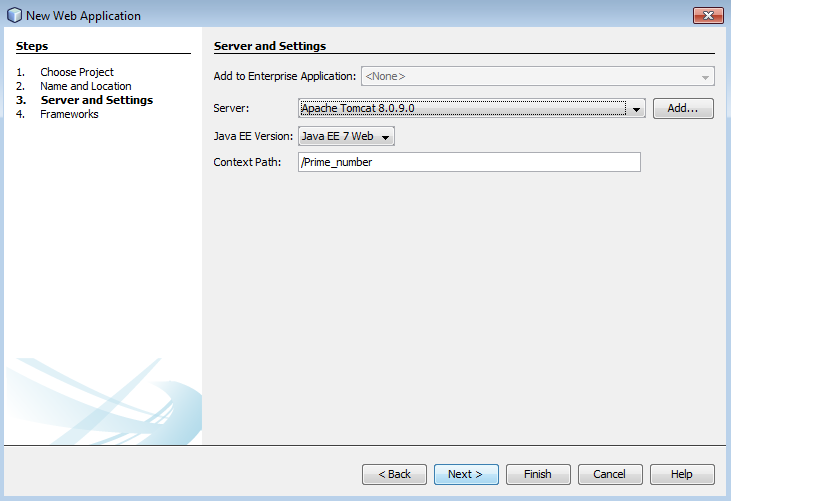
Figure : Creating new Project in NetBeans 8.0 (IV) – Selecting server
- Click on next and select the required server. The default server is Glassfish server. For fast server startup – shutdown as well as fast application access and run, it is advisable to use Apache Tomcat server. The version of Apache should be greater than 7.0.
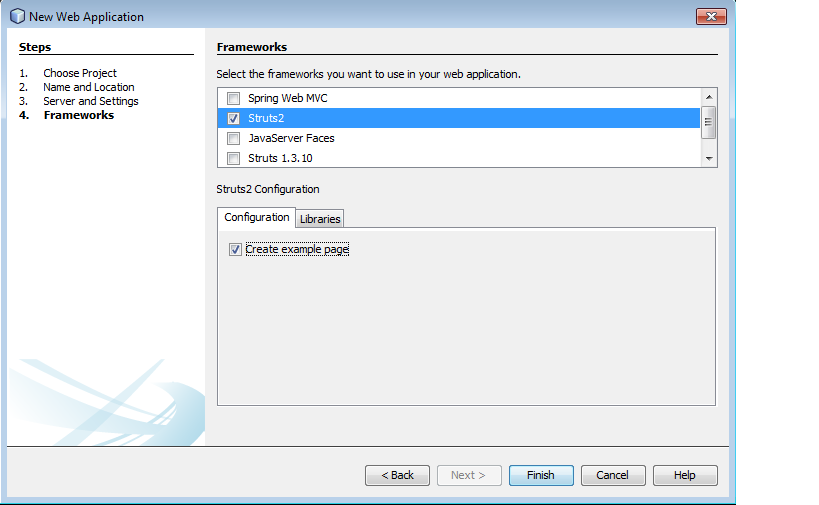
- Then click on next and select the framework you want to use. The current available options are:
- Java Server Faces
- Spring MVC
- Hibernate
- Struts 1.3
- Struts 2
- As Struts 2 is option is available (before installing struts 2 plugin, this option was disabled), select it and click on finish.
- Steps for writing Hello World application:
- The following can be seen after successful creation of the Web application.
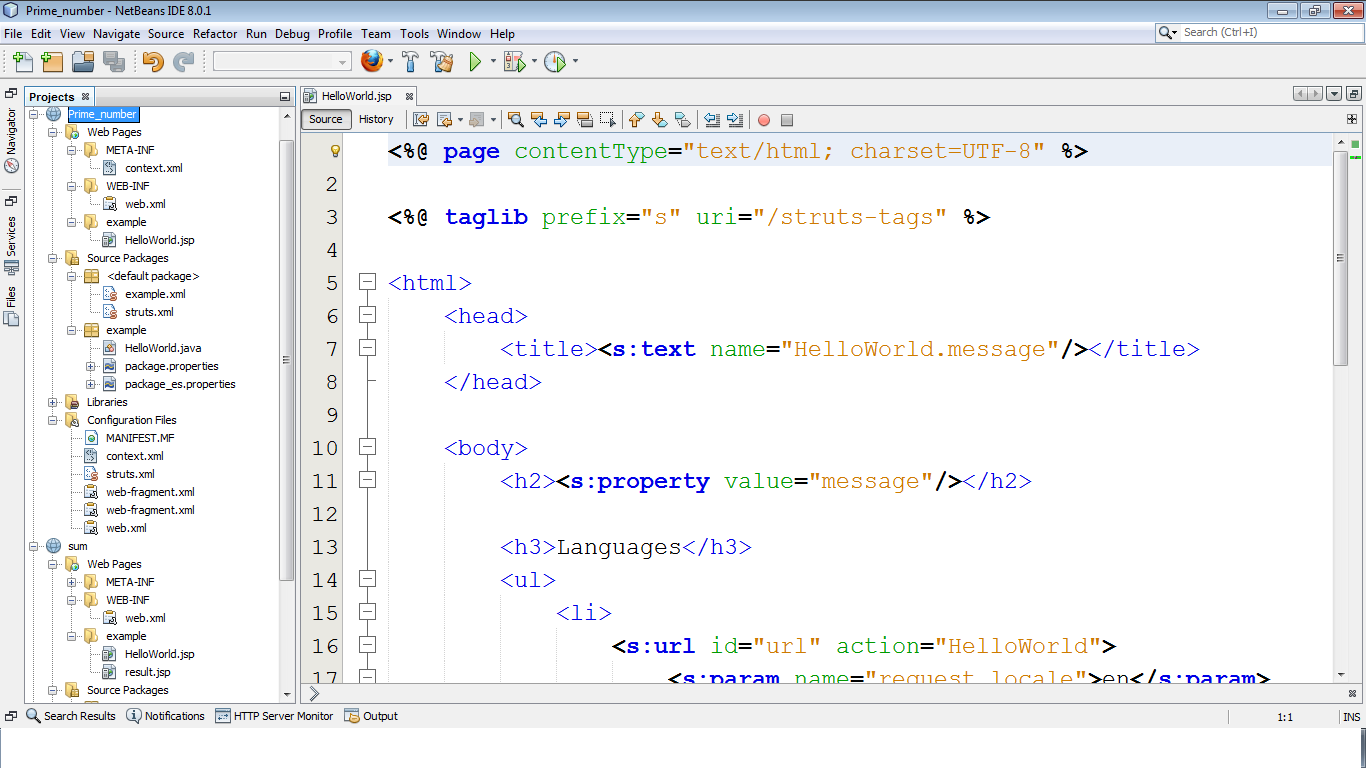
- The things in here are looking a bit complicated. So, let us delete the files which are already given and we will create new files as per our requirements.
- Before deleting anything, let us first understand the directory structure of Struts 2 applications.
- You have been given following :
- Web Application 1
- Web Pages
- Meta – INF
- Context.xml
- Web – INF
- Web.xml
- Example
- HelloWorld.jsp
- Meta – INF
- Source Packages
- Default package
- Example.xml
- Struts.xml
- Example
- HelloWorld.java
- Package.properties
- Package_es.properties
- Default package
- Libraries
- All struts libraries
- Configuration Files
- MANIFEST.MF
- Context.xml
- Struts.xml
- Web-fragment.xml
- Web.xml
- Web Pages
- Web Application 1
- Here, the required things are : (rest all can be deleted)
- Web Application 1
- Web Pages
- Meta – INF
- Context.xml
- Web – INF
- Web.xml
- Meta – INF
- Source Packages
- Default package
- Libraries
- All struts libraries
- Configuration Files
- MANIFEST.MF
- Context.xml
- Web-fragment.xml
- Web.xml
- Web Pages
- Web Application 1
- All the JSP’s (Java Server Pages), responsible for input – output activities are to be placed in the Web Pages folder. All the actions, that is, what should happen on button click or on dropdown menu click etc. are to be placed in source packages folder. And the path to find these and connect these pages are to be placed in “configuration files” folder.
Note : Steps to create Struts Application:
|
- Now the web application is empty and will run nothing. So to begin from scratch, let us create a folder named “jsp” inside the web pages folder. And create “first.jsp” by selecting new Java server pages document.
- As the page is JSP (that is Java Server Page = HTML+ Java), we can embed HTML code in JSP page.
- The requirement here is of a Label to display message, a textfield to retrieve the number and a submit button to process the form. Thus the HTML code will be:
// first.jsp
<%--
This is a comment in JSP (multiline). Normally used to print general information about the document.
    Document   : first
    Created on : Oct 31, 2014, 4:17:20 PM
    Author     : Infinity
--%>

<%@page contentType = "text/html" pageEncoding = "UTF-8"%>
<!DOCTYPE html>
<html>
    <head>
<%--
This is the header section (Optional).
--%>
    <meta http-equiv = "Content-Type" content = "text/html; charset = UTF-8">
        <title> Prime Number </title>
    </head>
    <body>

         <form action = "checkprime" method = "post">
             Enter a number : <input type = "text" name = "x"/>
            <input type = "submit" value = "Click"/>
        </form>
   </body>
</html>
- The same form can be created by using struts tags instead of HTML tags.
- To enable struts tag here, we must include a library with all struts tags. That is “/struts-tags” library is to be added at the top of jsp page. We should set a prefix for this library so that the tags are easily recognizable. The syntax is:
<%@taglib prefix = "s" uri = "/struts-tags" %>
- Here, the prefix suggests that from now onwards, in current page the struts tags will be prefixed by “s”. A prefix can be kept as per your choice. But the same prefix will be used throughout the web page for accessing the struts tags elements and attributes.
- As per our requirement, we need a label, button and a form which encapsulates these elements. So to create the web page, following needs to be added inside <body> tag:
- <s:label value = "Enter a number” name = "label1"/>:
- <s:textfield name = "x"/>: The number will be stored in variable x.
- <s:submit value = "CLICK" name = "submit"/> : Used to submit the button
- So the first.jsp can be coded as follows:
// first.jsp

<%--
    Document   : first
    Created on : Oct 31, 2014, 4:17:20 PM
    Author     : Infinity
--%>

<%@page contentType = "text/html" pageEncoding = "UTF-8"%>
<%@taglib  prefix = "s" uri = "/struts-tags" %>

<!DOCTYPE html>
<html>
    <head>
        <meta http-equiv = "Content-Type" content = "text/html; charset = UTF-8">
        <title> Prime Number </title>
    </head>
    <body>

     <s:form action = "checkprime" method = "post">

            <s:label value = “Enter a number” name = “lable1”/>
            <s:textfield name = "x”/>
             <s:submit value = "CLICK" name = "submit"/>
        </s:form>
    </body>
- After running this jsp, following output can be seen:

- On button click, the page is transferred to “checkprime” action page which is still unavailable. So following error can be seen:
- We also need a result page which displays the name of the user entered in text field after button click. So create another jsp page named as “next.jsp” inside jsp folder.
- Add the following statement to the result page for displaying user name :
The number entered is: <s:property value="answer"/>
- <s:property> tag is used to access the form field names from form elements using value attribute. Make sure that the value for “value” attribute is same as the name of form element you want to fetch.
- So the next.jsp looks like:
// next.jsp
<%@page contentType = "text/html" pageEncoding = "UTF-8"%>
<%@taglib prefix = "s" uri = "/struts-tags" %>
<html>
<body>
        <h1> The number entered is : <s:property value = "answer"/></h1>
</body>
</html>
- Now to create action pages, create a folder named action_jsp inside source packages. The folder here is known as package.
- Create action class “check” inside “action_jsp” package as seen in previous tutorials.
- To make the java class support Actions in Struts, we should always extend it with base class “ActionSupport.java” which is residing under xwork package.
- This action class resembles Java Beans class wherein, support for getter and setter methods for all the input variables must be provided.
- The input variable here is variable “x” (check the name attribute of text field in our form). So the getter setter methods are as follows:
public void setX(int x)
{
           this.x = x;
}
public int getX()
{
    return x;
}
- Now, on button click this class will be executed. We need one more method that returns a string of “success” if the number is prime and the action class is executed successfully.
- That method is check_number (). The “success” string is pre-declared in the properties of Struts actions. This resembles returning true or false based on the successful run of action class.
public String check_number()
{

// our code to check prime..
     return “success”;
}
- So the check java file will be as follows:
//check.java
package action_jsp;

import com.opensymphony.xwork2.ActionSupport;

public class check extends ActionSupport
{
    private int x;
    private String answer;

    public String getAnswer()
    {
        return answer;

    }
    public void setAnswer(String answer)
    {
        this.answer = answer;
    }
    public String check_number()
    {

      int counter = 0;
        for(int i =1 ; i <= x ; i++)
        {
            if(x%i == 0)
            {
                counter++;
            }
        }
        if(counter == 2)
        {
            answer = "prime";
            return "success";
        }
        else
        {
            answer = "not prime";
            return "failure";
        }
    }
    public void setX(int x)
    {
        this.x = x;
    }
    public int getX()
    {
        return x;
    }
}
- Checking prime can be done in two different ways. So, check.java can be also coded as follows:
// check.java

package action_jsp;

import com.opensymphony.xwork2.ActionSupport;
public class check extends ActionSupport
{
    private int x;
    private String answer;
    public String getAnswer()
    {
        return answer;
    }
    public void setAnswer(String answer)
    {
        this.answer = answer;
    }
    public String check_number()
    {

       for(int i = 2 ; i <= x/2 ; i++)
        {
            if(x%i == 0)
            {
                answer = “not prime”;
                return “failure”;
            }

        }
            answer = "prime";
            return "success";
     }
    public void setX(int x)
    {
        this.x = x;
    }
    public int getX()
    {
        return x;
    }
}
- The last thing left is to co-ordinate the action classes with the JSP pages. This can be done by creating struts.xml file. This is also known as configuration file of Struts 2 Framework. The file consists of mapping of actions to respected JSP pages. What should be executed when is specified in here. The file contains mapping inside <struts> tags as follows:
<struts>
   <package name = "default" extends = "struts-default">
      <action name = "Name of action as per action attribute in form tag" class = “class to be executed on this action, on button click”  method = "method to be executed of the class specified">
          <result name = "success">path of page to be displayed on success event(FQN)</result>
          <result name = "failure"> path of page to be displayed on failure event </result>
      </action>
  </package>

</struts>
- In our example, struts.xml can written as:
<!DOCTYPE struts PUBLIC
"-//Apache Software Foundation//DTD Struts Configuration 2.0//EN"
"http://struts.apache.org/dtds/struts-2.0.dtd">

<struts>

    <package name = "default" extends = "struts-default">
        <action name = "checkprime" class = "action_jsp.check" method = "check_number">
            <result name = "success"> jsp/next.jsp </result>
            <result name = "failure"> jsp/next.jsp </result>
        </action>
    </package>
</struts>
- Just like our struts.xml file, we also have the web.xml file (inside the Web – INF folder) which is responsible mainly for session configuration, start-up file configuration, server settings etc.
- In web.xml, change the welcome file (inside welcome file list tag) to our index.jsp. After corrections, web.xml should look like:
<?xml version = "1.0" encoding = "UTF-8"?>
<web-app version = "3.1" xmlns = "http://xmlns.jcp.org/xml/ns/javaee" xmlns:xsi = "http://www.w3.org/2001/XMLSchema-instance" xsi:schemaLocation = "http://xmlns.jcp.org/xml/ns/javaee http://xmlns.jcp.org/xml/ns/javaee/web-app_3_1.xsd">
    <filter>
        <filter-name> struts2 </filter-name>
        <filter-class> org.apache.struts2.dispatcher.FilterDispatcher </filter-class>
    </filter>
    <filter-mapping>
        <filter-name> struts2 </filter-name>
        <url-pattern> /* </url-pattern>
    </filter-mapping>
    <session-config>
        <session-timeout>
            30
        </session-timeout>
    </session-config>
    <welcome-file-list>
        <welcome-file> jsp/first.jsp </welcome-file>
    </welcome-file-list>
</web-app>
- Running the application will show following page:

Figure : first successful run of application
- Enter a number in the text field and click on the button. The action page is executed, which results in success if the number is prime and from the <result> tag, the value for success is executed. That is, the result page is displayed. If the number is not prime, the result returned is failure and the page of <result> tag with failure event will be executed.
The number is fetched from the first form (first.jsp) stored in a variable called “x”. The value of this variable is retrieved using <s:property> tag using value attribute

Figure : enter any number for verification

Figure : Result page (next.jsp)

Figure : Re-enter number for verification