
24.1 Working with Threads
Thread is the basic unit to which the time is allocated by the processor. It is an independent execution path within a program. User can perform multiple tasks at the same time by using threads in a program.
The CPU performs various complex tasks together at the same time. The task includes reading, writing, printing a document, and installing software. All the processes are handled by separate threads. A process executed using one thread is known as single – threaded process. The process is the running instance of a program. A single – threaded application can perform only one task at a time. User has to wait for one task to complete before another task to start.
To execute more than one task at a time, you can create multiple threads in a program. A process executing one or more process is called multithreaded process. Each thread in a process runs at the same time and maintains a different execution flow.
The Thread Model
A program uses threads to increase the CPU efficiency. In a single threaded application, an event loop with pooling is used. Polling is a process in which the single event is executed at a time. A single thread runs in an infinite loop till the operation is completed. When the operation is completed, the event loop sends the control to the appropriate event handler.
Multithreading is used when the software requires user interaction and quick response to the user activities. In a single threaded application, the entire program stops executing when the thread is suspended from execution as it is waiting for the system resources. The waiting time is utilized by the CPU for other tasks.
In C#, the Thread class is used to work with threads. The System.Threading.Thread class is used to construct and access individual threads in a multithreaded application. The first thread to be executed in the process is the main thread.
The main thread is created when the program is executed. The CurrentThread property of the Thread class is used to access the main thread of the program. User can create other threads in the program by using the Thread class. Such threads are called as child threads.
Working with Threads
Working with threads involves creation, managing and destroying threads. The other methods of the Thread class allow managing the lifetime of the thread and destroy the thread when required. The methods are as follows:
1) Start (): It starts the thread in an application.
2) Sleep (): It makes the thread to pause for a period of time
3) Abort (): It terminates the thread
4) Suspend (): It suspends a thread. If the thread is already suspended, it has no effect
5) Resume (): It resumes the suspended thread
Creating Threads
User can create the threads by using the Thread class. The Start() method of the Thread class is used to execute the thread. The code example for creating a Thread is as shown below:
class ThreadApp
{
    public static void childThreadCall()
    {
        Console.WriteLine(“child thread created”);
    }
    static void Main ( string[ ] args )
    {
        ThreadStart t = new ThreadStart ( childThreadCall );
        Console.WriteLine(“Creating child thread”);
        Thread t1 = new Thread ( t );
        t1.Start();
        Console.WriteLine(“User has requested the start of the child thread”);
        Console.Read();
    }
}
The output for the code is as shown below:
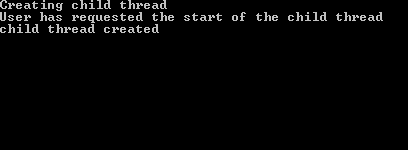
In the code, when the thread is created the method executes on the thread is represented by the ThreadStart delegate. The Start () method is used to execute the thread. The object t1 of the thread class is created. It instantiates the object, the constructor takes the object by passing the ThreadStart class as an argument. As soon as the execution begins, the childThreadCall method is invoked. The method is defined in the ThreadApp class.
Managing Threads
The tasks can be managed by using the various thread methods available in the Thread class. If the user wants to pause for a period of time so that another thread is allowed to execute. The Thread.Sleep () method is called. The method takes single argument representing time in milliseconds for which the thread will pause. The method is static avoiding other methods to call the current thread.
The code sample to demonstrate the Sleep method is as shown below:
class ThreadApp
{
    public static void childThreadCall()
    {
        Console.WriteLine(“child thread started”);
        int sleeptime = 6000;

        Console.WriteLine(“Sleeping for {0} seconds”, sleeptime/1000);
        Console.WriteLine(“Wake up”);

    }
    static void Main ( string[ ] args )
    {
        ThreadStart t = new ThreadStart ( childThreadcall );
        Console.WriteLine ( “Creating child thread”);
        Thread t1 = new Thread(t);
        t1.Start();
        Console.WriteLine (“User has requested the start of the child thread”);
        Console.Read();
    }
}
The output for the code is as shown below:
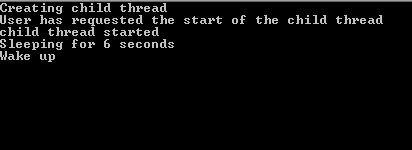
The Sleep () method can be called in many ways. One way is to call the Thread.Sleep method with the value 0, which will cause the current thread to unused balance time slice. Another method is to call the Thread.Sleep method with the parameter as Timeout.Infinite. The thread will sleep infinitely. The thread can be resumed by calling the Interrupt () of the Thread class.
Destroying Thread
The thread can be destroyed by using the Thread.Abort () method. The exception, ThreadAbortException is thrown when the thread is destroyed. This exception cannot be caught. The finally block in the method helps the runtime to send the control to it.
The following code using the Abort method is shown below:
class BasicThreadApp
{
    public static void childThreadCall()
    {
         try
        {
            Console.WriteLine(“Child thread started”);
            Console.WriteLine(“Child thread counting to 10”);
            for ( int i = 0; i<10; i++)
            {
                Thread.Sleep(1000);
                Console.WriteLine(“{0}….”, i );
            }
            Console.WriteLine(“Child thread completed”);
        }
        catch ( ThreadAbortException e )
        {
            Console.WriteLine(“Exception”);
        }
        finally
        {
            Console.WriteLine(“Child thread not able to catch the exception”);
        }
    }
    class Program
    {
        static void Main ( string[ ] args )
        {
            ThreadStart ts = new ThreadStart ( childThreadCall );
            Console.WriteLine(“child thread created”);
            Thread tc = new Thread ( ts );
            tc.Start();
            Console.WriteLine(“Child thread sleeping for 5 seconds”);
            Thread.Sleep(5000);
            Console.WriteLine(“Aborting child thread”);
            tc.Abort();
            Console.Read();
        }
    }
}
The output for the code is as shown below:
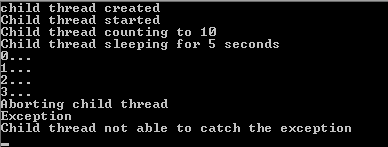
In the above code, the main thread is paused for 5 seconds to make sure that the child thread can be started. The child thread starts counting between the seconds time. When the main thread is resumed after 5 seconds, the child thread is aborted. The exception is thrown by the application. The finally block catches the exception.
24.2 Thread Life Cycle
The life cycle of the thread is started when the object of System.Threading.Thread class is created. The life cycle of the thread ends when the task is completed. The different states of the thread are as mentioned below:
1) Unstarted State
2) Runnable State
3) Not Runnable State
4) Dead State
1) Unstarted State
After creating the instance of Thread class, the thread enters the unstarted state. A new thread is an empty object of the Thread class, and no system resources are allocated to it.
2) Runnable State
The thread remains in the state until the program calls the Start () method. It places the thread in the runnable state. It is also known as ready or started state.
3) Not Runnable State
A thread is not in the runnable state if it is:
1) Sleeping: A thread is placed in the sleeping mode by calling the Sleep () method. The thread enters the runnable state after some specific time
2) Waiting: A thread can be made to wait by calling the Wait () method.
3) Blocked: A thread can be blocked by the I/O operations. The blocked thread enters the not runnable state
4) Dead State: When the statements of the thread method are completed, the thread enters the dead state. It is also known as terminated state. The thread can be forced to dead state by calling the Abort () method. There are no references for the thread in dead state.
24.3 Advantages and Limitations of Multithreading
The advantages of multithreading are as follows;
1) Improved performance: It provides improvement in the performance of the processor by performing computation and I/O operations simultaneously.
2) Minimized system resource: The threads using the same address and reference are used.
3) Access to multiple applications at the same time: It provides access to multiple applications at the same time.
4) Program structure simplification: It simplifies the structure of complex applications. Each activity is written in separate methods.
Limitations of Multithreading
1) Lock starvation: The limitation arises when the execution of the thread is postponed. The threads are executed based on priority by the processor.
2) Race condition: When two or more threads try to access a variable at same time, at least one thread tries to write a value in the variable. This is called race condition.
3) Deadlock condition: The condition occurs when two threads wait for each other to complete their operations for their actions. The two threads are locked and the program fails.
24.4 Creating Multiple Threads
User can create multiple threads in a program using the Thread class. The following code demonstrates the concept.
class thschedule
{
public static void ChildThread1()
{
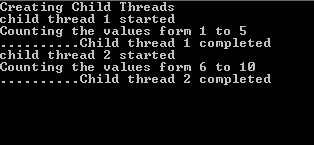
Console.WriteLine(“child thread1 started”);
Console.WriteLine(“Counting the values from 1 to 5 “);
{
for ( int cnt = 0; cnt < 10; cnt++)
{
Console.Write(“.”);
}
Console.WriteLine(“Child thread 1 completed”);
}
public static void ChildThread2()
{
Console.WriteLine(“child thread 2 started”);
Console.WriteLine(“Counting the values from 6 to 10”);
{
for ( int cnt = 0; cnt<10; cnt++)
{
Console.Write(“.”);
}
}
Console.WriteLine(“Child thread 2 completed”);
}
}
class Program
{
static void Main ( string[ ] args )
{
ThreadStart tc1 = new ThreadStart ( ChildThread1 );
ThreadStart tc2 = new ThreadStart ( ChildThread2 );
Console.WriteLine(“Creating Child Threads”);
Thread t1 = new Thread(tc1);
Thread t2 = new Thread(tc2);
t1.Start();
t2.Start();
Console.Read();
}
}
}
The output for the code is as shown below:
24.5 Thread Priority
Thread priority is the property that specifies the priority of one thread with respect to the other thread priority. The execution of multiple threads is scheduled in a single processor. The priority of the thread is defined as follows:
· Above Normal
· Below Normal
· Highest
· Lowest
· Normal
A thread with higher priority runs before the thread will lower priority. If the processor encounters another thread with higher priority, the current thread is pushed back. The lower priority thread starts execution if the higher priority thread stops or becomes not runnable.
A thread can be pushed back to the queue when the time for which the Sleep () method was called on another higher priority thread is over.
User can set the priority of the thread by using the Priority property of the Thread class. The following code snippet sets the priority of the Thread:

In the above code snippet, the ThreadPriority.Highest property specifies the priority setting for a new thread. They are scheduled based on their priority. The scheduling algorithm determines the order in which the threads are executed with each operating system. If there are multiple threads of same priority available, the scheduler gives each thread a fixed time slice in which they can execute.
The following code shows the execution of two child threads with different priorities.
class thschedule
{
    public static void ChildThread1()
    {
        Console.WriteLine(“child thread1 started”);
        Console.WriteLine(“Counting the values from 1 to 5 “);
        {
            for ( int cnt = 0; cnt < 10; cnt++)
            {
                Console.Write(“.”);
            }
            Console.WriteLine(“Child thread 1 completed”);
        }
        public static void ChildThread2()
        {
            Console.WriteLine(“child thread 2 started”);
            Console.WriteLine(“Counting the values from 6 to 10”);
            {
                for ( int cnt = 0; cnt<10; cnt++)
                {
                    Console.Write(“.”);
                }
            }
            Console.WriteLine(“Child thread 2 completed”);
        }
    }
    class Program
    {
        static void Main ( string[ ] args )
        {
            ThreadStart tc1 = new ThreadStart ( ChildThread1 );
            ThreadStart tc2 = new ThreadStart ( ChildThread2 );
            Console.WriteLine(“Creating Child Threads”);
            Thread t1 = new Thread(tc1);
            Thread t2 = new Thread(tc2);
            t1.Start();
            t2.Start();
            Console.Read();
        }
    }
}
In the above code, the priority of thread t1 is set to highest priority and thread t2 id set to the lowest. The properThread.Priority ty Thread.Priority is used to set the priority.
24.6 Synchronizing Threads
Synchronization of threads ensures that two or more thread needs to access a shared resource. User can synchronize the thread by using the synchronize keyword. Only one synchronized method can be invoked at a time.
The concept is based on monitoring. A monitor is an object that is used as a lock to the data members and methods of the class. To enter the monitors object, call a method that has been modified by the synchronized method.
The monitor controls the way in which the methods are accessed by the object or a class. When a thread has a lock, it has entered the monitor. The monitor assures that only one thread has access to the resources at any given time.