
4.1 Purpose of JAX WS Web Service Handler
JAX WS provides a way to customize the web services request and response handling with the help of handler. WS handlers intercept the SOAP Messages in the request on the way from client to server and in the response from the server to the client. SOAP Headers can be used to carry web service specific information and we can access this information using WS handlers
WS handlers also plays role in improving performance of the application. The frequently accessed information can be identified and WS handler methods can be used to cache this information. Whenever the requests related to that information receive from the clients, WS handler retrieves from the cache itself and the response will be sent quickly. Since the request will not be forwarded to the server and the round trip from the client to the server and from the server to the client will be avoided
There are two types of handlers in JAX WS
- SOAP handlers
This handler is used to access the entire SOAP message, including the headers
- Logic handlers
By using logic handlers, the payload of the message only can be accessed
Both the handlers extends javax.xml.ws.Handlers interface
The methods available in the Handler interface :
- handleMessage
- handleFault
- close
Soap Handlers and Handler chain:
We can group many SOAP message handlers to form handler chain
4.2 Implementation Steps with Example
Before starting to implement Web Service Handler, ensure that all the Web Service Java artifacts are already implemented
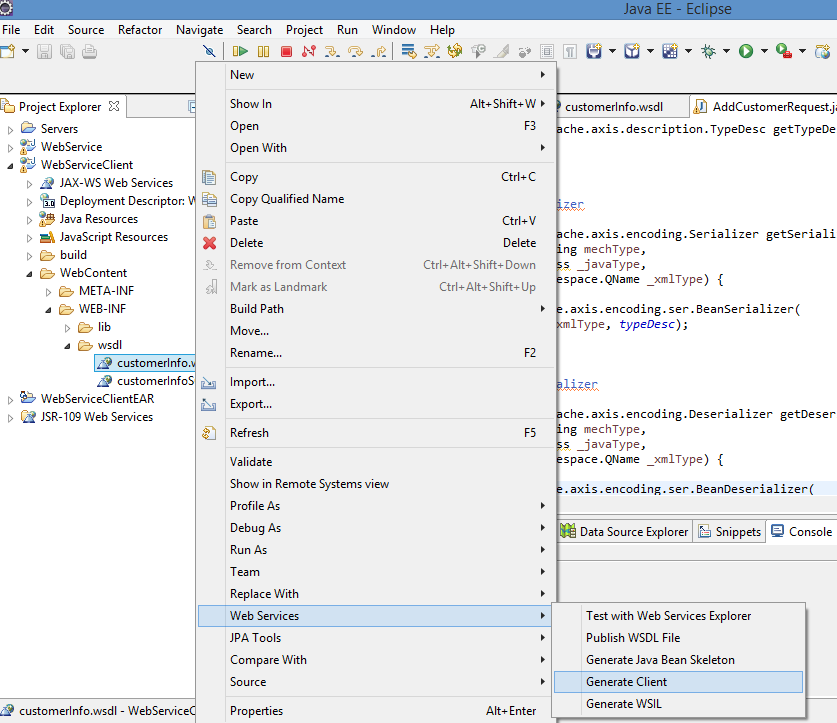
Access File menu in Eclipse select New and select other and enter as shown in Fig 4-1
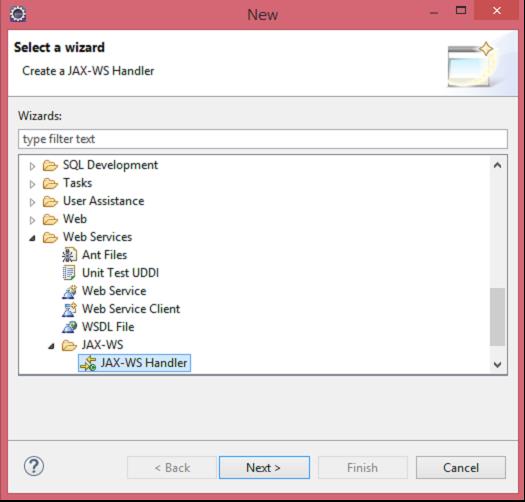
Select JAX- WS Handler from the select window shown in Fig 4-2 and click Next button
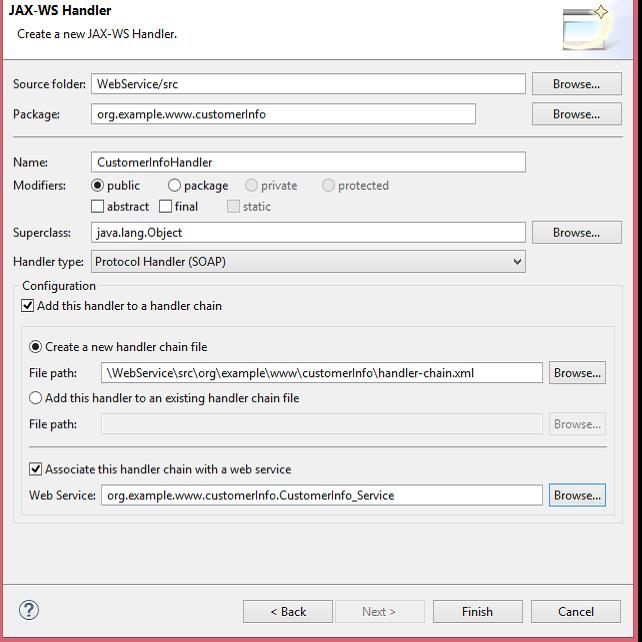
Provide the following details to create new WS Handler as shown in Fig 4-3:
1. Source folder
Enter or browse the src folder from the selected project
2. Package
Select the package name to create the handler class
3. Name of the Handler
Enter the name of the Handler class
4. Handler type
Select the Protocol Handler (SOAP) Handler Type from the drop down
5. Configure Handler chain
Select the package name for creating new handler chain configuration xml file or
Select the existing handler chain file
6. Associate with web service class
Select the appropriate web service or web service implementation classes for which associate this handler class
After providing all the above details, click on Finish button new Handler class will be created
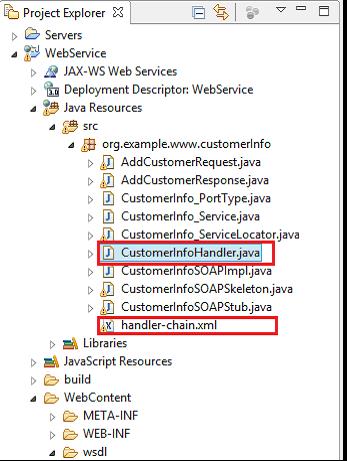
The project structure after creating the Handler class is shown in the Fig 4.4
The project structure after creating the Handler class is shown in the Fig 4.4 The newly created Handler class and the Handler chain xml file are available in the selected package
The generated Handler–chain.xml is shown in fig 4-5 where handler name and handler class have been defined

The default implementation of Handler class has the below methods as shown in the fig 4-6
1. handleMessage:
Since the generated handler is of Soap Protocol handler type, Soap specific information is processed. During normal process, any additional information on the Soap message either inbound or outbound can be processed within this method. This method has SoapMessageContext as the parameter.
2. handleFault:
This method is called if any issues happened in the Soap processing
3. getHeaders:
4. close:
This method also has SoapMessageContext as the parameter and this method can be used for resource cleanup and called after all the handlers complete
