
Introduction
HTML5 introduces a number of new form elements. Some of them are <datalist>, <keygen>, <output>, <progress> and <meter>. In addition to this, there are different input types which we can use with the <input> element. In this section, we are going to look at new form elements one by one. We will have a look at different input types in the next chapter.
<datalist>
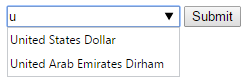
You can use the <datalist> element if you want to provide suggestions for the input, and at the same time allow user to enter inputs on his own. You can implement Google suggest like autocomplete feature using this element. As the user starts typing input, he will see a dropdown list of predefined options. As more characters are entered, the options become more filtered. However, he has the freedom to enter an input that is not available in the provided list. It is the main difference between the <select> and <datalist> element. The <select> element does not restricts the user to select an input from the provided list whereas <datalist> allows the user to select an input from the provided list or enter the input as he wants.
You have to use an <input> element and a <datalist> element together to implement datalist. The value of the list attribute of the <input> element and the id attribute of the datalist element should be the same to bind them together.
Sample Code:
<!DOCTYPE html>
 <html>
  <head>
    <title>Datalist Example</title>
  </head>
  <body>
    <form action="" method="get">
     <input list="currencies" name="currency">
       <datalist id="currencies">
         <option value="United States Dollar">
         <option value="Euro">
         <option value="Japanese Yen">
         <option value="Indian Rupee">
         <option value="United Arab Emirates Dirham">
         <option value="Philippine Peso">
       </datalist>
     <input type="submit">
   </form>
  </body>
</html>
Output:
<keygen>
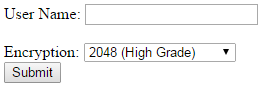
The <keygen> element is used to process forms with more security by creating a public key/ private key pair. The private key is encrypted and stored locally whereas the public key is sent with the form data. You can submit a challenge string along with the public key adding a challenge attribute. You can use the keytype attribute to specify the type of key to generate. The default value of this attribute is rsa and the other possible values are dsa and ec. You will find a significant delay when submitting a form with the generated key.
Sample Code:
<!DOCTYPE html>
 <html>
  <head>
   <title>Keygen Example</title>
  </head>
  <body>
   <form action="process.php" method="post">
     User Name: <input type="text" name="userName"><br /><br />
     Encryption: <keygen name="generateKey"><br />
     <input type="submit">
   </form>
  </body>
</html>
Output:
<output>
The <output> element is used to display the result of a calculation. You can add the for attribute to specify the relationship between the result of the calculation and the elements used in the calculation.
Sample Code:
<!DOCTYPE html>
 <html>
  <head>
    <title>Output Example</title>
  </head>
  <body>
    <form oninput="result.value = parseInt(first.value) + parseInt(second.value)">
     <input name="first" type="number" value="0"> +
     <input name="second" type="number" value="0"> =
     <output name="result" for="first second">0</output>
    </form>
  </body>
</html>
Output:

<meter>
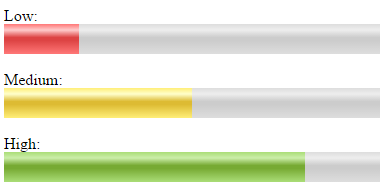
The <meter> element is used to display a measurement on a known scale. You can display your hard disk usage or percentage of students passed in a class using the <meter> element. The color of the meter bar depends on the measurement you display. The measurement can fall in any of the three categories: low, medium or high. The low category will be shown in red color, medium in yellow color and high in green color. You can add the min and max attributes to set the minimum and maximum values on the scale. You can use the value attribute to set the current value. You can also add the low and high attributes to define the boundaries for the three categories.
Sample Code:
<!DOCTYPE html>
<html>
  <head>
   <title>Meter Example</title>
   <style>
    meter
    {
     width:100%;
     height:30px;
    }
   </style>
  </head>
  <body>
   <p>Low: <meter value="20" min="0" max="100" low="25" high="75" optimum="100"></meter></p>
   <p>Medium: <meter value="50" min="0" max="100" low="25" high="75" optimum="100"></meter></p>
   <p>High: <meter value="80" min="0" max="100" low="25" high="75" optimum="100"></meter></p>
  </body>
</html>
Output:
<progress>
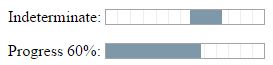
The <progress> element is used to create progress bars. You can display the progress of a file upload using this element. You can specify the value of max attribute to set how much work the task requires in total and the value attribute to set how much of this work has been completed. The browser automatically calculates the percentage of the work that has been completed and adjusts the length of the progress bar accordingly. You can access this percentage in JavaScript using the <progress> element’s position property. Progress bar that has a value attribute is known as being determinate and progress bar that doesn’t have a value attribute is known as being indeterminate. The browser will display determinate and indeterminate progress bars differently as shown below.
Sample Code:
<!DOCTYPE html>
<html>
  <head>
   <title>Progress Example</title>
  </head>
  <body>
    <p>Indeterminate: <progress max="100"></progress></p>
    <p>Progress 60%: <progress value="60" max="100"></progress></p>
  </body>
</html>
Output:
Summary
In this tutorial, we have seen different HTML5 form elements that are useful when creating forms.