
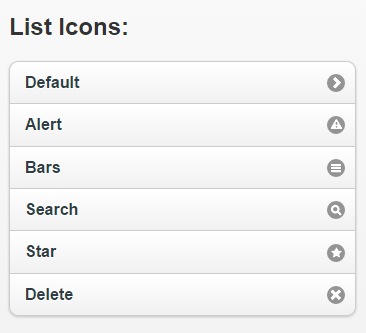
Adding Icons and Images
By default, each clickable list item contains a right arrow (carat-r icon). You can change this icon if you want adding the data-icon attribute to the <li> element and then setting its value to any of the available jQuery Mobile icon.
Try this yourself:
<!DOCTYPE html>
<html>
 <head>
   <title>Sample Code</title>
   <link rel="stylesheet" href="http://code.jquery.com/mobile/1.3.2/jquery.mobile-1.3.2.min.css" />
   <script src="http://code.jquery.com/jquery-1.9.1.min.js"></script>
   <script src="http://code.jquery.com/mobile/1.3.2/jquery.mobile-1.3.2.min.js"></script>
  </head>
 <body>
   <div data-role="page" id="lists">
    <div data-role="content">
     <h2>List Icons:</h2>
     <ul data-role="listview" data-inset="true">
       <li><a href="#">Default</a></li>
       <li data-icon="alert"><a href="#">Alert</a></li>
       <li data-icon="bars"><a href="#">Bars</a></li>
       <li data-icon="search"><a href="#">Search</a></li>
       <li data-icon="star"><a href="#">Star</a></li>
       <li data-icon="delete"><a href="#">Delete</a></li>
     </ul>
    </div>
   </div>
 </body>
</html>
Save the file as icons.html and open it using your browser. You will get a screen like this:
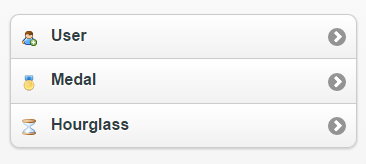
If you want to add standard 16*16 pixel icons to your items, then you need to add an <img> element inside the list item and then add the class ui-li-con to the <img> element.
Try this yourself:
<!DOCTYPE html>
<html>
<head>
<title>Sample Code</title>
<link rel="stylesheet" href="http://code.jquery.com/mobile/1.3.2/jquery.mobile-1.3.2.min.css" />
<script src="http://code.jquery.com/jquery-1.9.1.min.js"></script>
<script src="http://code.jquery.com/mobile/1.3.2/jquery.mobile-1.3.2.min.js"></script>
</head>
<body>
<div data-role="page" id="lists">
  <div data-role="content">
    <ul data-role="listview" data-inset="true">
      <li><a href="#"><img src="usericon.png" alt="user" class="ui-li-icon">User</a></li>
      <li><a href="#"><img src="medalicon.png" alt="Medal" class="ui-li-icon">Medal</a></li>
      <li><a href="#"><img src="hourglassicon.png" alt="Hourglass" class="ui-li-icon">Hourglass</a></li>
    </ul>
  </div>
</div>
</body>
</html>
Save the file as smallicons.html and open it using your browser. You will get a screen like this:
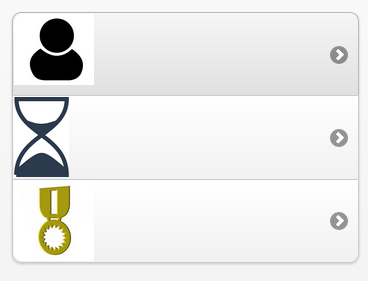
The images could be different based on what you add.
You can also add images inside a list item by just adding an <img> element as the first item without any class name. jQuery Mobile will automatically scale its size to 80*80 pixels.
Try this yourself:
<!DOCTYPE html>
 <html>
  <head>
   <title>Sample Code</title>
   <link rel="stylesheet" href="http://code.jquery.com/mobile/1.3.2/jquery.mobile-1.3.2.min.css" />
   <script src="http://code.jquery.com/jquery-1.9.1.min.js"></script>
   <script src="http://code.jquery.com/mobile/1.3.2/jquery.mobile-1.3.2.min.js"></script>
  </head>
  <body>
   <div data-role="page" id="lists">
    <div data-role="content">
      <ul data-role="listview" data-inset="true">
        <li><a href="#"><img src="user.png"></a></li>
        <li><a href="#"><img src="hourglass.png"></a></li>
        <li><a href="#"><img src="medal.jpg"></a></li>
     </ul>
    </div>
   </div>
 </body>
</html>
Save the file as thumbnails.html and open it using your browser. You will get a screen like this:
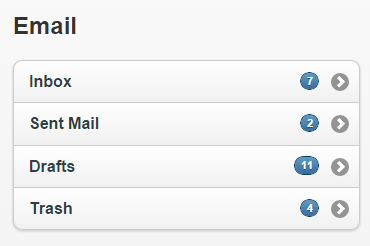
Adding Count Bubbles
You can add count bubbles to the list items to indicate the number associated with the items. You could see count bubbles when you open your gmail or yahoo mail account. You could see count bubbles for Inbox, Drafts, Sent Mail, Trash etc. To add a count bubble, you have to use an inline element like <div> or <span> and add the class ui-li-count. You can add a theme for the count bubbles by adding data-count-theme to the list and specifying a swatch letter.
Try this yourself:
<!DOCTYPE html>
<html>
 <head>
  <title>Sample Code</title>
  <link rel="stylesheet" href="http://code.jquery.com/mobile/1.3.2/jquery.mobile-1.3.2.min.css" />
  <script src="http://code.jquery.com/jquery-1.9.1.min.js"></script>
  <script src="http://code.jquery.com/mobile/1.3.2/jquery.mobile-1.3.2.min.js"></script>
 </head>
 <body>
  <div data-role="page" id="lists">
   <div data-role="content">
    <h2>Email</h2>
    <ul data-role="listview" data-inset="true" data-count-theme="b">
      <li><a href="#">Inbox<span class="ui-li-count">7</span></a></li>
      <li><a href="#">Sent Mail<span class="ui-li-count">2</span></a></li>
      <li><a href="#">Drafts<span class="ui-li-count">11</span></a></li>
      <li><a href="#">Trash<span class="ui-li-count">4</span></a></li>
    </ul>
   </div>
  </div>
 </body>
</html>
Save the file as countbubbles.html and open it using your browser. You will get a screen like this:
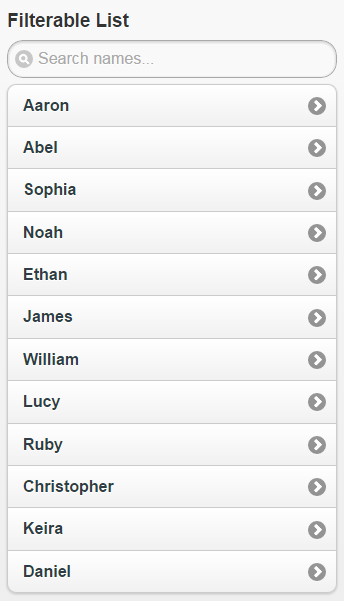
Making Lists Filterable
You can make a list filterable by just adding the data-filter attribute and setting its value to true. jQuery Mobile will then add a search box above the list which will filter only the items that contain the characters entered in the search box. The text in the search box is “Filter items….” by default. If you want to change it, use the data-filter-placeholder attribute and set the required value. You can add a theme for the search box by adding data-filter-theme to the list and specifying a swatch letter. If you do not want all the list items to be displayed when the search box is empty, then add the data-filter-reveal attribute and set its value to true.
Try this yourself:
<!DOCTYPE html>
<html>
 <head>
  <title>Sample Code</title>
  <link rel="stylesheet" href="http://code.jquery.com/mobile/1.3.2/jquery.mobile-1.3.2.min.css" />
  <script src="http://code.jquery.com/jquery-1.9.1.min.js"></script>
  <script src="http://code.jquery.com/mobile/1.3.2/jquery.mobile-1.3.2.min.js"></script>
 </head>
 <body>
  <div data-role="page" id="lists">
   <div data-role="content">
    <h3>Filterable List</h3>
    <ul data-role="listview" data-filter="true" data-filter-placeholder="Search names..." data-inset="true">
      <li><a href="#">Aaron</a></li>
      <li><a href="#">Abel</a></li>
      <li><a href="#">Sophia</a></li>
      <li><a href="#">Noah</a></li>
      <li><a href="#">Ethan</a></li>
      <li><a href="#">James</a></li>
      <li><a href="#">William</a></li>
      <li><a href="#">Lucy</a></li>
      <li><a href="#">Ruby</a></li>
      <li><a href="#">Christopher</a></li>
      <li><a href="#">Keira</a></li>
      <li><a href="#">Daniel</a></li>
    </ul>
   </div>
  </div>
 </body>
</html>
Save the file as filterablelist.html and open it using your browser. You will get a screen like this:
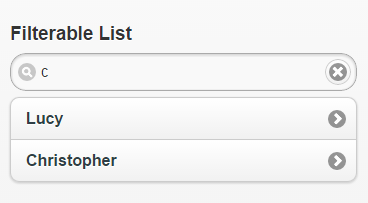
Suppose you enter c in the search box, then your list will look like this:
Summary
In this section, we have seen how to create a mobile optimized list and then style it, divide it, add icons and images and even make it filterable.