
After designing the interface of app, to provide functionality and lively look to this app, a developer should write code for it. To make an app functional, we have to define application logic and integrate that logic with UI of the app.
Application logics are defined using event handlers; those are integrated with events, performed by users. Event handlers are basically associated with the UI elements that raise events, but in case of routed events, these can be associated with other UI elements also.
Event handlers are defined in code behind file. In windows store app events may be of various types like: Tapped, DoubleTapped, DragEnter, Drop, GotFocus, KeyUp, KeyDown and many more. These events are Control specific. For eg. A button control may has events like: Click, Tapped and a GridView may has SelectionChanged event
Defining Event Handlers:
An event handler is the code that is to be executed whenever corresponding event rose. Every event handler has two parameters. The first parameter is an instance of the object class that represents the control. The second parameter is an instance of the EventArgs class or its subclass. It represents the event data like source of event and type of control on which event has occurred.
The syntax of Event handler is as follows:
<AccessSpecifier> <ReturnType> <NameOfEventHandler> (object <sender>, <EventArgsClass> <eventData>)
{
}
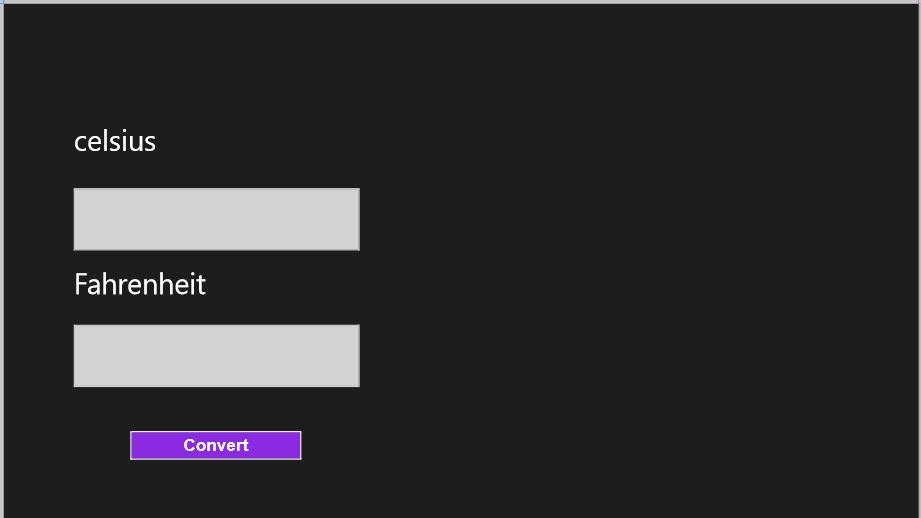
Exercise: Consider a scenario where we have to design a temperature converter app, which accept temperature in Celsius and converts it in Fahrenheit. For this we should create two TextBlocks, two TextBoxes and a button control showing in following snapshot:
Solution:
- Open a Windows store project application.
- Use the following Xaml code to create the interface.
<Page
    x:Class="App3.MainPage"
    xmlns="http://schemas.microsoft.com/winfx/2006/xaml/presentation"
    xmlns:x="http://schemas.microsoft.com/winfx/2006/xaml"
    xmlns:local="using:App3"
    xmlns:d="http://schemas.microsoft.com/expression/blend/2008"
    xmlns:mc="http://schemas.openxmlformats.org/markup-compatibility/2006"
    mc:Ignorable="d">
    <Viewbox>
<Grid Background="{StaticResource ApplicationPageBackgroundThemeBrush}" Height="900" Width="1600">
<TextBlock Text="celsius" FontSize="50" Margin="122,212,1002,623"></TextBlock>
<TextBox x:Name="txtDegreeCelsius" FontSize="70" Margin=”122,322,978,469" Width="500"></TextBox>
<TextBlock Text="Fahrenheit" FontSize="50" Margin="122,463,931,377"></TextBlock>
<TextBox x:Name="txtDegreeFahrenheit" FontSize="70" Margin="122,561,978,230" Width="500"></TextBox>
<Button x:Name="bttn" Background="BlueViolet" FontFamily="Arial" Content="Convert" HorizontalAlignment="Left" Height="56" FontSize="30" Margin="218,744,0,0" VerticalAlignment="Top" Width="305" Click="bttn_Click"/>
    </Grid>
 </Viewbox>
</Page>
- To provide the functionality, use the following code in MainPage.xaml.cs (Code behind file)
using System;
using System.Collections.Generic;
using System.IO;
using System.Linq;
using Windows.Foundation;
using Windows.Foundation.Collections;
using Windows.UI.Xaml;
using Windows.UI.Xaml.Controls;
using Windows.UI.Xaml.Controls.Primitives;
using Windows.UI.Xaml.Data;
using Windows.UI.Xaml.Input;
using Windows.UI.Xaml.Media;
using Windows.UI.Xaml.Navigation;
// The Blank Page item template is documented at http://go.microsoft.com/fwlink/?LinkId=234238
namespace App3
{
    /// <summary>
    /// An empty page that can be used on its own or navigated to within a Frame.
    /// </summary>
    public sealed partial class MainPage : Page
    {
       public MainPage()
        {
            this.InitializeComponent();
        }
        private void bttn_Click(object sender, RoutedEventArgs e)
        {
         if (!string.IsNullOrEmpty(txtDegreeCelsius.Text.Trim())){
                double tempc, tempf;
                tempc = Convert.ToDouble(txtDegreeCelsius.Text);
                tempf = tempc * 9 / 5 + 32;
                txtDegreeFahrenheit.Text = Convert.ToString(tempf);
          }
         else
            {
                txtDegreeFahrenheit.Text = "Invalid input";
            }
        }
        /// <summary>
        /// Invoked when this page is about to be displayed in a Frame.
        /// </summary>
        /// <param name="e">Event data that describes how this page was reached.  The Parameter
        /// property is typically used to configure the page.</param>
        protected override void OnNavigatedTo(NavigationEventArgs e)
        {
        }
    }
}
- After writing the code, press F6 button to build application. Or choose Build-> Build Solution.
- To execute the app press F5 or choose
 button from toolbar
Following screen will show
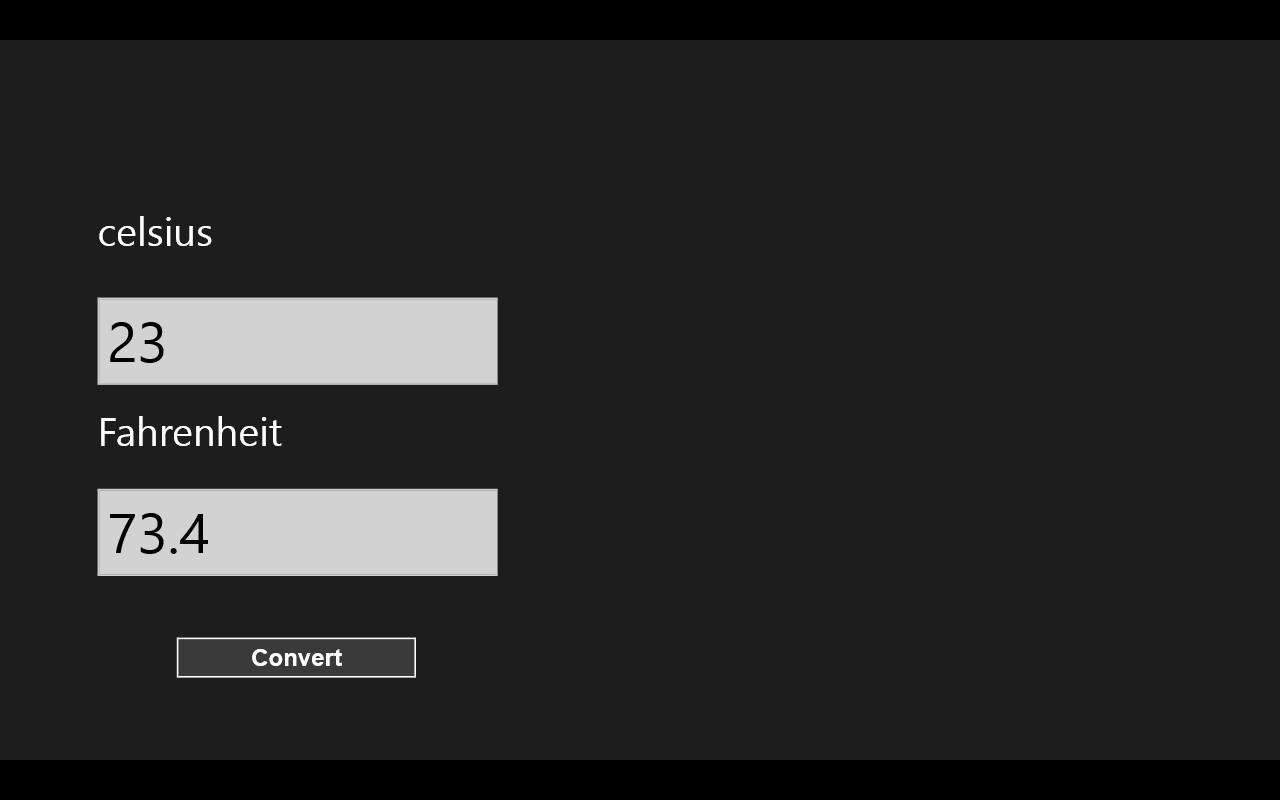
- Enter temperature in Celsius text box and click on Convert button.
- Result will be displayed in Fahrenheit text box.
In the above code we can see in Button control Click event is used as:
Click=”bttn_Click” , wher bttn_Click is event handler and it is defined in code behind file MainPage.xaml.cs
The output of above code is as:
Event handler defined in code behind file:

Associating Event handler with UI Elements:
In Window store apps Event handlers can be associated with UI elements in two ways:
- Using XAML code
- Using C# code
Using XAML code:
Using this method we can associate event handler to controls at design time. That means we can’t use this method for the controls those are dynamically added to the app.
In the preceding example, we have used this method as shown in following code:
<Button x:Name="bttn" Background="BlueViolet" FontFamily="Arial" Content="Convert"
HorizontalAlignment="Left" Height="56" FontSize="30" Margin="218,744,0,0"
VerticalAlignment="Top" Width="305" Click="bttn_Click"/>
Using C# code
To associate an event handler with UI element using C# code, we should use following syntax:
<ControlName>. <EventName> += <EventHandlerName>;
Like:
bttn.Click+=bttn_Click;
In above code bttn_Click event handler is associated with Click event of bttn button
Handling Routed Events
When we create the design of a window store app, all the UI elements are arranged in the form of element tree. Each UI element can have zero or more children and one parent element. This hierarchy is known as visual tree.
For eg in a scientific calculator app, all the numeric and symbol keys can be separately arranged in two Grid controls, along with a TextBox and a Page container. It forms a visual tree as:
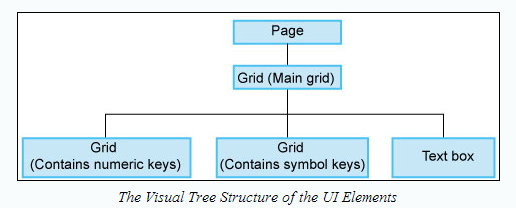
Further a button control may contain numeric and symbol keys made up of several UI elements in the form of hierarchy.
In this case to make an app functional, we have to define event handler for each UI element. In case of Routed event, event occurred in a UI element is passes to its parent and this process continues until the event reaches the root of the tree, and is called Bubbling process.
Defining Routed Event Handlers
To use routed event, we can define a common event handler for a group of controls and then associate it with an element that is ancestor of this group of controls.
Following syntax can be used for it:
private void grdNumerickeys_Tapped(object sender, RoutedEventArgs e)
{
}
We can use two properties of the RoutedEventArgs instance to access the event data:
- OriginalSource
It contains a reference of the source where the event was raised.
- Handled
Is used to determine whether the routed event is handled or not at current level. There are two possible values of this property true or false. Default is false.
For eg in the preceding example of calculator app, if we need that whenever a user tapped any key, that number should be displayed in TextBox. We can define and associate a single event handler for all the numeric keys.
private  void grdNumericKeys_Tapped(object sender, TappedRoutedEventArgs e)
{
    UIElement sourceControl= e. OriginalSource as UIElement;
    while(sourceControl!=null && sourceControl!=sender as UIElement)
    {
        If(sourceControl is Button)
        {
            Button bttnTapped=sourceControl as Button;
            txtblkResult.Text+=bttnTapped.Content.ToString();
            break;
        }
        sourceControl=VisualTreeHelper.GetParent(sourceControl) as UIElement;
    }