
Eclipse Plugin Wizards
If you use Eclipse IDE for java development then you must have used Wizards extensively for example, while creating Java class or while new Projects etc.
Wizards are helpful in performing repetitive tasks for ex: New Java Class wizard takes information from user and create java class template. Depending upon user input it is also generate main method, abstract methods from super class etc.
JFace has two interface's org.eclipse.jface.wizard.IWizard and org.eclipse.jface.wizard.IWizardPage which are useful in creating wizards. So each wizard consists of one or more pages. In order to take huge data as input we can divide the input data into logical sets and display each such set on every page of the wizard. For example: We want to take employee information, On first page we can take personal information such as first name, last name, age etc. On second page we can gather address information and so on. In order to make things simple for us JFace also provides corresponding abstract classes which we will use in our examples. First we will see how to construct an wizard and thereafter we will move on to understand how we can open up wizards.
Creating Wizard Pages
Open Resource Manager plugin project and create a new java class as described in steps below:
1. Create new package in project name it com.myplugin.rmp.wizards
2. Create a new Wizard Page (PersonalInformationPage) by creating java class as shown in figure below
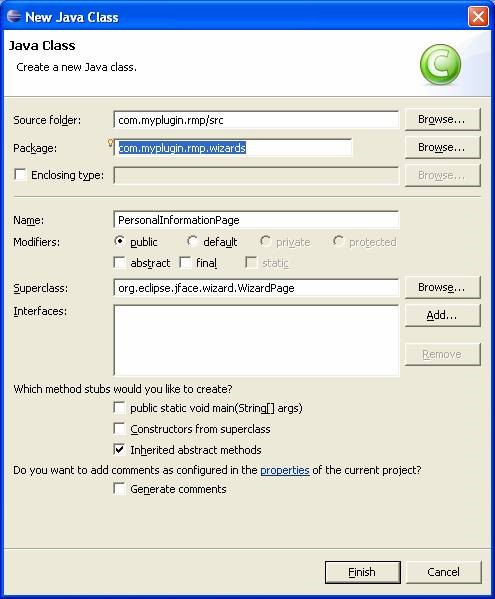
Figure 6-3
3. Modify the above generated class as shown below:
package com.myplugin.rmp.wizards;
import org.eclipse.jface.wizard.WizardPage;
import org.eclipse.swt.SWT;
import org.eclipse.swt.layout.GridData;
import org.eclipse.swt.layout.GridLayout;
import org.eclipse.swt.widgets.Composite;
import org.eclipse.swt.widgets.Label;
import org.eclipse.swt.widgets.Text;
public class PersonalInformationPage extends WizardPage {
     Text firstNameText;
     Text secondNameText;
     protected PersonalInformationPage(String pageName) {
              super(pageName);
              setTitle("Personal Information");
              setDescription("Please enter your personal information");
     }
     public void createControl(Composite parent) {
              Composite composite = new Composite(parent, SWT.NONE);
              GridLayout layout = new GridLayout();
               layout.numColumns = 2;
               composite.setLayout(layout);
               setControl(composite);
               new Label(composite,SWT.NONE).setText("First Name");
               firstNameText = new Text(composite,SWT.NONE);
               new Label(composite,SWT.NONE).setText("Last Name");
               secondNameText = new Text(composite,SWT.NONE);
     }
}
4. Create another Wizard page (AddressInformationPage) class and modify it as follows:
package com.myplugin.rmp.wizards;
import org.eclipse.jface.wizard.WizardPage;
import org.eclipse.swt.SWT;
import org.eclipse.swt.layout.GridLayout;
import org.eclipse.swt.widgets.Composite;
import org.eclipse.swt.widgets.Label;
import org.eclipse.swt.widgets.Text;

public class AddressInformationPage extends WizardPage {
     Text street;
     Text city;
     Text State;

     protected AddressInformationPage(String pageName) {
              super(pageName);
              setTitle("Address Information");
              setDescription("Please enter your address information");
     }
     public void createControl(Composite parent) {
              Composite composite = new Composite(parent, SWT.NONE);
              GridLayout layout = new GridLayout();
              layout.numColumns = 2;
              composite.setLayout(layout);
              setControl(composite);
              new Label(composite,SWT.NONE).setText("Street");
              street = new Text(composite,SWT.NONE);
              new Label(composite,SWT.NONE).setText("City");
              city = new Text(composite,SWT.NONE);
              new Label(composite,SWT.NONE).setText("State");
              state = new Text(composite,SWT.NONE);
     }
}
5. Create a new Wizard name it CaptureEmployeeInfomrationWizard as shown below:

Figure 6-4
6. Modify the above created class as shown below:
package com.myplugin.rmp.wizards;
import org.eclipse.jface.wizard.Wizard;
public class CaptureEmployeeInfomrationWizard extends Wizard {
     PersonalInformationPage personalInfoPage;
     AddressInformationPage addressInfoPage;

     public void addPages() {
              personalInfoPage = new PersonalInformationPage("Personal Information Page");
              addPage(personalInfoPage);
              addressInfoPage = new AddressInformationPage("Address Information");
              addPage(addressInfoPage);
     }
     public boolean performFinish() {
              return false;
     }
}
Test newly created wizard
In order to test this wizard Modify run method of com.myplugin.rmp.ResourceManagerViewActionDelegate created in earlier chapter to open up the wizard when user clicks on View tool bar action
public void run(IAction action) {
         CaptureEmployeeInfomrationWizard wizard = new CaptureEmployeeInfomrationWizard();
         WizardDialog dialog = new WizardDialog(view.getSite().getShell(), wizard);
         dialog.create();
         dialog.open();
}
From Overview tab of Manifest editor - launch eclipse to test your changes. Open Resource Manager Perspective and click on toolbar action to open up wizard (See image below).
