
Action represent user actions such as “Run”, “Debug”, “Save to file”, “Search” or “Go to marker”. Actions are attached to buttons, tool/menu bars in an eclipse application. Actions run method is called whenever end user clicks on menu item or button. This chapter covers all this with examples that show how to use actions and action sets in the example Resource Manager plug-in. Following figure shows the many areas where a plug-in can contribute actions. It includes Context menu of a view or editor, to local toolbar and pull down menu of a view, to the main toolbar and menu bar of the workbench window. In course of this tutorial we will add actions to various places in workbench window. However, at this time some of these actions may not do anything useful other then displaying some pop up message or opening up resource manager view. During the course of this tutorial we will re-visit these actions to add more meaningful implementation.
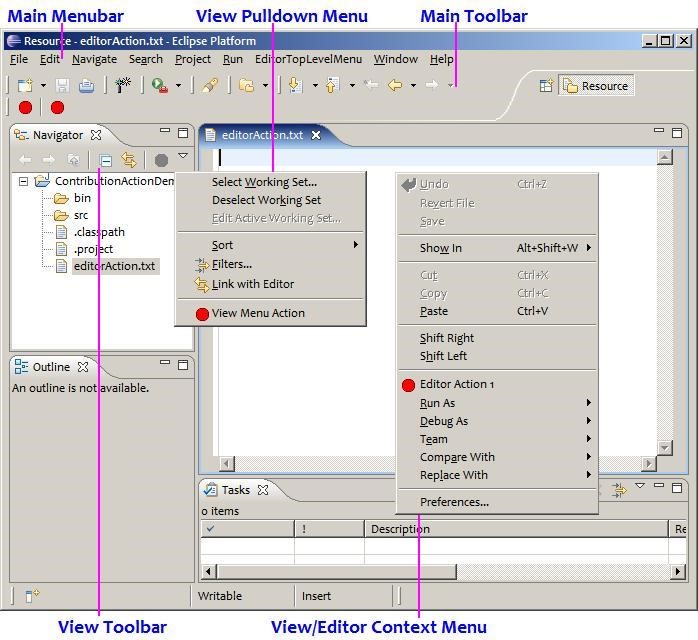
Figure 5-1
Adding actions to Main Menu bar and Main Toolbar
Now we will add a menu to the main menu bar and a button to the main toolbar. Both of these open the Resource manager view when clicked by the user. Open the Resource Manager plug-in manifest editor, Next navigate to Extensions page followed by clicking on the "Add" button. Select org.eclipse.ui.actionSets from the list and then Click on the Finish button.
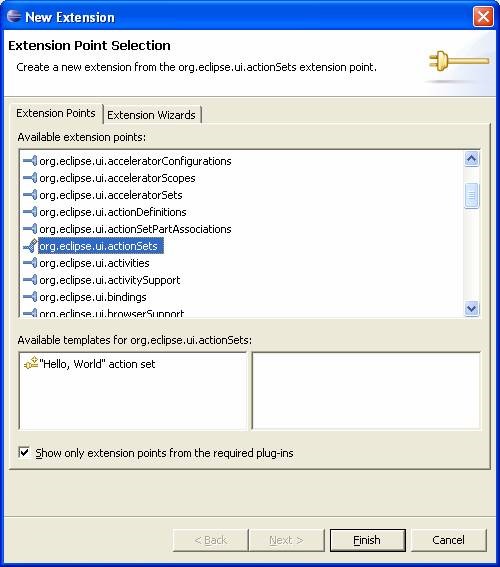
Figure 5-2
Navigate back to the Extensions page. Open right click context menu on the org.eclipse.ui.actionSets item and select New > actionSet (See Image below).
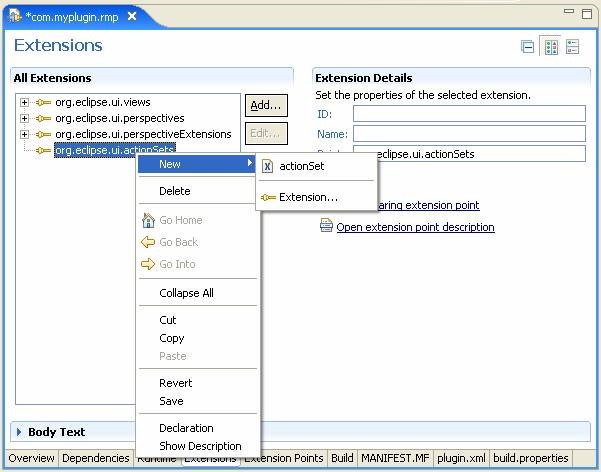
Figure 5-3
Once new com.myplugin.rmp.actionSet1 is added, Select this action set and modify its properties as shown below.
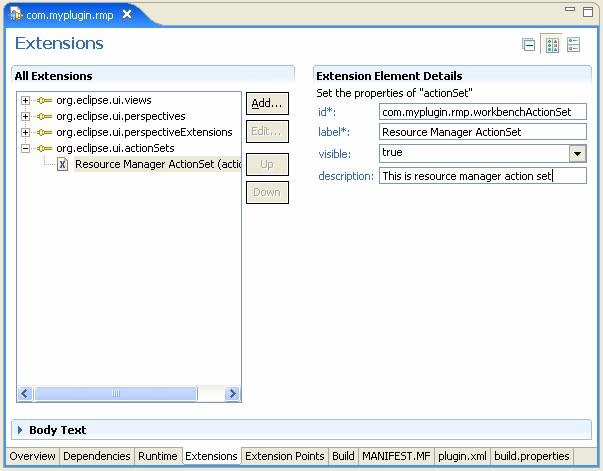
Figure 5-4
Next, add a menu to the main menu bar by opening up the right click context menu on the action set followed by selecting New > menu (As shown below)
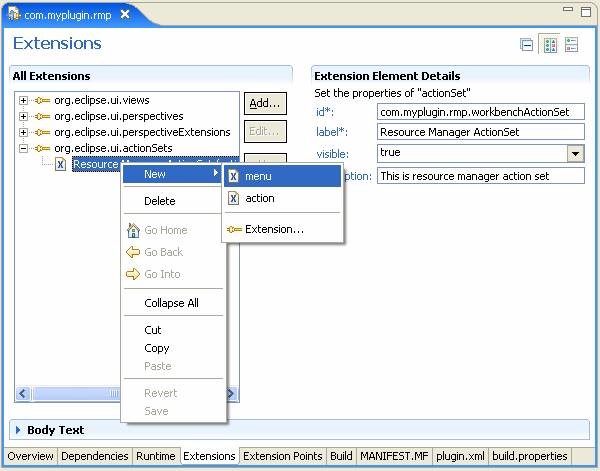
Figure 5-5
Next, Select the menu and modify its properties as shown below. Notice the path attribute, we have specified its value as “additions”. For now don’t worry about this attribute, we will discuss it in section to follow.
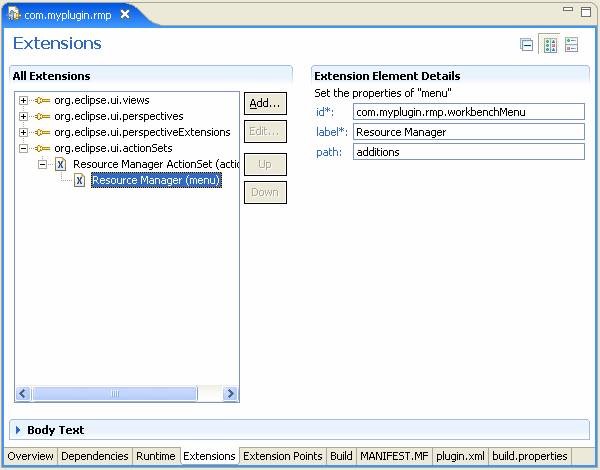
Figure 5-6
Working With Groups
When working with menu’s we often define groups. So we will have menu’s - which will have groups and actions will be added to groups. So first some groups need to be defined. Two types of groups are available – Separator and groupMarker. A separator group displays a horizontal line. We will now create both of these groups. First we create a groupMarker by opening up right click context menu on Resource Manager menu and select New followed by groupMarker. Select the groupMarker and change its name to "content" Next define second group to the Resource Manager menu; by selecting New followed by separator and change its name to "additions".
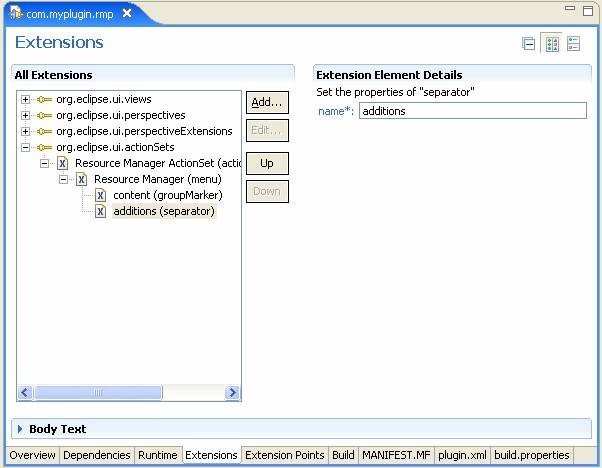
Figure 5-7
We will use this groups when we create actions discussed next. Take a minute to look back at path attribute which we provided at the time of creating menu inside action set. We defined “additions” in the path attribute, this is nothing but a predefined group.
Next, we will define the action itself. Open right click context menu on the Resource Manager ActionSet and select New followed by action. Modify action properties as shown below:
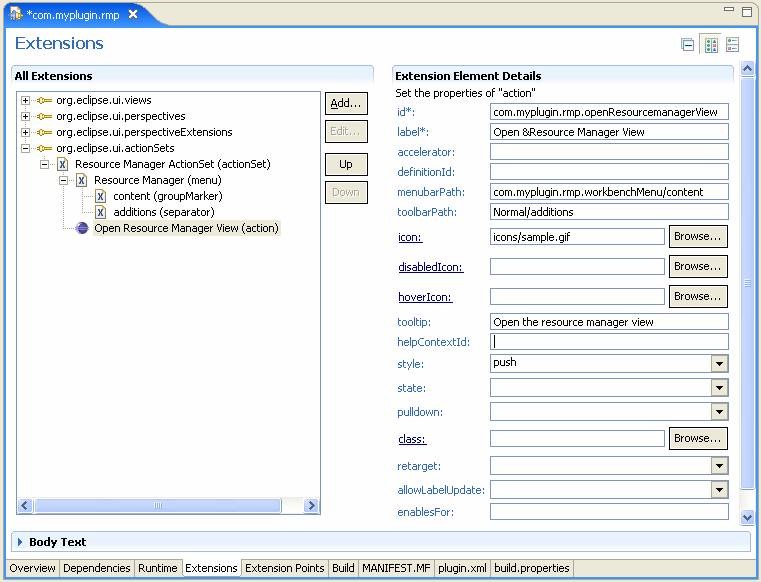
Figure 5-8
Almost every attribute is self descriptive, However following attributes require special attention:
menubarPath: We have entered “com.myplugin.rmp.workbenchMenu/content” in this attribute. Notice that the first part is same as the id attribute of Resource Manager menu created earlier and the second part i.e. content is the name of the group created earlier. So this full statement means that we want to add this action to Resource Manager Menu under content group.
toolbarPath: We have entered "Normal/additions" to this attribute. The first part is the id of toolbar where we would like to add this action. Note that eclipse has only single toolbar and its id is “Normal”. Second part is again a predefined group in toolbar. So the complete statement specifies that we would like to add this action to Normal toolbar under additions group.
Working with action delegate
Action delegate is a class which implements the behavior associated with the action. All above steps have no meaning until we specify the behavior associated with the action. When we say behavior, it essentially means what action will be triggered when user clicks on the menu item or toolbar button. Next, we will create a action delegate class.
Click on the "class" link on the left of the class Text Box.
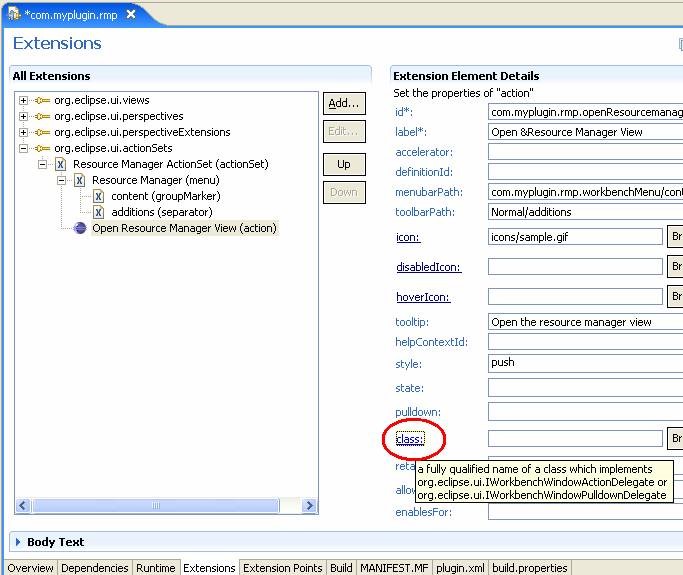
Figure 5-9
Clicking the class label will open up the Java Attribute Editor for the action's class.
In Package text box, provide "com.myplugin.rmp.actions" and "OpenResourceManagerViewActionDelegate" as Name. Click on the Finish button
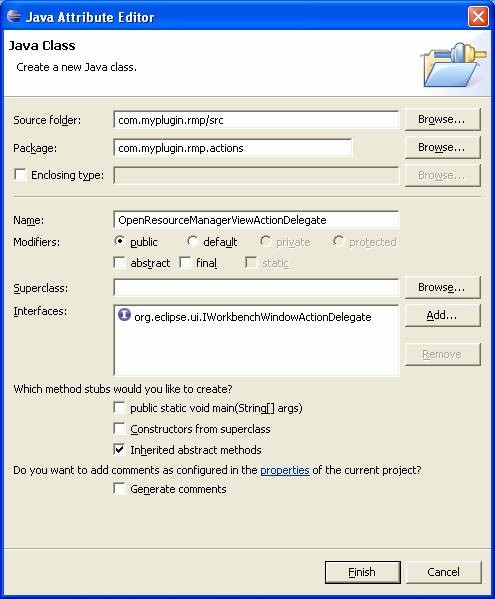
Figure 5-10
Modify the class as shown below:
package com.myplugin.rmp.actions;
import org.eclipse.jface.action.IAction;
import org.eclipse.jface.viewers.ISelection;
import org.eclipse.ui.IWorkbenchPage;
import org.eclipse.ui.IWorkbenchWindow;
import org.eclipse.ui.IWorkbenchWindowActionDelegate;
import org.eclipse.ui.PartInitException;

public class OpenResourceManagerViewActionDelegate implements IWorkbenchWindowActionDelegate {

        private IWorkbenchWindow window;
        public static final String ID = "com.myplugin.rmp.views.ResourceManagerView";

        public void init(IWorkbenchWindow window) {
           this.window = window; // cache the window object in which action delegate is operating
        }
        public void dispose() {}

        public void run(IAction action) {

                IWorkbenchPage page = window.getActivePage();

                try {
                     page.showView(ID); // use the Resource Manager View id to open up view.

                } catch (PartInitException e) {

                }
        }
        public void selectionChanged(IAction action, ISelection selection) {}
}
Testing the new action
launch the Runtime Workbench. You will see that action have been added to main menu bar and a push button has been added to main toolbar. Clicking on anyone of these will open up Resource Manager View.
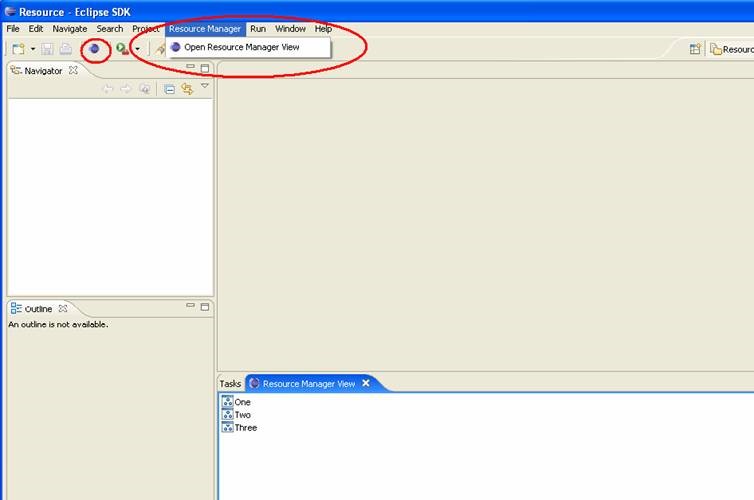
Figure 5-11