
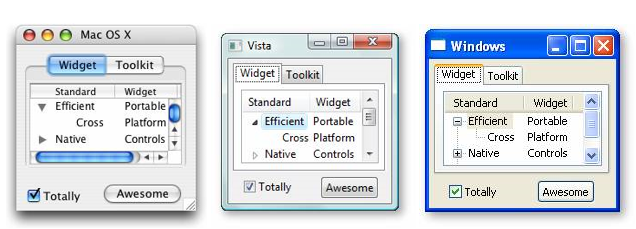
Standard Widget Toolkit (SWT) is the foundation on which entire Eclipse UI is based. SWT provides easy to use widgets and API's which are helpful in building rich user interfaces. SWT is designed in a way so as to give us access to the underlying operation system resources. It uses native (OS) widgets which gives an native look and feel, similar to what is provided by operating system (See figures below). SWT includes many different type of controls for ex: tree, table, button, label etc. This tutorial introduces SWT by describing some of the basic concepts and classes.
SWT Widgets
SWT provides a rich set of widgets that can be used to create either stand-alone Java applications or Eclipse plug-ins. We will start by implementing a small SWT example before getting into details about each of the widgets you are likely to use. In order to create this standalone version of swt program we will start by creating new java Project in eclipse. Before you can start using SWT, the SWT libraries need to be added to your project's classpath. To add SWT support, do the following: 1. Download SWT library. For 3.1.2 version of eclipse, SWT library is available at http://archive.eclipse.org/eclipse/downloads/drops/R-3.1.2-200601181600/index.php Look for the section titled SWT Binary and Source. 2. From main menu tool bar, select "File" followed by "Import". Doing so will bring up the "Import wizard" dialog. 3. Now select "Existing Projects into Workspace" and click on "Next" button. 4. Click on "Select archive file" followed by "Browse" button. Now locate the SWT archive that you downloaded in step 1. 5. Click the Finish button to finish importing the SWT project into your workspace. 6. Create new java project from File > New Java Project. 7. Right-click on the project and select the Properties command to open the Properties dialog. 8. Select the Java Build Path followed by Projects tab and click the Add button. 9. Select the org.eclipse.swt project and click OK to finish adding the SWT libraries to your project's classpath
Create a new Standalone SWT Program
Create a new java class as follows:
1 import org.eclipse.swt.*;
2 import org.eclipse.swt.graphics.*;
3 import org.eclipse.swt.widgets.*;

4 public class FirstExample {
5     public static void main(String[] args){
6         Display firstDisplay = new Display();
7         Shell firstShell = new Shell(firstDisplay);
8         firstShell.setText("First Example");
9         firstShell.setSize(200,100);
10         firstShell.open ();
11         while (!firstShell.isDisposed()) {
12             if (!firstDisplay.readAndDispatch())
13                 firstDisplay.sleep ();
14         }
15         firstDisplay.dispose ();
16     }
17 }
Lines 1-3: SWT classes are contained in different packages which begin with org.eclipse.swt. The package org.eclipse.swt is the main package and contains SWT class and exception/error classes. All the SWT widgets are contained in org.eclipse.swt.widgets package. Refer to online help for more information about these packages
Line 6: Every SWT program has a Display. Display acts like a bridge between program and underlying operating system
Lines 7-9: Next, in the program we have created a shell. All the Top level windows are created by the class Shell and shell's are contained in Display.
Line 10: When a shell is created it is invisible by default. Shell becomes visible only when method open() is called on shell instance. open() method not only makes shell visible but also brings it to the front so that all user input can be intercepted by the shell.
Lines 11-14: SWT supports an event based user interface. Event driven user interface essentially means that user interaction events are generated which are then intercepted by eclipse application to perform various actions. Not surprisingly, any event driven UI requires an event loop that continously listens to user interface events and then broadcasts the events to interested parties. Example of such event could be "Button click", "Minimize Window" etc. The condition when this event loop ends depend upon the application For ex: in some cases user might close the window OR clicks on the exit button provided by the application.
Line 15: Next, we are disposing the Display. Disposing display will release all resources that were acquired by the running program in its lifetime.
In order to run this example program use the Run As > "SWT Application". This will open up new window with title “First Example”.
Events
As discussed earlier, SWT supports an event based user interface. These events are generated by user actions. User actions could be keyboard entry, button click, mouse drag etc. We can trap or listen to these events by adding/attaching listeners to various SWT controls. Following listing shows an example to attach selection listener to button widget
final Button myButton = new Button(shell, SWT.PUSH);

SelectionAdapter adapter = new SelectionAdapter() {
        public void widgetSelected(SelectionEvent event) {
        myButton.setText("You clicked me!");
    }
};
myButton.addSelectionListener(adapter);
myButton.setText("Click");
In order to know more about events and widgets which support each of these events refer to online Platform Plug-in Developer Guide. Look for headings Low level events and High level events.