Introduction:
- The chapter will explain the interceptor “chain” in Struts 2 with an example program.
chain Interceptor:
- As the name suggests, chain interceptor is used for chaining the actions in Struts 2.
- A sequence of action classes can be executed by chain interceptor. That is, more than one action class can be executed by the implemented chain interceptor.
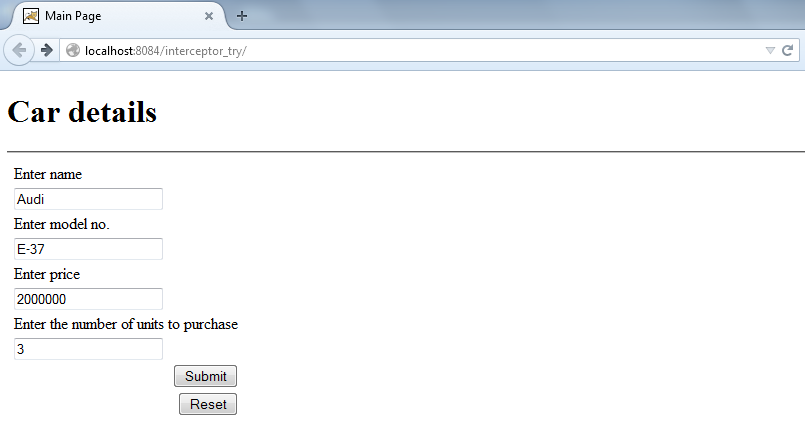
- In our example, the web application gets the details like name, model no, price and the number of units to purchase of a car from user and displays the total amount to pay on the next page to the user. So the first.jsp can be coded as:
// first.jsp

<%--
    Document   : first
    Created on : Nov 20, 2014, 12:34:17 PM
    Author     : Wideskills.com
--%>

<%@page contentType = "text/html" pageEncoding = "UTF-8"%>
<%@taglib prefix = "s" uri = "/struts-tags" %>

<!DOCTYPE html>
<html>
    <head>
        <meta http-equiv = "Content-Type" content = "text/html; charset = UTF-8">
        <title> Get your Car Application - Main Page </title>
    </head>
    <body>
      <s:form action = "click" method = "POST">
         <h1> Car details </h1>
         <hr/>
         <s:label value = "Enter name"/>  <s:textfield name = "name"/>

         <s:label value = "Enter model no."/>  <s:textfield name = "id"/>

         <s:label value = "Enter price"/> <s:textfield name = "price"/>

         <s:label value = "Enter the number of units to purchase"/>

         <s:textfield name = "units"/>

         <s:submit name = "SUBMIT"/>

         <s:reset name = "RESET"/>
      </s:form>
   </body>
</html>
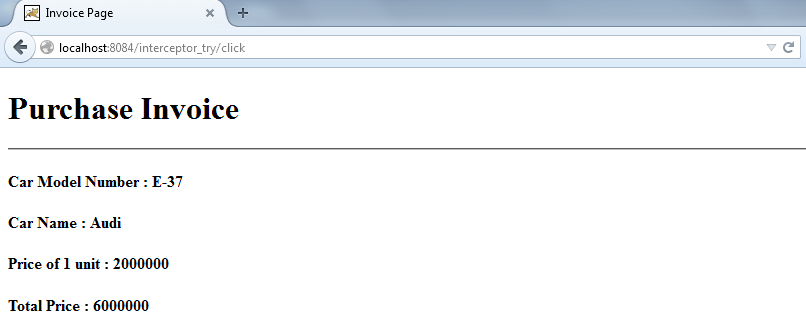
- The next.jsp will gather the information from first.jsp, and will calculate the total amount to pay.
- So, next.jsp can be written as follows:
//next.jsp
<%--
    Document   : next
    Created on : Nov 20, 2014, 12:50:20 PM
    Author     : Admin
--%>
<%@page contentType = "text/html" pageEncoding = "UTF-8"%>
<%@taglib prefix = "s" uri = "/struts-tags" %>
<!DOCTYPE html>
<html>
    <head>
        <meta http-equiv = "Content-Type" content = "text/html; charset = UTF-8">
        <title> Get your Car Application - Invoice Page </title>
    </head>
    <body>
        <h1> Purchase Invoice of Car </h1>
        <hr/>
        <h4>
           <s:label value = "Car Model Number : "/>  <s:property value = "id"/>
       </h4>
       <h4>
          <s:label value = "Car Name : "/>  <s:property value = "name"/>
       </h4>

       <h4>
         <s:label value = "Price of 1 unit : "/>   <s:property value = "price"/>
       </h4>
       <h4>
         <s:label value = "Total Price : "/>   <s:property value = "answer"/>
       </h4>
   </body>
</html>
- The first.jsp will run as follows:
Figure-1

- Now, as we have to use chain interceptor (chaining of action classes), we will create two action classes here.
- Myaction_1.java – only responsible for details of Model ID and car name.
- Myaction_2.java – responsible for calculating final payable amount from the price entered and number of units of be purchased.
- So Myaciton1.java will be coded as:
// Myaction_1.java

/*
 * To change this license header, choose License Headers in Project Properties.
 * To change this template file, choose Tools | Templates
 * and open the template in the editor.
 */

package action_class;

import com.opensymphony.xwork2.ActionSupport;
import java.io.*;
import javax.servlet.http.HttpServletRequest;
import org.apache.commons.io.FileUtils;
import org.apache.struts2.interceptor.ServletRequestAware;

/**
 *
 * @author Admin
 */
public class Myaction_1 extends ActionSupport
{
    private String id;
    private String name;
    public String getId()
    {
       return id;
    }
    public String getName()
    {
       return name;
    }
    public void setId(String id)
    {
       this.id = id;
    }
    public void setName(String name)
    {
       this.name = name;
    }
    public String execute()
    {
       return SUCCESS;
    }
}
- And Myaction_2.java will be as follows:
// Myaction_2.java
/*
 * To change this license header, choose License Headers in Project Properties.
 * To change this template file, choose Tools | Templates
 * and open the template in the editor.
 */
package action_class;
import com.opensymphony.xwork2.ActionSupport;
/**
 *
 * @author Admin
 */
public class Myaction_2 extends ActionSupport
{
   private int price,units,answer;

   public int getUnits()
   {
       return units;
   }
   public void setUnits(int units)
   {
      this.units = units;
   }

   public int getAnswer()
   {
      return answer;
   }
   public void setAnswer(int answer)
   {
      this.answer = answer;
   }

   public int getPrice()
   {
      return price;
   }
   public void setPrice(int price)
   {
      this.price = price;
   }
   public String execute()
   {
      answer = units * price;
      return "success";
   }
}
- Now to combine our JSP’s with action class, we need to configure our struts.xml.
//struts.xml

<!DOCTYPE struts PUBLIC
"-//Apache Software Foundation//DTD Struts Configuration 2.0//EN"
"http://struts.apache.org/dtds/struts-2.0.dtd">
<struts>
   <package name = "default" namespace = "/" extends = "struts-default">
     <action name = "click" class = "action_class.Myaction_1">
         <result name = "success" type = "chain"> Myaction_2 </result>
     </action>
     <action name = "Myaction_2" class = "action_class.Myaction_2">
        <result name = "success"> jsp/next.jsp </result>
     </action>
   </package>
</struts>
- The chain interceptor element is given in result element with following syntax:
<result name = “Name of result” type = “chain” > JSP page name </result>
- In our example, on click of submit button, Myaction_1.java should be executed followed by another action class (chain) – Myaction_2.java. So the action element can be written as:
<action name = "click" class = "action_class.Myaction_1">
<result name = "success" type = "chain"> Myaction_2 </result>
</action>
- And again, on the success of Myaction_2.java, next.jsp is to be displayed. That is,
<action name = "Myaction_2" class = "action_class.Myaction_2">
<result name = "success"> jsp/next.jsp </result>
</action>
- And at last, web.xml can be given as:
//web.xml
<?xml version = "1.0" encoding = "UTF-8"?>
<web-app version = "3.1" xmlns = "http://xmlns.jcp.org/xml/ns/javaee" xmlns:xsi = "http://www.w3.org/2001/XMLSchema-instance" xsi:schemaLocation = "http://xmlns.jcp.org/xml/ns/javaee http://xmlns.jcp.org/xml/ns/javaee/web-app_3_1.xsd">
    <filter>
        <filter-name> struts2 </filter-name>
        <filter-class> org.apache.struts2.dispatcher.FilterDispatcher </filter-class>
    </filter>
    <filter-mapping>
        <filter-name> struts2 </filter-name>
        <url-pattern> /* </url-pattern>
    </filter-mapping>
    <session-config>
        <session-timeout>
            30
        </session-timeout>
    </session-config>
    <welcome-file-list>
        <welcome-file> jsp/first.jsp </welcome-file>
    </welcome-file-list>
</web-app>
- So the application will run as follows:

Figure: First run of application