
What are HTML Forms?
HTML form is a container and it can contain one or more buttons, text boxes and other form elements. The form elements are used to access or collect information from the web users. The information is then processed accordingly within the web page or it can also be sent to a web server application for further processing.
Usually, we fill out forms when we are creating any account with a web site or when we give details for online product delivery.
Creating a Form
A Form is created using the begin and end form tags <form> and </form>
The general Syntax for creating a form is:
<form>
   … Form Elements...
</form>
Attributes of Form element
The most important form attributes are
| Attribute | Value | Description |
| name | any name | specifies the name of the form |
| action | URL | the script specified in the URL will receive the uploaded data and processes the form information |
| method | get & post | Specifies how form information is sent. Default value is get. |
| target | _blank, _self and _parent | Specifies the target page where the result of the script will be displayed. |
| enctype | application/x-www-form-urlencoded or multipart/form-data | Specifies how the browser encodes the data before sending it to the server. application/x-www-form-urlencoded is the default value. This encryption type converts spaces to the plus sign and non-alphanumeric characters into the hexadecimal code for that character in ASCII text. multipart/form-data sends the data of each form control in consecutive parts. |
HTML - The input element
- The input element is the most important form element.
- We use input tag to create form elements like radio, button, submit etc.
- The input elements are created using the following syntax
<input type=”type of the control” name=”control name”>
Examples of Types of control are button, text, radio etc.
- The input element is an empty element, it only contains attributes.
- Attributes of input tag are as follows,
| Attribute | Value | Description |
| type | text, password, checkbox, radio, submit, reset, file, hidden, image, | Specifies the type of control to create. |
| button | Default value is text. | |
| name | any valid name | Assigns the control a name. |
| value | text | Specifies the initial value of a control. It is mostly used when the type attribute has the value radio or checkbox |
| size | number | Specifies the initial width of the control. |
| maxlength | number | Specifies the maximum no. of characters the user may enter. |
| The default value is unlimited. | ||
| checked | checked | Specifies the control should be pre-selected when the page loads. It is used when the type attribute has the value radio or checkbox |
| src | URL | This is applicable for only attribute type image. It specifies the URL of the image to use as a submit button. |
- The end tag is not required.
- The input tag in HTML5 has several new attributes & the type attribute of input tag has several new values.
HTML - Controls
The form elements like textboxes, check boxes, radio buttons, text areas etc are also called Controls. Before submitting a form to a web server or mail server for processing the user completes a form by modifying the form controls. Checking a checkbox, selecting a radio button, selecting an item from a list, inputting text into text area etc. are examples of modifying controls.
The most common controls or input types used in HTML forms are:
Text Inputs
We use two types of text inputs in HTML forms
Single-line Text input: This single line text input control is created by supplying the type attribute value of the input tag as text. The following is an example:
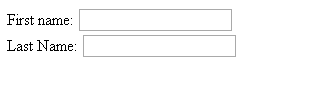
<form method="get" name="form1">
  First name:
  <input type="text" name="First_Name">
  <br>
  Last Name:
  <input type="text" name="Last_Name">
</form>
The output of the above code would be:
Multi-line Text Control: This control allows the user to enter multiple lines of text. This control is created using <textarea> element.
A text area can hold unlimited number of characters and the text is usually displayed in fixed-width font (usually Courier)
Attributes of <textarea> tag
name: We can specify name of the text area through this attribute.
rows: It specifies the visible no. of lines in a text area
cols: It specifies the visible width of a text area
Several new attributes like autofocus, form, maxlength, placeholder, required and wrap are introduced in HTML5.
Example for text area
<form method="get" name="form1">
Please enter your feedback here:<br>
<textarea rows="5" cols="25">
</textarea>
</form>
The output of the above code would be

Password Control
The password control can be created by supplying the type attribute of input tag with the value “password”. The characters in the password field are masked i.e. they are displayed as asterisks or circles.
Although the password is masked from the observers, it may be read by anyone who has access to low-level network.
<form method="get" name="form1">
  user name or email id :
  <input type=”text” name="uname">
  <br>
  Password:
  <input type=”password” name="pwd">
</form>
The output of the above program would be

Buttons
We can create clickable buttons using input tag. We can create three types of buttons in HTML.
The type attribute of the input tag is used to create the following buttons,
- Submit Buttons
- Reset Buttons
- Push Buttons
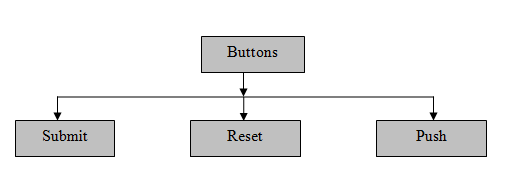
Submit Button
A submit button submits a form to the server The form data is sent to the page specified in the action attribute of the form tag.
Reset Button
When activated (clicked) the reset button resets all controls to their initial values.
Push Button
Push button doesn’t have any default behavior. We can create our own customized buttons by associating a client-side script for each button which is activated whenever an event is triggered (pressing the button or releasing)
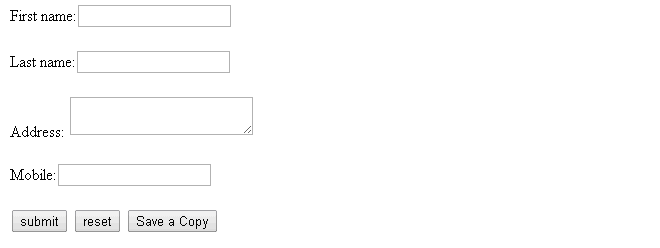
The following is an example which creates submit button
<form method="get" name="form1" action="demo.asp">
  First name:<input type="text" name="fname">
  <br><br>
  Last name:<input type="text" name="lname"><br><br>
  Address:
  <textarea rows="2 cols="10"></textarea><br><br>
  Mobile:<input type="text" name="num"><br><br>
  <input type="submit" value="submit">
  <input type="reset" value="reset">
  <input type="button" value="Save a Copy">
</form>
The output of the above code would be:
Using images for Buttons
We can also create a graphical submit button in HTML. We should specify the URL of the image in the src attribute. You can add graphical buttons to your HTML using the following line of code,
<input type="image" name=”Control_name” src="URL">
Control_name is any name you give for the graphical button.
Check Boxes
You might have observed these types of controls during the installation of the software, the most common check box we check is the

Though we do not read the entire document, we check this check box.
So, now we know what checkboxes are and now its time to learn how to create them,
The syntax for creating check boxes is,
<input type=”checkbox” name=”Any_name” value=” value_of_the_checkbox”>
We can select one or more options from the check boxes given.
An example for creating checkboxes
<form method="get" name="form1">
<input type="checkbox" name="ns">Please sign me up for newsletter<br>
<input type="checkbox" name="alerts">Mail me the alerts weekly<br>
</form>
The output of the above code would be
Please sign me up for newsletter |
Attributes of Check boxes
Some important attributes of the check boxes are
| Attribute | Value | Description |
| type | checkbox | Indicates that you want to create a checkbox. |
| name | any valid name | Assigns the check box a name. |
| checked | checked | Specifies that this checkbox should be pre-selected when the page loads. |
| value | text | Indicates that this value will be sent to the server if ever you check the checkbox. |
Radio Buttons
Radio buttons are just like check boxes except that we can select only one from the given options.
We use input tag with the type value attribute as radio to create radio buttons.
Attributes of Radio Buttons
Some important attributes of the Radio Buttons are
| Attribute | Value | Description |
| type | radio | Indicates that you want to create a radio button. |
| name | any valid name | Assigns the radio button a name. |
| checked | checked | Specifies that this radio button should be pre-selected when the page loads. |
| value | text | Indicates that this value will be sent to the server if ever you select this radio button |
An example for creating Radio buttons is as follows,
<form method="get" name="form1">
  How many Pizzas would you like to order?<br>
  <input type="radio" name="single" value="single">1- $10<br>
  <input type="radio" name="double" value="double">2- $20<br>
  <input type="radio" name="triple" value="triple">3- $25<br>
</form>
The output of the above program would be
How many Pizzas would you like to order? |
Creating a Menu in HTML
We can create a drop down list using <select> element in HTML.
We use this type of control when we have many options to offer the user but only one or two among them would be selected.
The <option> tag is used to define the options in the drop down list.
An example for creating a select list is as follows,
<form method="get" name="form1">
  Are you coming to the Party?
  <select name="select_list">
    <option value="yes" selected="selected">Yes</option>
    <option value="No">No</option>
    <option value="Maybe">May be</option>
  </select>
</form>
The output of the above program would be
Are you coming to the Party? |
Attributes for <select>
| Attribute | Value | Description |
| name | name | Defines a name for the drop-down list |
| size | number | Specifies the no. of visible options. |
| multiple | multiple | Specifies that multiple options can be selected at once. |
New Attributes in HTML5
The attributes for <select> tag that are newly added in HTML5 are
- autofocus
- form
- required
Attributes for <option> tag
The attributes of the <option> tag are as follows
| Attribute | Value | Description |
| value | text | specifies a value to be sent to the server |
| selected | selected | Specifies that this option should be pre-selected when the page loads |
| disabled | disabled | Specifies this option should be disabled. |
| label | text | Specifies a label for an option |
We also have an element called optgroup which allows us to group the choices logically.
File select Control
We have seen many websites which allows its users to upload files, here we use file select control. The selected or uploaded file will be submitted with the content of the form.
This is created using the <input> element
Example for creating a file select box is as follows
<form method="post" name="form1">
<input type="file" name="upload">
</form>
The output of the above code would be

Hidden Controls
If you want to pass the information between the pages without the notice of the user then use this type of control. Almost every form uses this type of control, but the user cannot see it in the browser window. We use input element to create a hidden control.
The information between client/server exchanges is usually stored using this control.
The user cannot see or manipulate the hidden content.
Example for creating hidden controls is as follows
<form method="post" name="form1">
  <input type="file" name="upload">
  <p> No. of Clicks-2,32,352
  <input name="clickNo"  type="hidden" value="2,32,352">
  <input type="submit" value="update">
</form>
The output of the above code would be

The field clickNo will not be displayed because it is marked as hidden.
These are all about Forms in HTML. In the next chapter, we would learn about HTML - Frames.