
In the Package Explorer (the left most window showing the name of the project), click the arrow pointing to the project name. It will open the folders within the project.
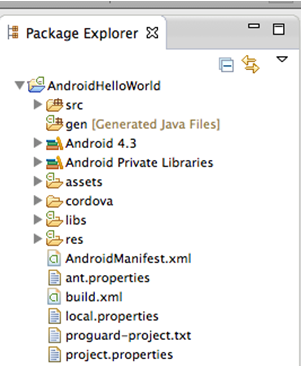
You could see a number of folders and files. The AndroidManifest.xml is very important because it provides all critical information about the application to the Android system. If you open the AndroidManifest.xml file, you could see the package name as an attribute of the manifest element (package="com.learn.AndroidHelloWorld"), the permissions that this particular app has to access different APIs within the <uses-permission> element, the screens supported by this particular app within the <supports-screens> element and so on.
As we proceed with our app, the folder that would be accessed the most is the assets folder. In the assets/www folder, you will find a number of folders like css, img, js and so on and files like index.html, main.js, master.css etc. You might have guessed it right. As already mentioned, PhoneGap uses web technologies including HTML, CSS and JavaScript to develop mobile applications. The file index.html is the main file which we will be modifying the most. The cordova.js is the file used by the PhoneGap framework and we should not modify it.
Note: Whenever you open any file to view or modify, it is always good to open it using your favourite text editor like Notepad++, Sublime Text or Komodo Edit. The GUI it offers is normally more user friendly.
Right click the index.html file within the assets/www folder and open with your text editor to analyze the code. You could find that it is a normal html file. In fact, it is an HTML5 file. How could you identify that index.html is an HTML5 file? The first line <!DOCTYPE html> tells us that it is an HTML5 file. Let's make some changes to the index.html file. First, remove the long comment that starts from the second line. As this is our first app to understand how to create and run an Android app using PhoneGap, we are not planning to add any style to our content. So, remove the line that links to the style sheet (the line just above the <title> element).
Now cut the <script> tag that links to the cordova.js file (it is within the <body> tag) and paste it just after the <title> tag. Next remove everything within the <body> tags (opening and closing body tags). Finally, we are adding the content we want to display on the screen. So after the opening body tag, add the following lines of code.
<h1>Hello World</h1>
<h2>This is my first mobile app</h2>
Your index.html file will look like this:
<!DOCTYPE html>
<html>
    <head>
        <meta charset="utf-8" />
        <meta name="format-detection" content="telephone=no" />
        <meta name="viewport" content="user-scalable=no, initial-scale=1, maximum-scale=1, minimum-scale=1, width=device-width, height=device-height, target-densitydpi=device-dpi" />
        <title>Hello World</title>
        <script type="text/javascript" src="cordova.js"></script>
    </head>
    <body>
        <h1>Hello World!!!</h1>
        <h2>My First Mobile App</h2>
    </body>
</html>
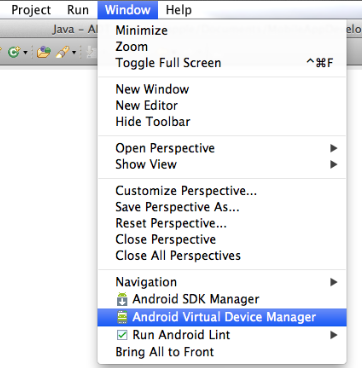
Now we are ready with the code. Next we need to create an emulator to execute and check our application. We will create the emulator using Android Virtual Device Manager. For this go to Window → Android Virtual Device Manager.
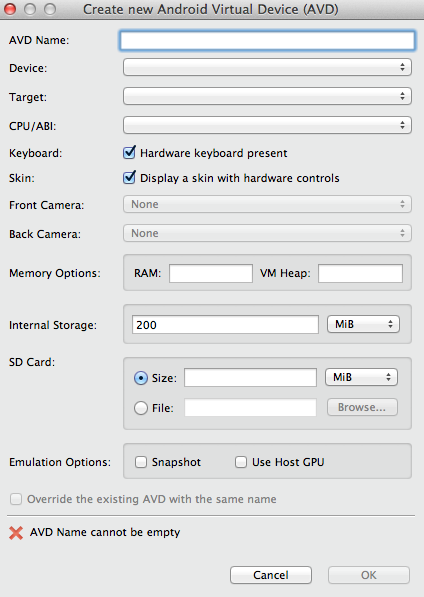
You will get a new window. Click the New button and you will get a screen like this:
You can specify whatever name you want for your virtual device inside AVD Name: textbox. From the Device: list, select a device. The appearance of your virtual device will be same as that of the device you select here. Once you enter the device name, many other details will be added automatically. The latest version of Android on which the project is running is the target. Specify the SD Card Size as 32. If you enter the required values, the screen will look like this (the values could be different based on the device you selected):
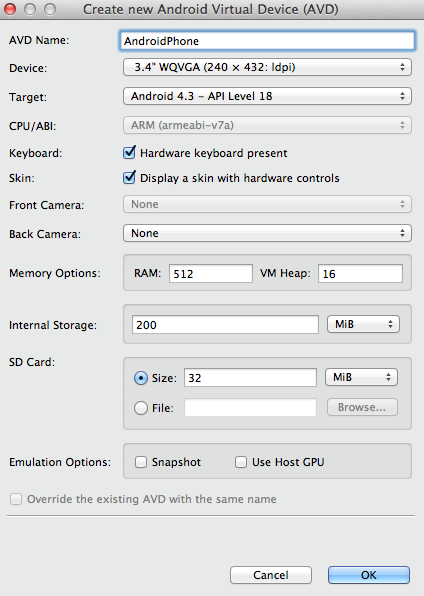
Click the OK button and this virtual device will be available in the Android Virtual Device Manager. Close the window.