
In this chapter we will cover Android Activities. Please be patient while reading this. This is the point where we are going to know the most important component of Android app development. We shall cover the fundamental concepts so that when we develop complex Android apps we should be confident about concepts. We are trying to bring every flavor under one roof so it might take some time, but trust me; you will love to have knowledge of these concepts while facing practical problems.
3.3.1 Android Application Process states
We already know what an android activity is and about the back stack. So I am going to continue the story line after that point. The active processes have more priority with respect to other processes. Generally an application undergoes following process states
Priority Increases 
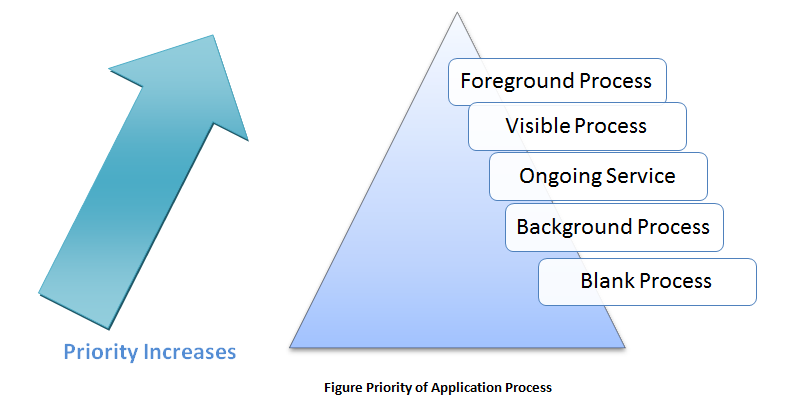
- Blank or Empty Process: This is a cache which is maintained by the Android system. There are applications which are kept in memory even after their life is finished. This is done to reduce the start-up time if they are to be launched again. They are removed from memory from time to time. These processes have least priority.
- Background Process: These processes hold invisible activities. They don’t have any running service. These processes are generally killed with the pattern of killing first, last seen activity. These processes have higher priority than empty process, but less than running services or service that has started.
- Ongoing Services: They have lesser user interaction so they have slightly low priority than a foreground service or visible activity respectively. They are generally not killed unless system runs out of resources. System reattempts to start them when resources become available.
- Visible Process: They are killed in extreme conditions to run foreground processes. They are very few in number. These processes, host visible activities. They might not need any user interaction as they are visible only.
- Foreground process: These processes have the highest critical priority. To keep them alive other processes may be compromised with. They are processes which involve user interaction. Hence must be responsive. An example would be an activity responding to user events, or a broadcast receiver, etc.
Thus, it is very critical to structure our app that its priority measurements are done properly so that it doesn’t get terminated in the middle of something.
3.3.2 Construction of Activities
To build an activity we have to extend the Activity class or extend another subclass of Activity. Every activity has a life cycle and there are corresponding callback methods for these changes. Each callback is a specialist and allows us to do a specific task. These tasks may include creating an activity, stopping it, resuming it or destroying it. First of all we are going to see the life cycle of activity.
Whenever you press the back button the activity will be destroyed and nothing will be saved when you restart it. To retain the state we have to write some extra lines of code. Now we shall see life cycle and then callback methods. It is very important to keep your app running and it is possible by strong management of life cycle activities. Their association with other activities, tasks and back stack is one crucial point of focus from which, as a developer, you should never divert.
3.3.2.1 Lifecycle of Activity
By implementing callback methods we can manage the life cycle of activity. Let us first find out the entire lifetime of an activity.
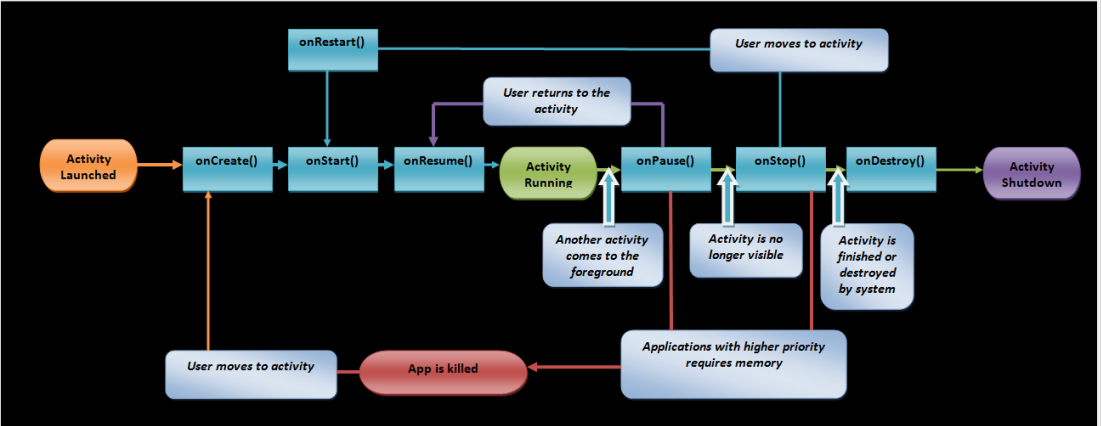
Figure - Activity Life cycle
Essentially an activity can stay in one of the following states:
- Running: In this stage application is in foreground and focus is on user interaction. This stage is also called Resumed.
- Paused: In this any other activity is visible with previous activity. Although it is visible but it is not in full focus of user. The screen is captured by some other activity so it is partially visible. The entire state of a paused activity is retained and generally they are not killed. Only in case of extreme low memory condition a paused activity is killed. In back stack there is another activity on top of paused activity.
- Stopped: It is no longer visible. It is now moved back to the background. Stopped activity can stay alive but they can be killed anytime.
3.3.2.2 Implementing an Activity
Let us check out all the callback methods at a glance and see how to and when to use them.
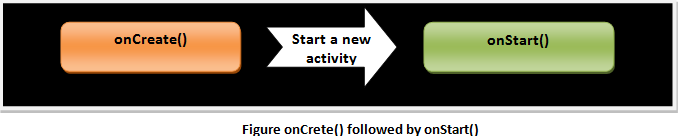
1. onCreate(): It is the first method to be called when any activity is first created. All the invariant set up are to be initiated in this method. Views are created, bind data, etc. A Bundle object is passed where all the previous activity states are captured.
- It is followed by onStart() method.
- At this state, activity cannot be killed by the system.
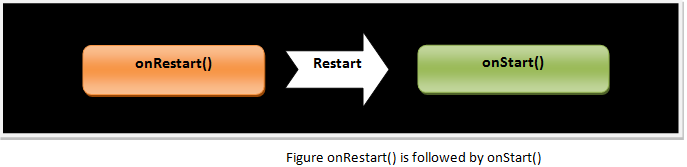
2. onRestart(): If the activity is paused and that activity is to be restarted then this method is called.
- It is always followed by onStart().
- The system cannot kill this activity at this state.
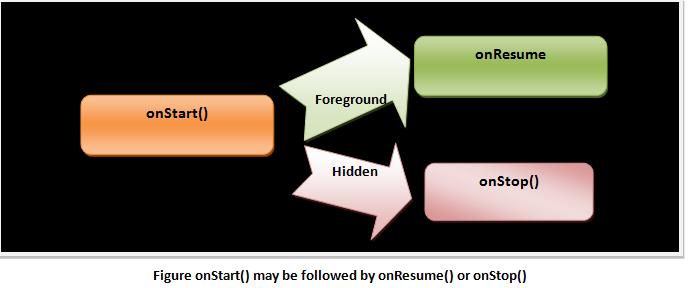
3. onStart(): App becomes visible after this method is called.
- It is followed by onResume when activity is in the foreground
- It is followed by onStop() when activity is hidden.
- At this state, system cannot kill the activity.
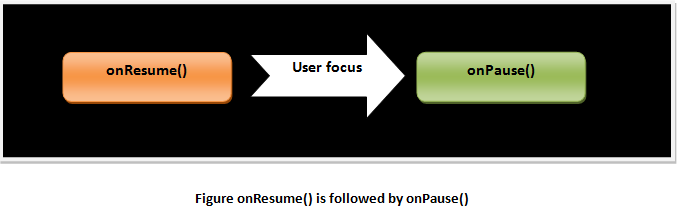
4. onResume(): When activity starts interacting onResume() is called. User interacts with activity and gives the input. It is at the top of back stack now.
- It is always followed by onPause().
- System cannot kill activity at this stage also.
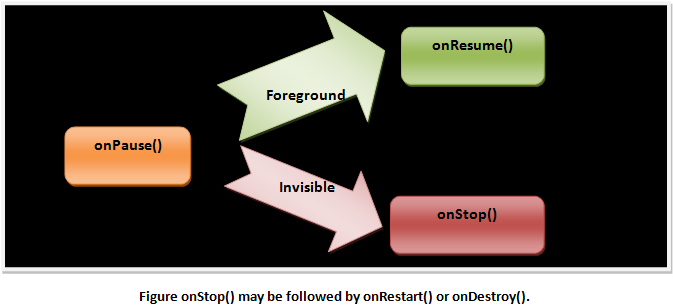
5. onPause(): If activity wants to resume then this method is called. This saves all the unsaved changes. Anything which is consuming CPU is stopped. The next stage is not started until control returns from paused state. Hence this stage has a very short life span.
- If activity has to come to foreground then it is to be followed by onResume().
- If it becomes invisible then onStop() method is called after this.
- System can kill at this stage.
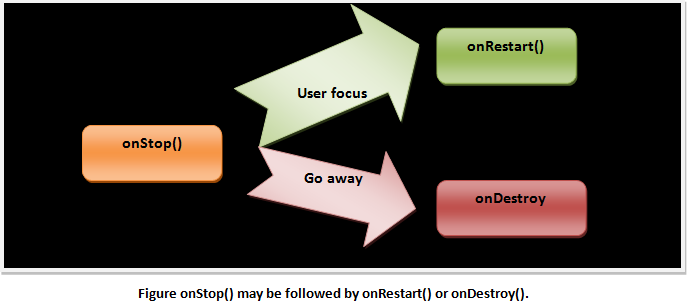
6. onStop(): In this case either activity is destroyed or it is overtaken by any other activity. It is called when activity becomes invisible.
- If activity wants user re-interaction then this is followed by onRestart() method.
- If this activity has to go away then it is followed by onDestroy() method.
- System can kill the activity at this stage.
7. onDestroy(): When activity has to be destroyed, then this method is called. It is the final call. It is either called when activity is about to finish or it is going to be replaced to save space.
- It is not followed by any call as it is final.
- The system kills this activity.
We have implemented activity in HelloWorld application. We shall implement all of them together in an application in later sections so that everything is ready to cook and you would come to know the connection set up between an intent and activity, or activity callbacks, etc.
3.3.3 ActivityTest App
Let us implement our callback methods and practically see what happens. Please follow the steps and you will get result as shown in snapshots. This is a practical demonstration of what we studied in this section of activities. So just do as instructions are given and you will understand the things clearly
- Open eclipse and create a project as we did in HelloWorld application. Name it anything, say ActivityTest.
- Let the xml file be as it is and open the file saying ActivityTest.java and write the following code. Don’t go for copy and paste as it is not a healthy practice for a programmer. Type it in your Java class.
package com.Debosmita.Activitytest;
import android.os.Bundle;
import android.app.Activity;
import android.util.Log;
import android.widget.Toast;

public class MainActivity extends Activity {
     String tag = "Events";
     @Override
     protected void onCreate(Bundle
            savedInstanceState) {
            super.onCreate(savedInstanceState);
            setContentView(R.layout.activity_main);
            Toast.makeText(getApplicationContext(),
            "onCreate()",Toast.LENGTH_SHORT).show();
            Log.d(tag, "onCreate() Event");
         }

     @Override
     public void onStart() {
            super.onStart();
            Log.d(tag, "onStart() Event");

        }

     @Override
     public void onRestart() {
            super.onRestart();
            Log.d(tag, "onRestart() Event");
     }
     @Override
     public void onResume() {
            super.onResume();
            Log.d(tag, "onResume() Event");
     }
     @Override
     public void onPause() {
            super.onPause();
            Log.d(tag, "onPause() Event");
     }
     @Override
     public void onStop() {
            super.onStop();
            Log.d(tag, "onStop() Event");
     }
     @Override
     public void onDestroy() {
            super.onDestroy();
            Log.d(tag, "onDestroy() Event");
     }

}
- So now you are ready. Launch your emulator with the help of AVD Manager.
- Right click on your project saying ActivityTest and then select Run As… Android Application.
- Wait for a while and now your emulator must have started running your application. Now, carefully, follow the instructions to see the call sequence of callback methods.