
Today we shall learn about Android UI notification. Our virtual device or emulator is like a real device on system. We will program the device controls which will listen to the Android UI notification.
4.6.1 Introduction
There are two levels of Android user interface with which users interact and they are as follows:
- Activity level
- View level
4.6.1.1 Activity Level
At activity level, there are certain methods in Activity class which we can override. Some of the genuine methods are as follow:
- onKeyUp(): This is called when a key was released. This is not handled by any of the views inside the activity
- onKeyDown(): This is called when a key was pressed. This is not handled by any of the views inside the activity.
- onMenuItemSelected(): This is called when any item of the menu panel is pressed by user.
- onMenuOpened(): This method is called when user opens the panel’s menu.
The following code snippet is an instance of such an implementation:
public boolean onKeyDown(int keyCode, KeyEvent event) {
        // TODO Auto-generated method stub
        switch (keyCode) {
        case KeyEvent.KEYCODE_DPAD_CENTER:
            Toast.makeText(getBaseContext(), "Center of Dpad was pressed",
                    Toast.LENGTH_SHORT).show();
            return true;
        case KeyEvent.KEYCODE_DPAD_DOWN:
            Toast.makeText(getBaseContext(), "Down arrow was pressed",
                    Toast.LENGTH_SHORT).show();
            return true;
            }
        return false;
    }
Figure - Code snippet for activity level implementation
Shortly, we shall cover an example to find the usage of these methods in a practical implementation.
4.6.1.2 View Level
When any user interacts with a view, the corresponding view fires event. When a user touches a button or an image button or any such view we have to service the related service so that appropriate action can be performed. For this, events need to be registered. For a button we will have code like this:
private OnClickListener SaveListener = new OnClickListener() {
        @Override
        public void onClick(View v) {
            // TODO Auto-generated method stub
            Toast.makeText(getBaseContext(), "Save button was clicked",
                    Toast.LENGTH_SHORT).show();
        }
    };
Figure - Simple registration example of a button view
4.6.2 UI notification Example
Everything will be crystal clear when you go through this example. No worries, you already know the implementation. You just have to know the one-to-one relationship between these elements. We will implement both the activity level user interface notification and view level user interface notification in one example. Go through the code and you will find the comments highlighting their nature. For that open your IDE and name it as you like. I am naming it as UINotificationExample App. Open your xml file and code it as shown in the following listing:
<RelativeLayout xmlns:android="http://schemas.android.com/apk/res/android"
    xmlns:tools="http://schemas.android.com/tools"
    android:layout_width="match_parent"
    android:layout_height="match_parent"
    android:paddingBottom="@dimen/activity_vertical_margin"
    android:paddingLeft="@dimen/activity_horizontal_margin"
    android:paddingRight="@dimen/activity_horizontal_margin"
    android:paddingTop="@dimen/activity_vertical_margin"
    tools:context=".MainActivity" >
    <TextView
        android:id="@+id/textView1"
        android:layout_width="wrap_content"
        android:layout_height="wrap_content"
        android:text="Hello Readers!!" />
    <EditText
        android:id="@+id/editText1"
        android:layout_width="wrap_content"
        android:layout_height="wrap_content"
        android:layout_below="@+id/textView1"
        android:layout_marginTop="51dp"
        android:layout_toRightOf="@+id/textView1"
        android:ems="10"
        android:inputType="textPersonName" >
        <requestFocus />
    </EditText>
    <TextView
        android:id="@+id/textViewName"
        android:layout_width="wrap_content"
        android:layout_height="wrap_content"
        android:layout_alignBaseline="@+id/editText1"
        android:layout_alignBottom="@+id/editText1"
        android:layout_alignLeft="@+id/textView1"
        android:text="Name:" />
    <Button
        android:id="@+id/buttonCancel"
        android:layout_width="wrap_content"
        android:layout_height="wrap_content"
        android:layout_alignBaseline="@+id/buttonSAVE"
        android:layout_alignBottom="@+id/buttonSAVE"
        android:layout_alignRight="@+id/editText1"
        android:layout_marginRight="52dp"
        android:text="Cancel" />
    <Button
        android:id="@+id/buttonSAVE"
        android:layout_width="wrap_content"
        android:layout_height="wrap_content"
        android:layout_below="@+id/editText1"
        android:layout_marginTop="42dp"
        android:layout_toRightOf="@+id/textView1"
        android:text="Save" />
</RelativeLayout>
Figure - xml file of app
The graphical output of app should be similar to the following snapshot:
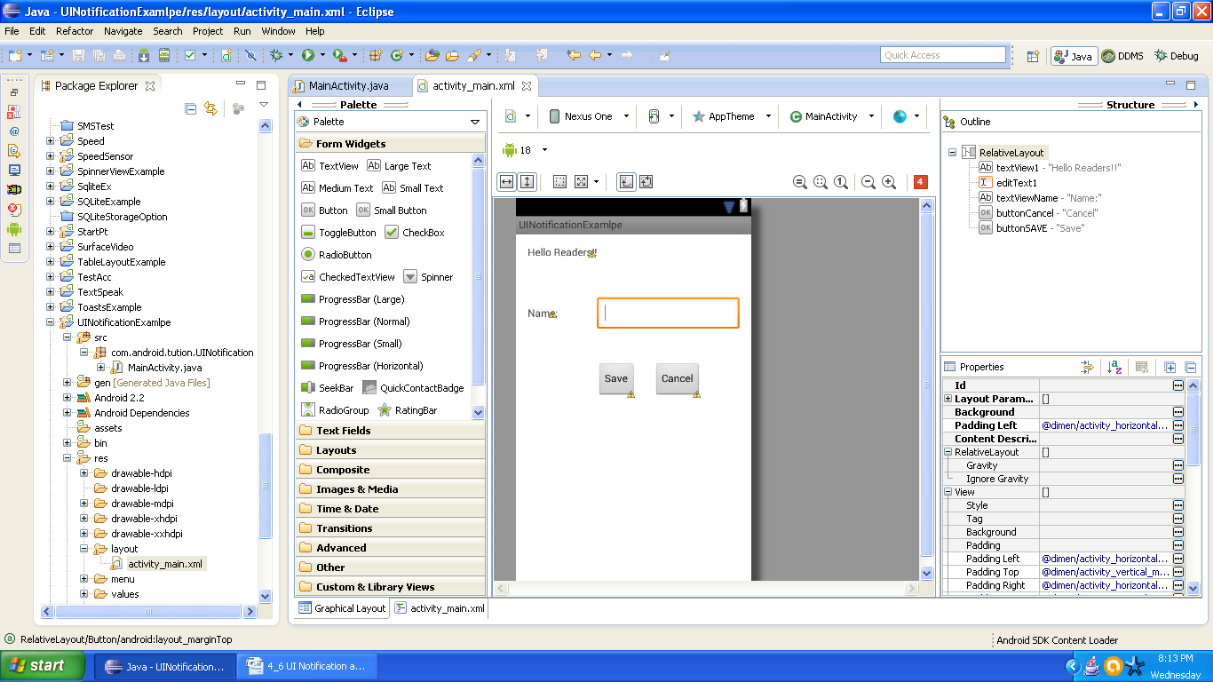
Figure - Graphical layout UI notification example
Now open your main activity file and code it as shown in the following listing:
package com.android.tution.UINotification;
import android.os.Bundle;
import android.app.Activity;
import android.view.KeyEvent;
import android.view.Menu;
import android.view.View;
import android.view.View.OnClickListener;
import android.widget.Button;
import android.widget.EditText;
import android.widget.Toast;
public class MainActivity extends Activity {
    @Override
    protected void onCreate(Bundle savedInstanceState) {
        super.onCreate(savedInstanceState);
        setContentView(R.layout.activity_main);
        EditText edit = (EditText) findViewById(R.id.editText1);
        Button save = (Button) findViewById(R.id.buttonSAVE);
        Button cancel = (Button) findViewById(R.id.buttonCancel);
        save.setOnClickListener(SaveListener);
        cancel.setOnClickListener(CancelListener);
    }
// Activity level
    @Override
    public boolean onKeyDown(int keyCode, KeyEvent event) {
        // TODO Auto-generated method stub
        switch (keyCode) {
        case KeyEvent.KEYCODE_DPAD_CENTER:
            Toast.makeText(getBaseContext(), "Center of Dpad was pressed",
                    Toast.LENGTH_SHORT).show();
            return true;
        case KeyEvent.KEYCODE_DPAD_DOWN:
            Toast.makeText(getBaseContext(), "Down arrow was pressed",
                    Toast.LENGTH_SHORT).show();
            return true;
        case KeyEvent.KEYCODE_DPAD_LEFT:
            Toast.makeText(getBaseContext(), "Left arrow was pressed",
                    Toast.LENGTH_SHORT).show();
            return true;
        case KeyEvent.KEYCODE_DPAD_RIGHT:
            Toast.makeText(getBaseContext(), "Right arrow was pressed",
                    Toast.LENGTH_SHORT).show();
            return true;
        case KeyEvent.KEYCODE_DPAD_UP:
            Toast.makeText(getBaseContext(), "Up arrow was pressed",
                    Toast.LENGTH_SHORT).show();
            return true;
        case KeyEvent.KEYCODE_0:
            Toast.makeText(getBaseContext(), "Press cancel button to exit",
                    Toast.LENGTH_SHORT).show();
            break;
        }
    // return super.onKeyDown(keyCode, event);
        return false;
    }
Figure - First half of the code of the example
This part of code was about the overriding of methods at activity level. The following code is going to show the registration of a view. Please continue coding in the same activity in the same sequence as shown in the listings:
private OnClickListener SaveListener = new OnClickListener() {
        @Override
        public void onClick(View v) {
            // TODO Auto-generated method stub
            Toast.makeText(getBaseContext(), "Save button was clicked",
                    Toast.LENGTH_SHORT).show();
        }
    };
private OnClickListener CancelListener = new OnClickListener() {
        @Override
        public void onClick(View v) {
            // TODO Auto-generated method stub
            Toast.makeText(getBaseContext(),
                    "Cancel button was pressed, Finishing the App",
                    Toast.LENGTH_LONG).show();
            finish();
        }
    };
    @Override
    public boolean onCreateOptionsMenu(Menu menu) {
        // Inflate the menu; this adds items to the action bar if it is present.
        getMenuInflater().inflate(R.menu.main, menu);
        return true;
    }
Figure - Second part of code
Now create a suitable emulator. Nowadays, emulator doesn’t enable D-Pad. You have to do this explicitly by going to the AVD Manager. After you create a AVD. Run your app. Output after pressing the UP arrow of D-Pad it should be similar to the following snapshot
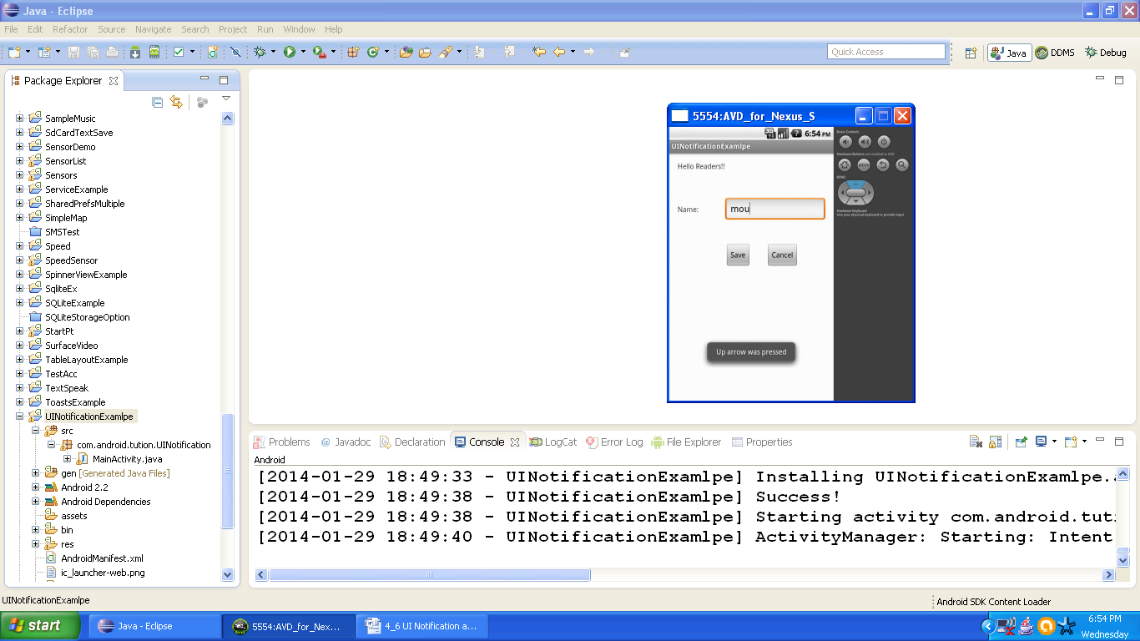
Figure - Output after pressing up arrow of D-Pad
Similarly, after pressing the down arrow, output should be similar to the following snapshot:

Figure - Output after pressing right arrow
After you press the button saying Save, output should be similar to the following snapshot:

Figure - Output after pressing Save button
After pressing the cancel button, application finishes itself and goes back to the home page of emulator. Output should be similar to the following snapshot:
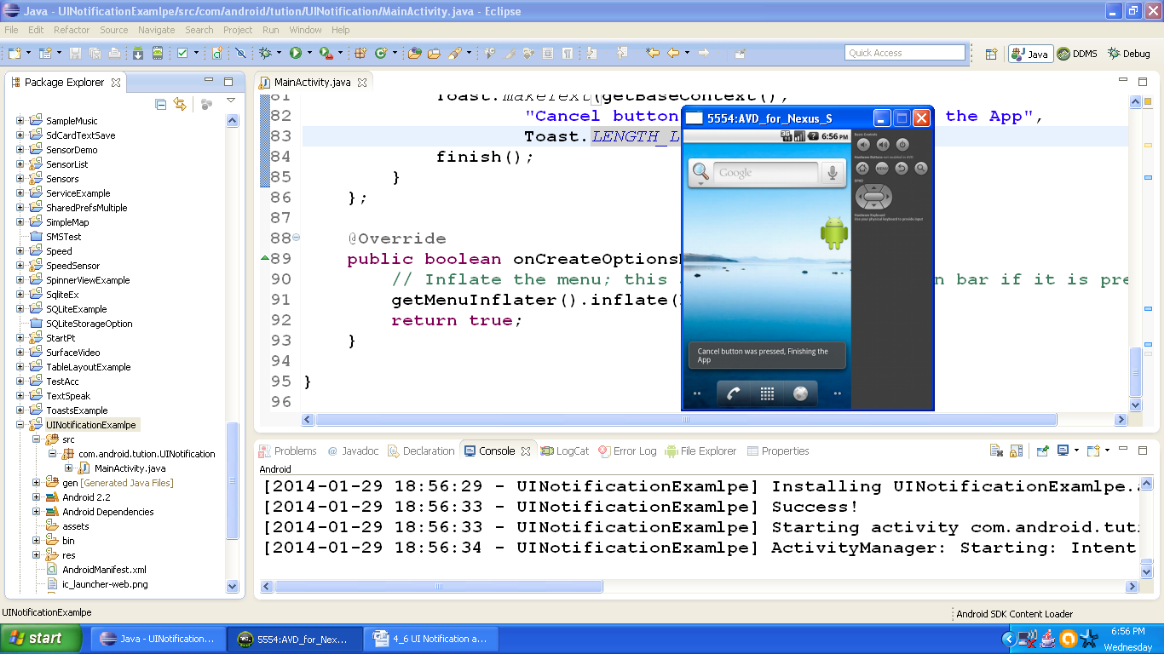
Figure Output after pressing cancel button
Congratulations buddiesJ!! we are done. We have successfully created an application which overrides the methods at activity level and view level as well. This is it. See you in the next section. Till then keep practicing. Happy App Developing!!