
Hello Readers!! Hope you are doing well. Android platform supports Google Maps. Although we have used Google maps in our previous tutorial sections but weare going to learn the basics of maps. Trust me; you will love doing this maps tutorial. Let us not waste time and start maps.
10.1 Introduction
Android platform comes bundled with Google Maps. We can not only use maps but we can embed maps in our applications which we have already done in the previous sections. Now we are to the basics. Most common usage of Google Maps is as shown in the following listing:
- We can change views of Google maps
- We can obtain latitude and longitude of locations in Google Maps
- We can translate address into latitude and longitude values.
- We can translate street address from latitude and longitude of a particular location.
- We can add markers to Google Maps
We need to have Google APIs added on in our project. This add-on includes standard Android library along with Maps library which are packaged within maps.jar file. We need to apply for a free Google Maps API key before wecan integrate Google Maps into our Android application. When we apply for the key, we must also agree to Google’s terms of use. To obtain key we need to follow certain steps. We need to have a google account for sure before doing any such thing. Before testing the application on the Android Emulator or an Android device directly connected to our development machine, we have to locate the SDK debug certificate located in the default folder. We can verify the existence of the debug certificate by navigating to Eclipse and selecting Window->Preferences. Then we have to expand the Android item and choose Build. On the right side of the window, we will be able to see the debug certificate’s location. Filename of the debug key store is debug.keystore. This is the certificate which Eclipse uses to sign our application so that it may be run on the Android Emulator or devices. The debug keystore is used to extract its MD5 fingerprint. It in turn uses the Keytool.exe application which is included with our JDK installation. This fingerprint is required to apply for the free Google Maps key. The Keytool.exe application is usually found in the C:\ProgramFiles\Java\<JDK_version_number>\bin folder.
The key class in the Google Maps Android API is MapView. A map is displayed by the MapViewwith data obtained from the Google Maps service. MapView will capture key presses and touch gestures to pan and zoom the map automatically. It also handles network requests for additional map tiles.
10.2 Maps Key
Following set up is required to use MapView class:
1. Download and install the Google API’s Software Development Kit (SDK).
2. Obtain a valid Maps API key to use the Google Maps service
2. Obtain a valid Maps API key to use the Google Maps service
Use the keytool command to generate an MD5 certificate fingerprint for the key alias_name:
keytool -list -alias alias_name -keystoremy.keystore
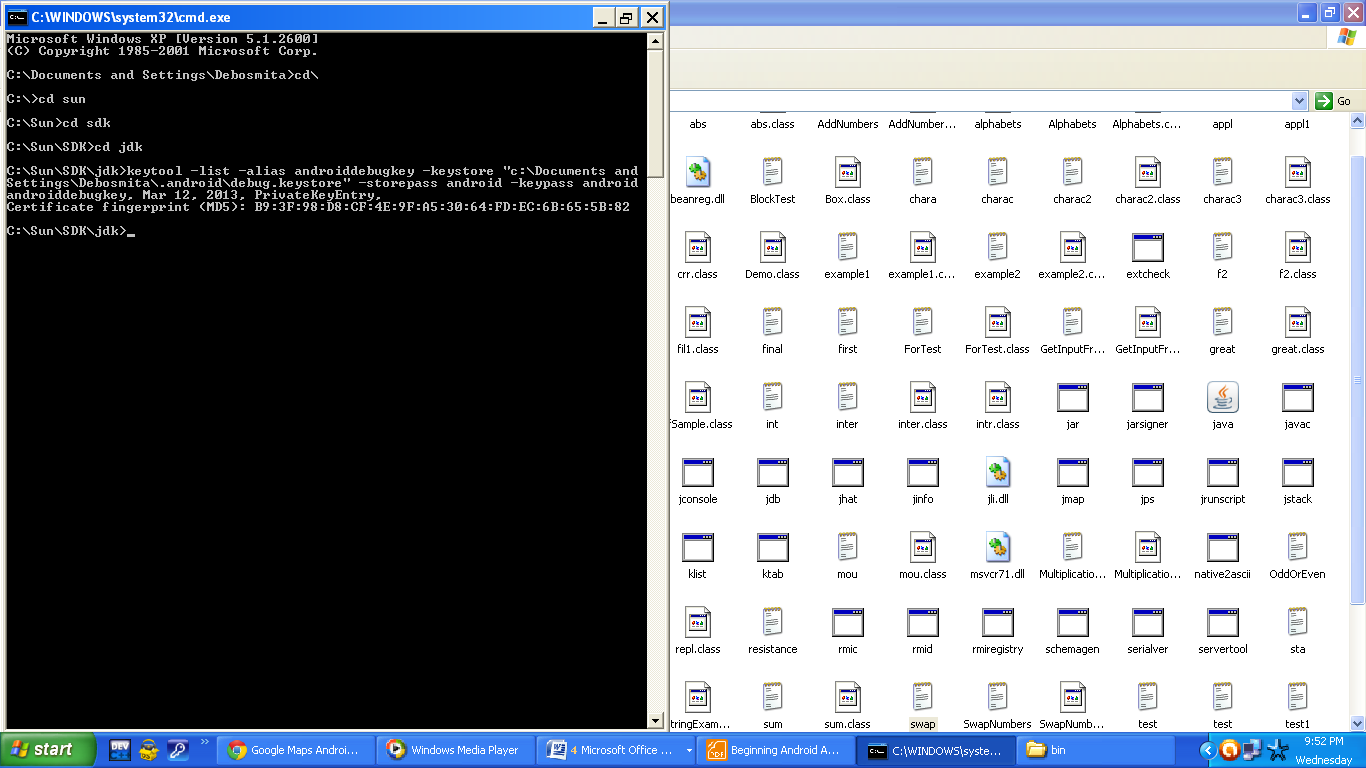
Figure Extracting the MD5 fingerprint
The overall process of adding a map to an Android application is as follows:
- Download and configure the Google Play services SDK. The Google Maps Android API is distributed as part of this SDK.
- Obtain an API key. To do this, you will need to register a project in the Google APIs Console, and get a signing certificate for your app.
- Specify settings in the Application Manifest.
- Add a map to a new or existing Android project.
- Publish your application
Obtaining a key for your application requires several steps
- Retrieve information about your application's certificate.
- Register a project in the Google APIs Console and add the Maps API as a service for the project.
- Once you have a project set up, you can request one or more keys.
- Finally, you can add your key to your application and begin development

Figure Obtaining API Key
As soon as key is generated, it can be used for the application.

Figure Generated API key
10.3 Example
Create a project and name it as you like. I am naming it as MapOverlay app. Open the activity_main.xml file and populate the class as shown in the following listing:
<?xmlversion="1.0"encoding="utf-8"?>
<LinearLayoutxmlns:android="http://schemas.android.com/apk/res/android"
xmlns:tools="http://schemas.android.com/tools"
android:layout_width="fill_parent"
android:layout_height="fill_parent"
    android:orientation="vertical"
>
<com.google.android.maps.MapView
android:id="@+id/mapView"
android:clickable="true"
android:layout_height="fill_parent"
android:layout_width="fill_parent"
android:enabled="true"
android:apiKey="<your key>"
>
</com.google.android.maps.MapView>
</LinearLayout>
Figure activity_main.xml
Open the main activity file and populate the class as shown in the following listing:
packagecom.android.tution.MapOver;
importjava.io.IOException;
importjava.util.List;
importjava.util.Locale;
importcom.google.android.maps.GeoPoint;
importcom.google.android.maps.MapActivity;
importcom.google.android.maps.MapController;
importcom.google.android.maps.MapView;
importcom.google.android.maps.MyLocationOverlay;
importcom.google.android.maps.Overlay;
importcom.google.android.maps.OverlayItem;
importandroid.app.AlertDialog;
importandroid.content.DialogInterface;
importandroid.graphics.drawable.Drawable;
importandroid.location.Address;
importandroid.location.Geocoder;
importandroid.os.Bundle;
importandroid.view.MotionEvent;
importandroid.widget.Toast;
publicclassMainActivityextendsMapActivity {
    longstart;
    longstop;
MapViewmap;
MyLocationOverlaycompass;
MapControllercontroller;
Double lat,lon;
GeoPointtouch;
intx,y;
List<Overlay>overlays;
Drawabled;
@Override
publicvoidonCreate(Bundle savedInstanceState) {
super.onCreate(savedInstanceState);
setContentView(R.layout.activity_main);
map=(MapView)findViewById(R.id.mapView);
map.setBuiltInZoomControls(true);
map.setSatellite(true);
        Touchy t=newTouchy();
overlays=map.getOverlays();
overlays.add(t);
compass=newMyLocationOverlay(MainActivity.this, map);
overlays.add(compass);
controller=map.getController();
lat=30.7363236*1E6;
lon=76.7350951*1E6;
GeoPoint point=newGeoPoint(lat.intValue(),lon.intValue());
controller.animateTo(point);
controller.setZoom(7);
d=getResources().getDrawable(R.drawable.ic_launcher);
    }
    @Override
    protectedvoidonPause() {
        // TODO Auto-generated method stub
    compass.disableCompass();
        super.onPause();
    }
Figure first half of activity class
Second half of class is as shown in the following listing:
@Override
    protectedvoidonResume() {
        // TODO Auto-generated method stub
        compass.enableCompass();
        super.onResume();
    }
    @Override
    protectedbooleanisRouteDisplayed() {
        // TODO Auto-generated method stub
        returnfalse;
    }
publicclass Touchy extends Overlay{
publicbooleanonTouchEvent(MotionEvente,MapView m){
    if(e.getAction()==MotionEvent.ACTION_DOWN)
     {
        start=e.getEventTime();
        x=(int)e.getX();
        y=(int)e.getY();
        touch=map.getProjection().fromPixels(x, y);
     }
    if(e.getAction()==MotionEvent.ACTION_UP)
     {
        stop=e.getEventTime();
     }
    if((stop - start) > 1500)
     {
        AlertDialog alert=newAlertDialog.Builder(MainActivity.this).create();
        alert.setTitle("Pick an option");
        alert.setMessage("just pick one of these");
        alert.setButton("place a pinpoint", newDialogInterface.OnClickListener() {
            @Override
            publicvoidonClick(DialogInterface dialog, int which) {
                // TODO Auto-generated method stub
            OverlayItemoverlayItem=newOverlayItem(touch, "what's up", "simple string");
            CustomPinpoint custom=newCustomPinpoint(d,MainActivity.this);
            custom.insertPinpoint(overlayItem);
            overlays.add(custom);
            }
        });
Figure Second half of class
After a long press or click we would be alerted with options to toggle view or get address etc. Third half of code is as shown in the following listing:
alert.setButton2("get an address", newDialogInterface.OnClickListener() {
            @Override
            publicvoidonClick(DialogInterface dialog, int which) {
                // TODO Auto-generated method stub
                Geocoder geocode=newGeocoder(getBaseContext(),Locale.getDefault());
                try{
                    List<Address> address=geocode.getFromLocation(touch.getLatitudeE6()/1E6, touch.getLongitudeE6()/1E6, 1);
                    if(address.size()>0){
                        String display="";
                        for(inti=0;i<address.get(0).getMaxAddressLineIndex();i++){
                            display += address.get(0).getAddressLine(i)+ "\n";
                        }
                    Toast t=Toast.makeText(getBaseContext(), display, Toast.LENGTH_LONG);
                    t.show();
                    }
                } catch (IOException e) {
                    // TODO Auto-generated catch block
                    e.printStackTrace();
                }finally{
                }
            }
        });
alert.setButton3("Toggle View", newDialogInterface.OnClickListener() {
    @Override
    publicvoidonClick(DialogInterface dialog, int which) {
        // TODO Auto-generated method stub
        if(map.isSatellite())
        {
            map.setSatellite(false);
            map.setStreetView(true);
        }else{
            map.setStreetView(false);
            map.setSatellite(true);
        }
    }
});
    alert.show();
returntrue;
     }
    returnfalse;
 }
}
}
Figure third half of class
In this project we shall have a custom pin point on map. Create another inner class and name it CustomPinpoint. Populate this class as shown in the following listing:
packagecom.android.tution.MapOver;
importjava.util.ArrayList;
importandroid.content.Context;
importandroid.graphics.drawable.Drawable;
importcom.google.android.maps.ItemizedOverlay;
importcom.google.android.maps.OverlayItem;
publicclassCustomPinpointextendsItemizedOverlay<OverlayItem>{
    privateArrayList<OverlayItem>pinpoints=newArrayList<OverlayItem>();
    public Context c;
    publicCustomPinpoint(DrawabledefaultMarker) {
        super(boundCenter(defaultMarker));
        // TODO Auto-generated constructor stub
    }
    publicCustomPinpoint(Drawablem,Context context) {
        // TODO Auto-generated constructor stub
        this(m);
        c=context;
    }
    @Override
    protectedOverlayItemcreateItem(inti) {
        // TODO Auto-generated method stub
        returnpinpoints.get(i);
    }
    @Override
    publicint size() {
        // TODO Auto-generated method stub
        returnpinpoints.size();
    }
publicvoidinsertPinpoint(OverlayItem item)
{
pinpoints.add(item);
this.populate();
}
}
Figure CustomPinpoint class
Okay guys we done with coding part. Now let us do our last task of manifest file. Open the manifest file and populate it as shown in the following listing:
<?xmlversion="1.0"encoding="utf-8"?>
<manifestxmlns:android="http://schemas.android.com/apk/res/android"
package="com.android.tution.MapOver"
android:versionCode="1"
android:versionName="1.0">
<uses-sdk
android:minSdkVersion="8"
android:targetSdkVersion="17"/>
<uses-permissionandroid:name="android.permission.ACCESS_COARSE_LOCATION"/>
<uses-permissionandroid:name="android.permission.INTERNET"/>
<application
android:allowBackup="true"
android:icon="@drawable/ic_launcher"
android:label="@string/app_name"
android:theme="@style/AppTheme">
<uses-libraryandroid:name="com.google.android.maps"
></uses-library>
<activity
android:name="com.android.tution.MapOver.MainActivity"
android:label="@string/app_name">
<intent-filter>
<actionandroid:name="android.intent.action.MAIN"/>
<categoryandroid:name="android.intent.category.LAUNCHER"/>
</intent-filter>
</activity>
</application>
</manifest>
Figure manifest file
Create a suitable emulator and run your application. It should look similar to the following application’s snapshot:
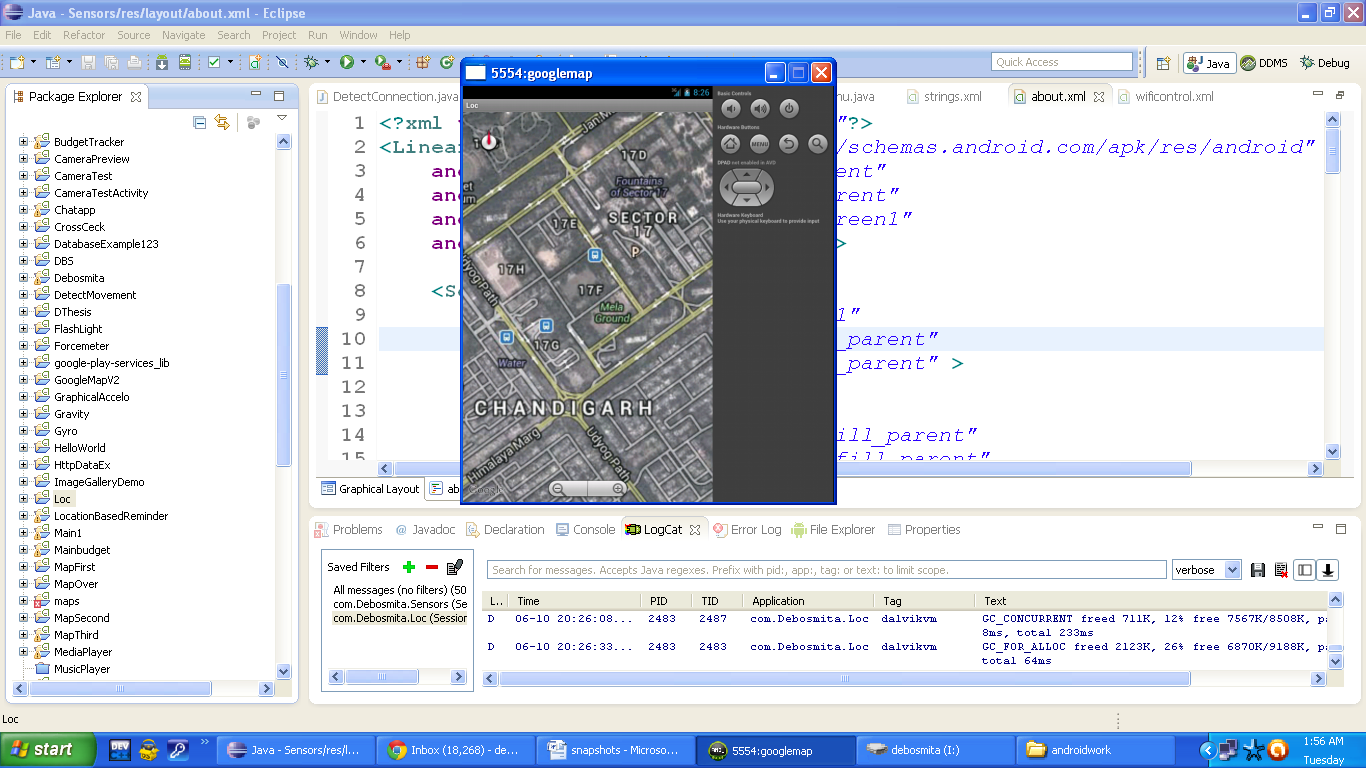
Figure Output of app
Congratulations buddiesJ!!! We are done with maps. Hope you enjoyed this section. Till then keep practicing. Happy App Developing!!!