4.8.1 Introduction to Android Action Bar
Android Action bars provide a familiar user interface to applications throughout the system. System amicably adapts to different screen configurations. It is a window feature. It identifies user locations, supports different user actions and navigation modes. Generally an action bar consists of following constituents:
- Application icon
- Application items and
- Overflow actions.
Android Action bar provides a particular area where app can be identified and user’s location is indicated. Important actions like search action is provided in action bar. As icons are present in action bar so navigation becomes easier.
ActionBar APIs were available from Android 2.1 or API level 7 but as a part of support library. These APIs were first added in Android 3.0 or Honeycomb version with API level 11. In case of supporting ActionBar in Android versions below API 11 we have to extend ActionBarActiivty and we have to set permission in manifest file. But for API 11 or above there is no such problem as we shall use ActionBar APIs present in framework.
For Android 3.0 or above action bar is added to apps which use Theme.Holo theme or one of its descendants when the targetSdkVersion or minSdkVersion attribute is set to “11” or higher. In case you want to avoid this you can do this by choosing Theme.Holo.NoActionBar.
Let us check out an example and find out the procedure of adding and programming action bar.
4.8.2 Android Action Bar Example
Open your IDE and create a project. Name it as you like. I am naming it as ActionBarExample App. You need to copy some images in your res/drawable folder. Make sure that you copy all the images in all the sub-folders of drawable folder. These images are going to be used as app icons. Now open a file saying menu in your res folder. Find the main.xml file in menu folder. The path is res/menu/main.xml. Add the code as shown in the following listing:
<menuxmlns:android="http://schemas.android.com/apk/res/android">
<item
android:id="@+id/action_settings"
android:orderInCategory="100"
android:showAsAction="never"
android:title="@string/action_settings"/>
<item
android:id="@+id/home"
android:icon="@drawable/ic_launcher"
android:orderInCategory="1"
android:showAsAction="always"
android:title="HOME"/>
<item
android:id="@+id/c"
android:icon="@drawable/c"
android:orderInCategory="2"
android:showAsAction="always"
android:title="C LANGUAGE"/>
<item
android:id="@+id/cplusplus"
android:icon="@drawable/cplusplus"
android:orderInCategory="3"
android:showAsAction="always"
android:title="C++ LANGUAGE"/>
<item
android:id="@+id/java"
android:icon="@drawable/java"
android:orderInCategory="4"
android:showAsAction="ifRoom"
android:title="JAVA LANGUAGE"/>
<item
android:id="@+id/csharp"
android:icon="@drawable/csharp"
android:orderInCategory="5"
android:showAsAction="ifRoom"
android:title="C# LANGUAGE"/>
<item
android:id="@+id/xml"
android:icon="@drawable/xml"
android:orderInCategory="6"
android:showAsAction="ifRoom"
android:title="XML LANGUAGE"/>
Figure - Android Action Bar main.xml file
Now open the activity_main.xml file and code it as shown in the following listing:
<RelativeLayoutxmlns:android="http://schemas.android.com/apk/res/android"
xmlns:tools="http://schemas.android.com/tools"
android:layout_width="match_parent"
android:layout_height="match_parent"
android:paddingBottom="@dimen/activity_vertical_margin"
android:paddingLeft="@dimen/activity_horizontal_margin"
android:paddingRight="@dimen/activity_horizontal_margin"
android:paddingTop="@dimen/activity_vertical_margin"
tools:context=".MainActivity">
<TextView
android:id=”@+id/textView1”
android:layout_width="wrap_content"
android:layout_height="wrap_content"
android:text="Hello Readers!! Enjoy action bar"/>
<TextView
android:id="@+id/text"
android:layout_width="wrap_content"
android:layout_height="wrap_content"
android:layout_alignLeft="@+id/textView1"
android:layout_below="@+id/textView1"
android:layout_marginLeft="36dp"
android:layout_marginTop="36dp"
android:text=" "/>
<ImageView
android:id="@+id/imageViewMain"
android:layout_width="wrap_content"
android:layout_height="wrap_content"
android:layout_below="@+id/text"
android:layout_centerHorizontal="true"
android:layout_centerVertical="true"
android:src="@drawable/ic_launcher"/>
Figure - activity_main.xml file
Graphical layout of app should be similar to the following snapshot:
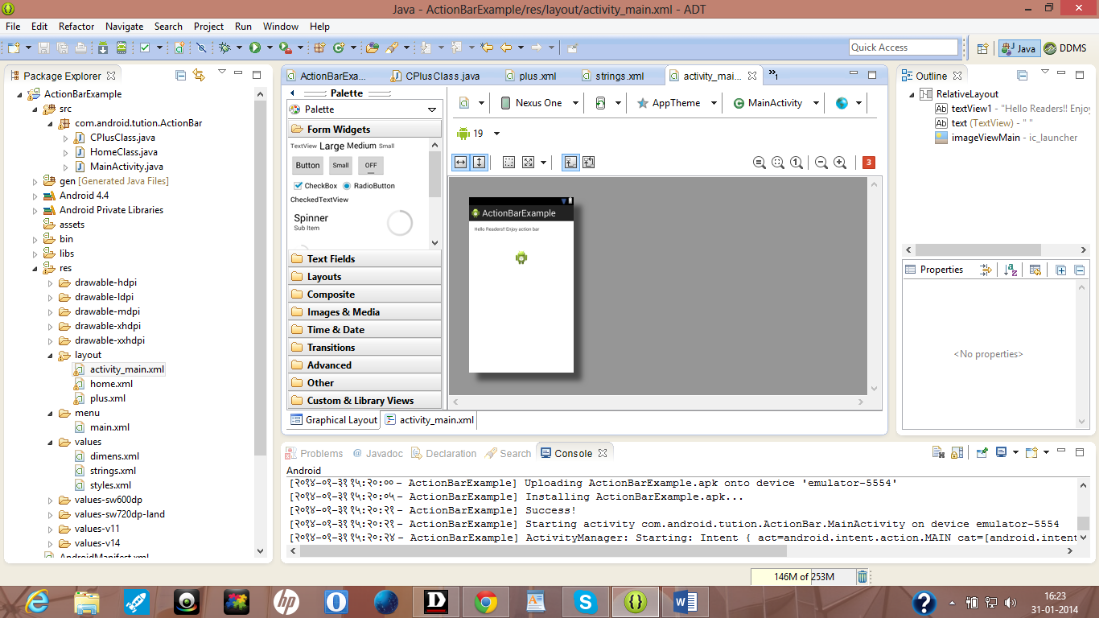
Figure - Graphical layout of Android Action Bar app
Now open your main activity file and code it as shown in the following listing:
package com.android.tution.ActionBar;
import android.app.Activity;
import android.content.Intent;
import android.os.Bundle;
import android.view.Menu;
import android.view.MenuItem;
import android.widget.ImageView;
import android.widget.TextView;
import android.widget.Toast;
publicclass MainActivity extends Activity {
    TextView tv;
    ImageView image;
    @Override
    publicvoid onCreate(Bundle savedInstanceState) {
        super.onCreate(savedInstanceState);
        setContentView(R.layout.activity_main);
        tv = (TextView) findViewById(R.id.text);
        image = (ImageView) findViewById(R.id.imageView);
    }
    @Override
    publicboolean onCreateOptionsMenu(Menu menu) {
        // Inflate the menu; this adds items to the action bar if it is present.
        getMenuInflater().inflate(R.menu.main, menu);
        returntrue;
    }
    @Override
    publicboolean onOptionsItemSelected(MenuItem item) {
        // TODO Auto-generated method stub
        switch (item.getItemId()) {
        case R.id.home:
            HomeActivity();
            returntrue;
        case R.id.c:
            CActivity();
            returntrue;
        case R.id.cplusplus:
            CPLUSPLUSActivity();
            returntrue;
        case R.id.java:
            JavaActivity();
            returntrue;
        case R.id.csharp:
            CSharpActivity();
            returntrue;
        case R.id.xml:
            XMLActivity();
            returntrue;
            // return super.onOptionsItemSelected(item);
        case R.id.action_settings:
Figure - First half of code for Android Action Bar app
Code the second half of code in the same activity continued from the last line of the first half of code. Just for clear understanding it is split into two sections. Second half of code is as shown in the following listing:
publicvoidXMLActivity() {
        // TODO Auto-generated method stub
        tv.setText("Extensible Mark up language (XML). \n It is a markup language which defines a set of rules.\n This rule demonstrates the encoding format.\n This format is both human readable and machine readable.");
    }
    privatevoidCSharpActivity() {
        // TODO Auto-generated method stub
        Toast.makeText(
                getApplicationContext(),
                "C# is a multi-paradigm programming language. \n It is object-orieted, imperative, strongly typed, component-oriented, generic and functional programming language. \n It was developed by Microsoft within .Net initiative. \n Recent version of c# is 5.0 ",
                Toast.LENGTH_LONG).show();
    }
    publicvoidJavaActivity() {
        // TODO Auto-generated method stub
        tv.setText("Java is a programming language which is object-oriented, class based and concurrent. \n The basic principle behind the working of JAVA is Write Once, Run Anywhere i.e., WORA. \n Java code is compiled into bytecode  i.e., a classfile. \n Thisbytecode can run anywhere on a Java Virtual Machine (JVM) regardless of any underlying computer architecture");
    }
    privatevoidCPLUSPLUSActivity() {
        // TODO Auto-generated method stub
        Intent one = newIntent(MainActivity.this, CPlusClass.class);
        startActivity(one);
    }
    privatevoidCActivity() {
        // TODO Auto-generated method stub
        Toast.makeText(
                getApplicationContext(),
                "C is a procedural language.\n It was developed by Dennis Ritchie at AT& Bell Laboratory. \n It provides efficiecnt mapping to machine instructions. \n C is supported by most of the computer architectures and operating systems",
                Toast.LENGTH_LONG).show();
    }
    publicvoidHomeActivity() {
        // TODO Auto-generated method stub
        Intent i = newIntent(MainActivity.this, HomeClass.class);
Figure - Second half of code for Android Action Bar app
Now as you can see in the code we have two more classes. So create a new java file and name it as HomeClass.java. Open this class and code it as shown in the following listing:
package com.android.tution.ActionBar;
import android.app.Activity;
import android.os.Bundle;
publicclass HomeClass extends Activity {
    @Override
    protectedvoid onCreate(Bundle savedInstanceState) {
        // TODO Auto-generated method stub
        super.onCreate(savedInstanceState);
        setContentView(R.layout.home);
    }
}
Figure - HomeClass class file
Now create a corresponding xml file. Name it home.xml and code it as shown in the following listing:
<LinearLayoutxmlns:android="http://schemas.android.com/apk/res/android"
android:layout_width="fill_parent"
android:layout_height="fill_parent"
android:orientation="vertical">
<ImageView
android:id="@+id/imageView"
android:layout_width="wrap_content"
android:layout_height="wrap_content"
android:layout_gravity="center"
android:src="@drawable/ic_launcher"/>
<TextView
android:id="@+id/textViewHome"
android:layout_width="match_parent"
android:layout_height="wrap_content"
android:text="@string/home"
android:textAppearance="?android:attr/textAppearanceMedium"/>
</LinearLayout>
Figure - home.xml file
You will get an error in the Text View and to remove it open the strings .xml file and edit it with the following code:
<?xmlversion="1.0"encoding="utf-8"?>
<resources>
<stringname="app_name">ActionBarExample</string>
<stringname="action_settings">Settings</string>
<stringname="hello_world">Hello world!</string>
<stringname="home">Android is a software stack. It comprises of an operating system, a midleware and a set of applications. The latest version of Android is 4.4. Pet name of this version is set to be kitkat</string>
</resources>
Figure - strings.xml file
The graphical layout of file should be similar to the following snapshot:
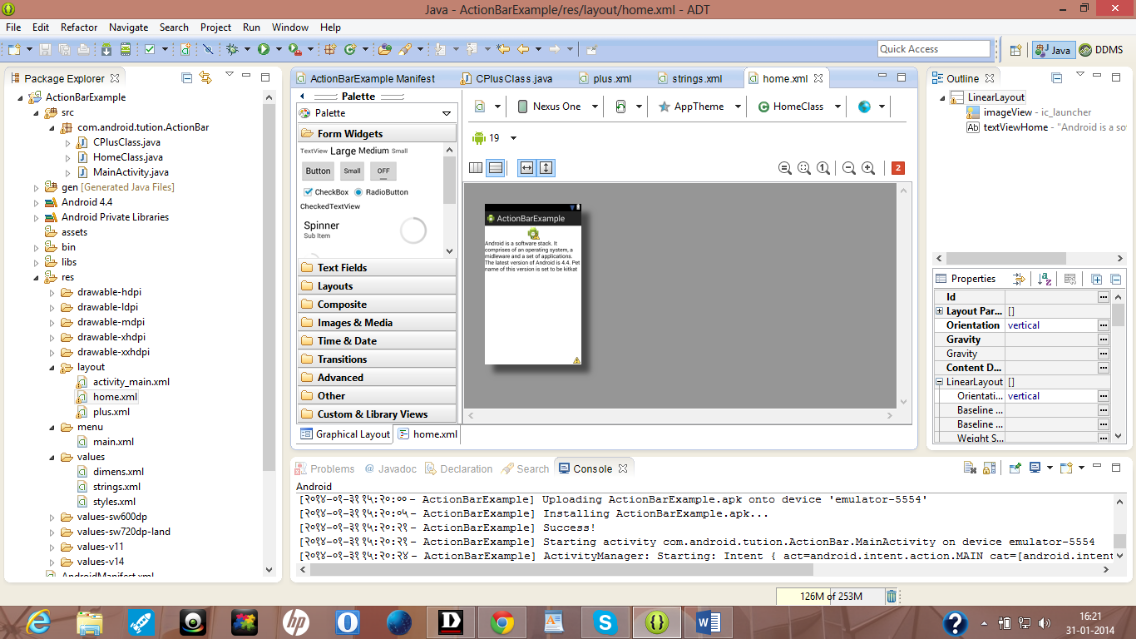
Figure - Graphical layout of home.xml file for Android Action Bar Example
Now create another java class and name it as CPLusClass.java. Code it as shown in the following listing:
package com.android.tution.ActionBar;
import android.app.Activity;
import android.os.Bundle;
import android.widget.ImageView;
import android.widget.TextView;
publicclass CPlusClass extends Activity {
    @Override
    protectedvoid onCreate(Bundle savedInstanceState) {
        // TODO Auto-generated method stub
        super.onCreate(savedInstanceState);
        setContentView(R.layout.plus);
        TextView text = (TextView) findViewById(R.id.textViewPlus);
        ImageView imagePlus = (ImageView) findViewById(R.id.imageViewPlus);
        text.setText("C++ is a object-oriented programming language. \n C++ is statically-typed, multi-paradigm, free-form and compiled language. \n It is an intermediate-level programming language. \n C++ was originally named as C With Classes");
    }
}
Figure - CPlusClass.java class
Now create the corresponding xml file. Name it plus.xml and code it as shown in the following listing:
<LinearLayoutxmlns:android="http://schemas.android.com/apk/res/android"
android:layout_width="fill_parent"
android:layout_height="fill_parent"
android:orientation="vertical">
<ImageView
android:id="@+id/imageViewPlus"
android:layout_width="wrap_content"
android:layout_height="wrap_content"
android:src="@drawable/cplusplus"/>
<TextView
android:id="@+id/textViewPlus"
android:layout_width="wrap_content"
android:layout_height="wrap_content"
android:text=""
android:textAppearance="?android:attr/textAppearanceMedium"/>
Figure - plus.xml file
Graphical layout should be similar to the following snapshot:
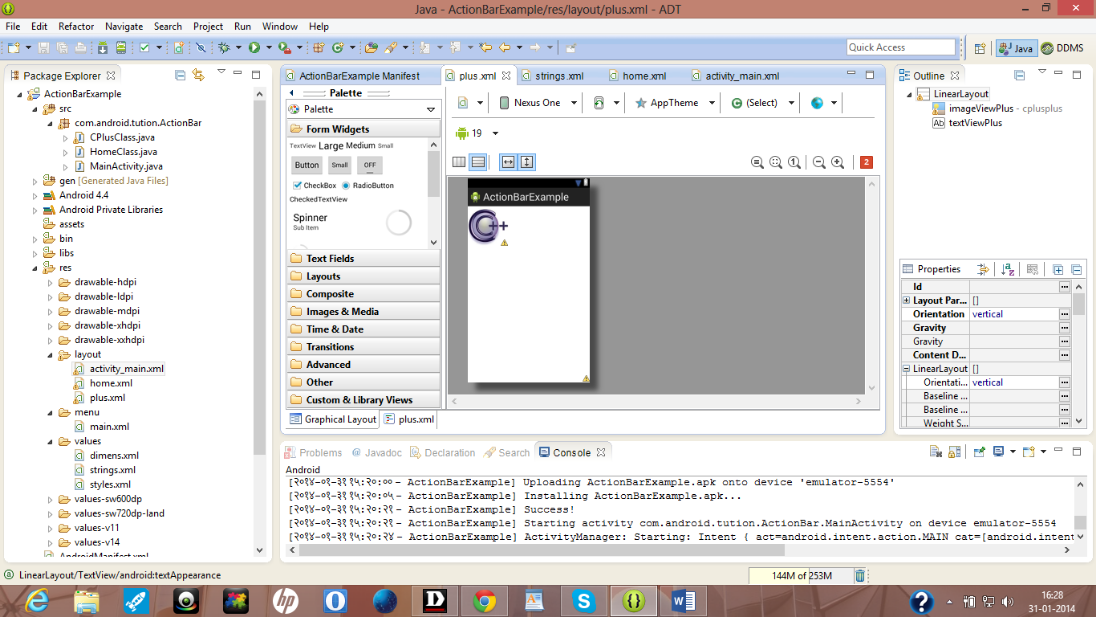
Figure - plus.xml file
Now the last thing to do is open your app manifest file and cross-check it with the following lines of code:
<?xmlversion="1.0"encoding="utf-8"?>
<manifestxmlns:android="http://schemas.android.com/apk/res/android"
package="com.android.tution.ActionBar"
android:versionCode="1"
android:versionName="1.0">
<uses-sdk
android:minSdkVersion="8"
android:targetSdkVersion="18"/>
<application
android:allowBackup="true"
android:icon="@drawable/ic_launcher"
android:label="@string/app_name"
android:theme="@style/AppTheme">
<activity
android:name="com.android.tution.ActionBar.MainActivity"
android:label="@string/app_name">
<intent-filter>
<actionandroid:name="android.intent.action.MAIN"/>
<categoryandroid:name="android.intent.category.LAUNCHER"/>
</intent-filter>
</activity>
<activityandroid:name=".HomeClass">
</activity>
<activityandroid:name=".CPlusClass">
</activity>
</application>
Figure - manifest file of Android Action Bar Example app
Create a suitable emulator and run your application. Output should be similar to the following snapshot:
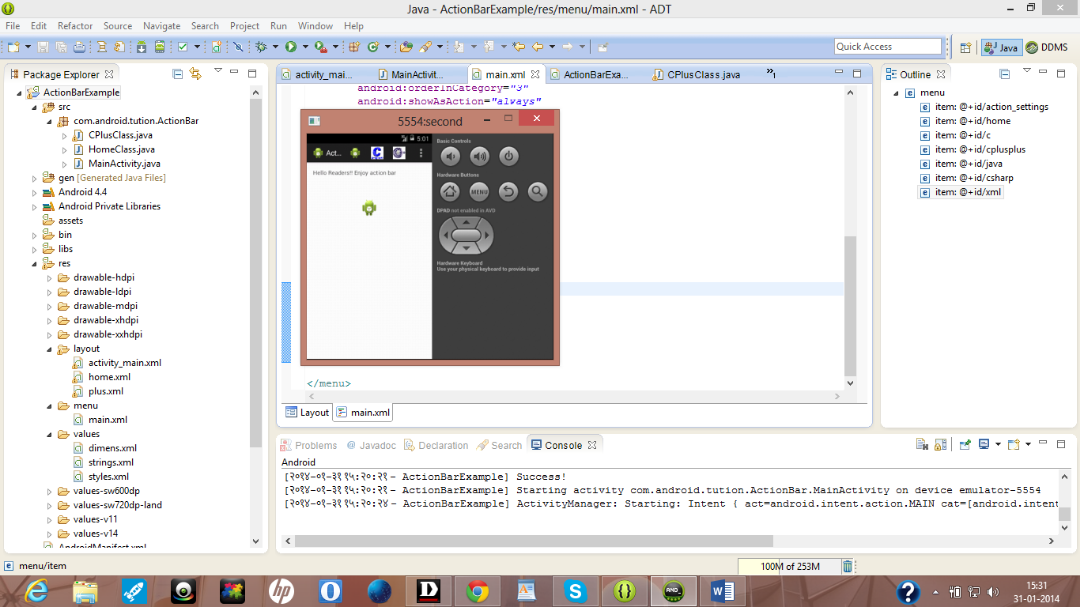
Figure - Output after launching the application
Now click the green robot on your action bar. This is your action item. Output should be similar to the following snapshot:
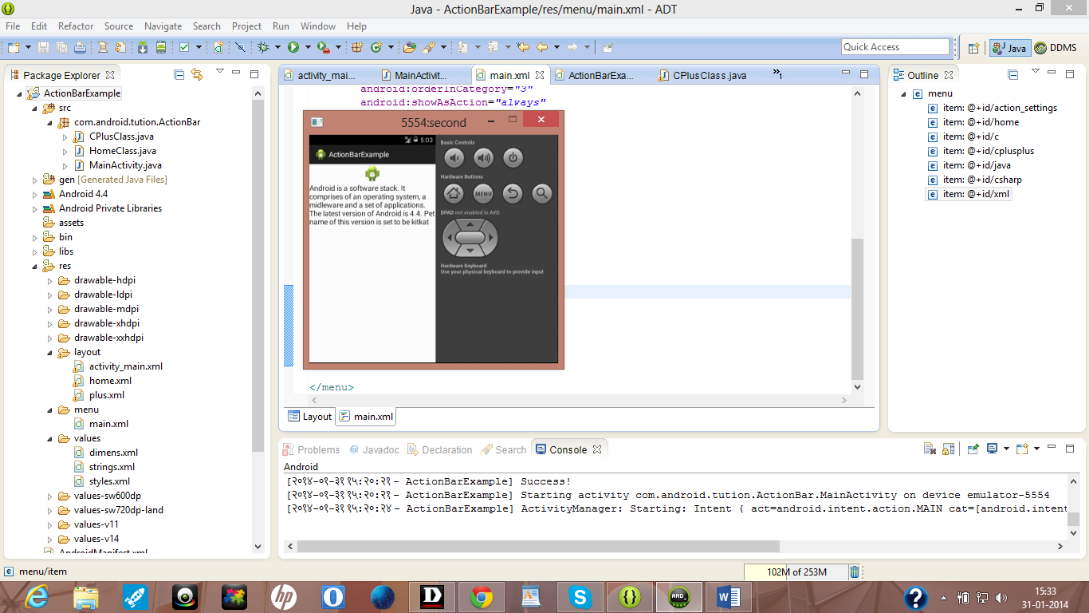
Figure - Output after selecting the home icon of app
Make sure you don’t get confused with the application’s launcher icon. Now go to the second icon. Images may vary as you might copy any image on your res/drawable folder. Rest of the things are similar. Output should be similar to the following snapshot:
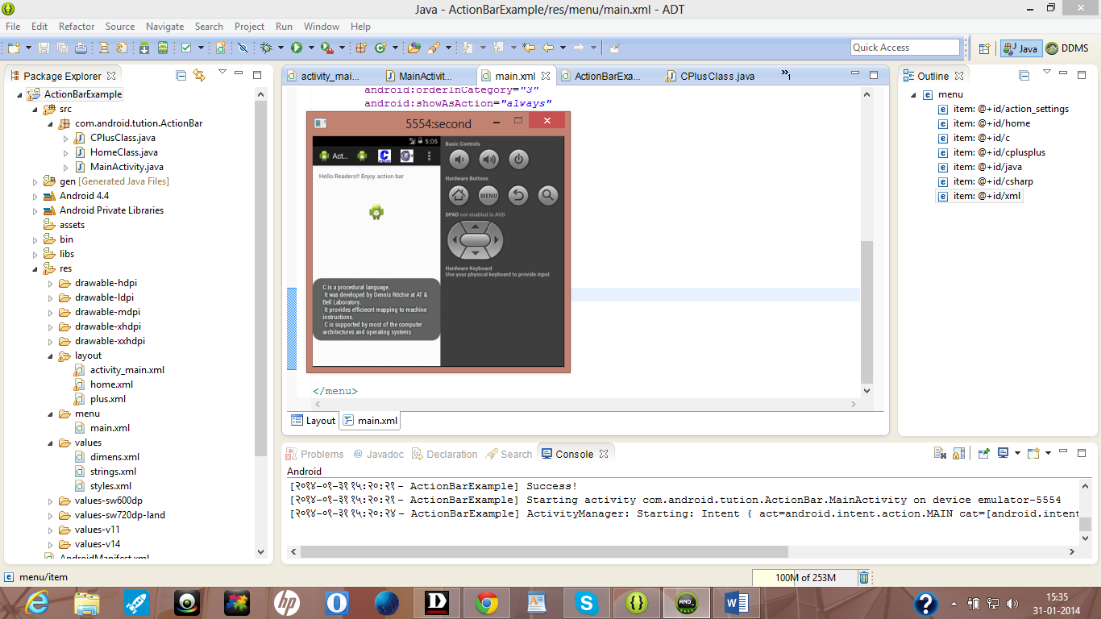
Figure - Output after pressing C icon
Now press the third icon and output should be similar to the following snapshot:
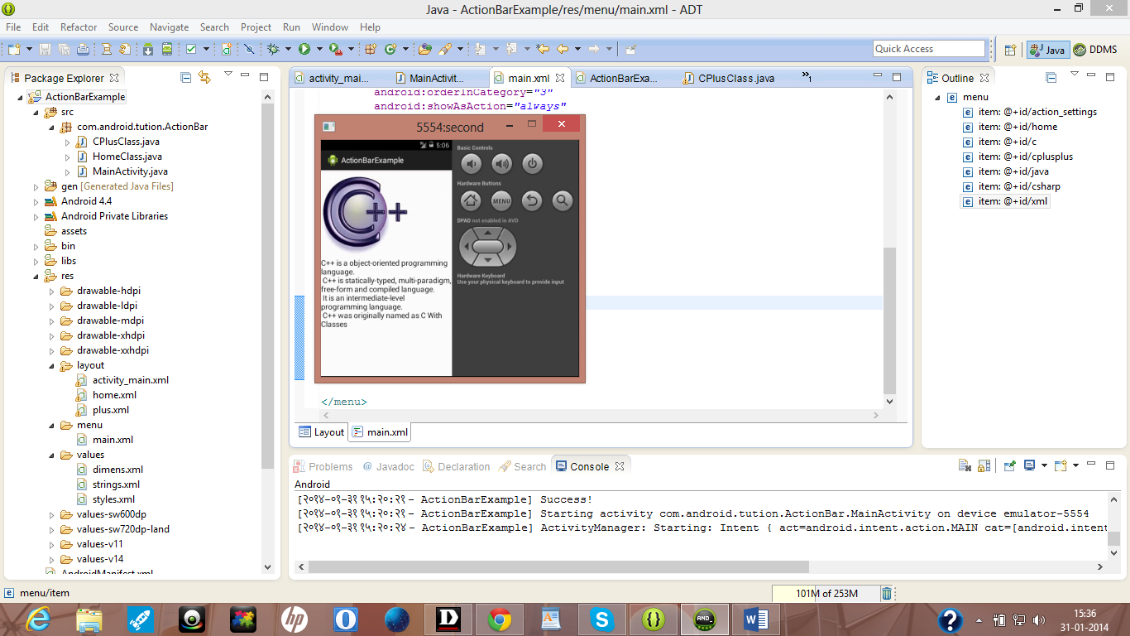
Figure - Output after selecting C++ icon
Now the other icons or menu items which we have coded will be shown in the overflow option
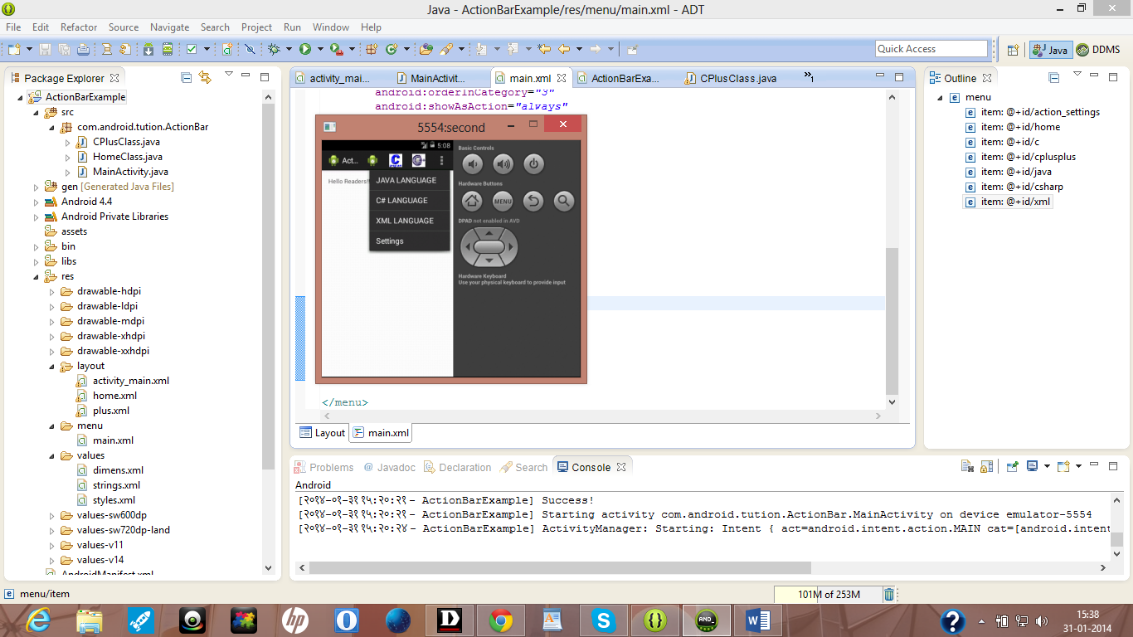
Figure - Overflow options
Select the first option and output should be similar to the following snapshot:
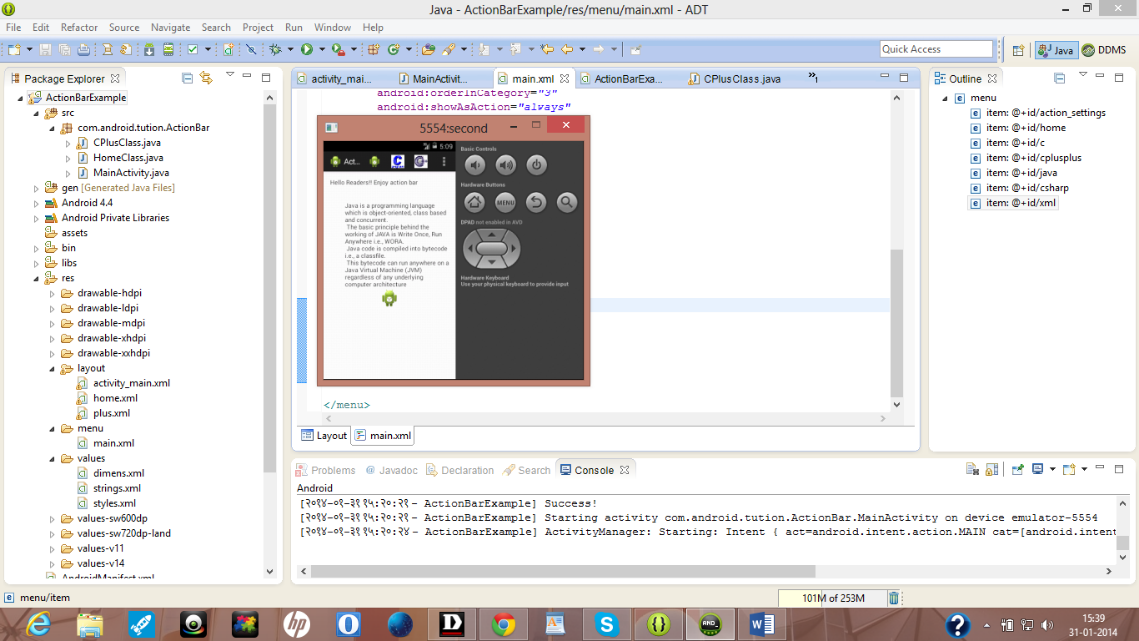
Figure - Output after selecting JAVA option
Similarly go to the second option in the list and select the item. Press it and the output should be similar to the following snapshot:
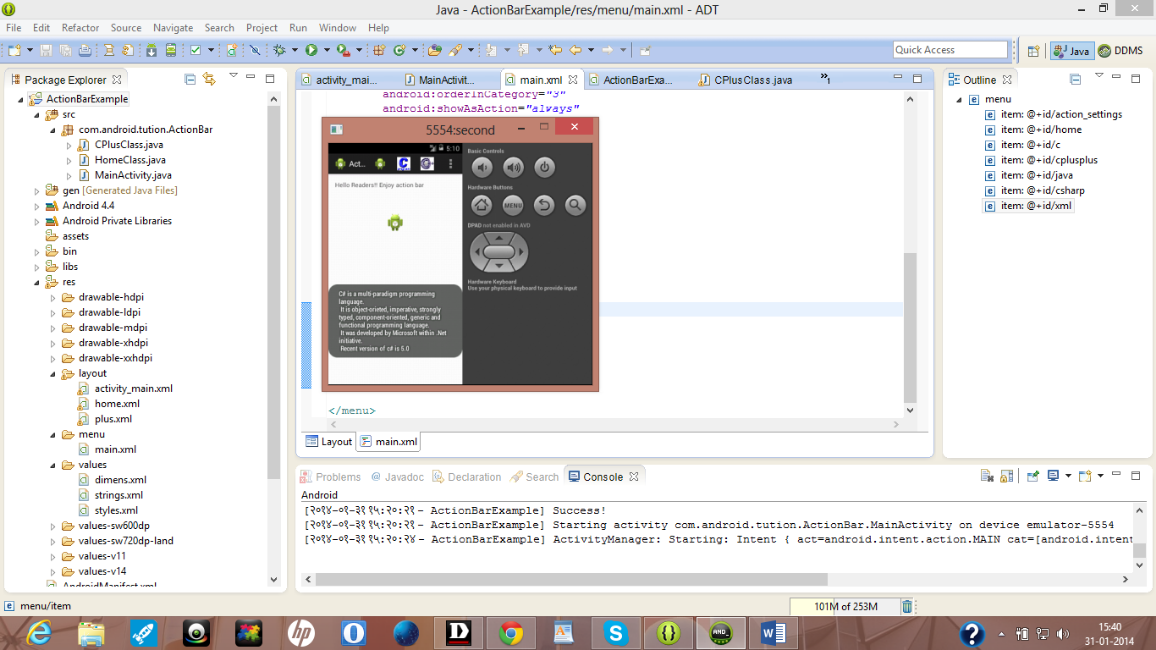
Figure - Output after selecting C# option
Go to the third option and select it. Output should be similar to the following snapshot:
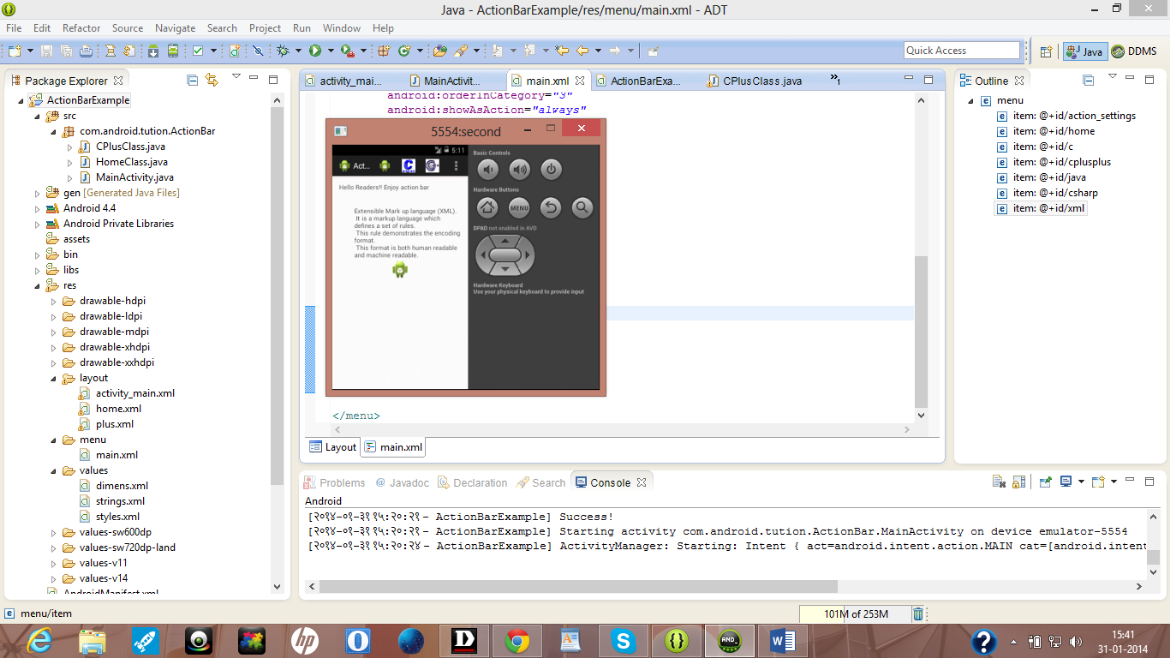
Figure - Output after selecting XML option
Now select the last option. If you don’t press the back button and select this option then output should be similar to the following snapshot:
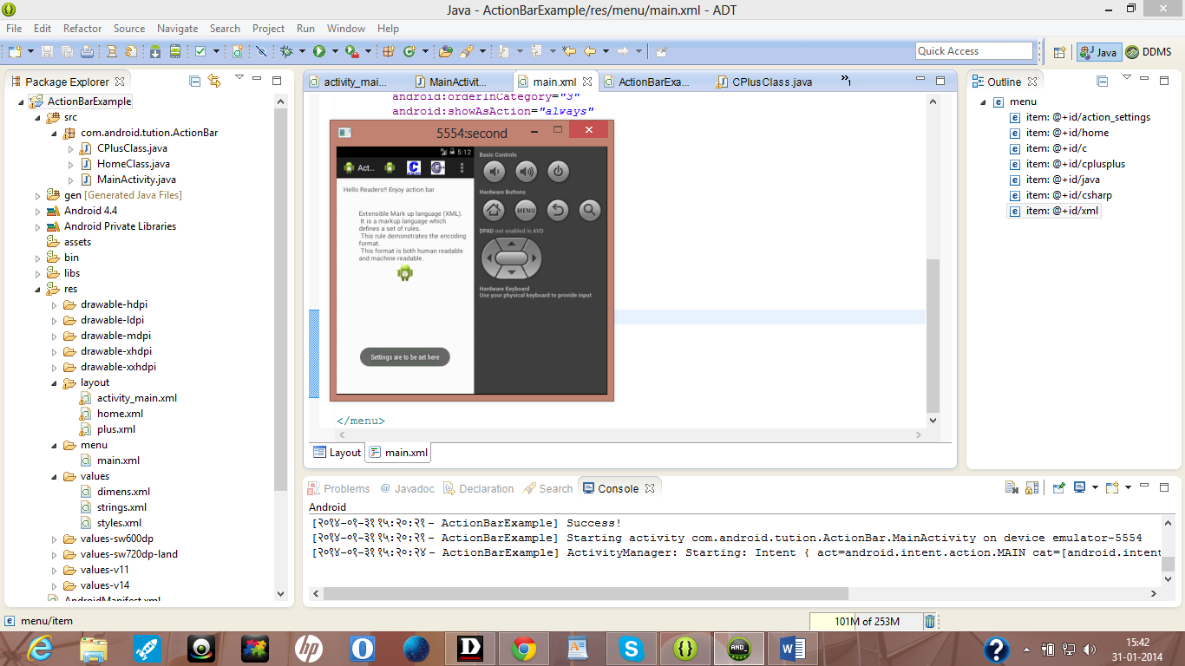
Figure - Output after choosing Settings option
Congratulations readers!! We are done. Hope you enjoyed this tutorialJ. See you in the next section. Till then keep practicing. Happy App Developing!!
