
App widgets have been introduced in 1.5 but performance has drastically improved with 3.0 and 3.1. Let us understand the attributes of our previous xml file.
- minHeight and minwidth attributes defines the default amount of space consumed by the widget on screen. Our home screen has a grid of cells where app widget is placed according to its dimensions. If we define a value and it doesn’t fits well then it is rounded up to nearest figure. App widget’s size should not exceed 4x4 dimensions for better performance across various screen sizes.
- minResizeWidth and minResizeHeight: This is the minimum requirement of widget’s dimension. Below these values, widget would become unusable. This is helpful when we want to resize the app widget to be smaller than the default size. This would in turn provide more space in home screen.
- updatePerionMillis: This attribute specifies the update interval of the app widget. Widget shall refresh itself at regular update intervals. App Widget framework will request an update from the AppWidgetProvider by calling the onUpdate() callback method at this frequency. Although it is not guaranteed that it will be updated at this time interval. Updating frequency should not be more than once in an hour. Although you can specify but that is going to consume the battery life.
- initilalLayout: This attribute specifies the layout resource where app widget’s layout is defined.
- previewImage: This attribute specifies the app widget’s launcher image on screen when user launches it. This is the image which user will see on screen. If not defined then application launcher icon will be displayed on the home screen. This is introduced in 3.0.
- resizeMode: This attribute specifies the resizing axis of widget i.e., you can resize your widget either vertically or horizontally or in both axes. This is introduced in 3.1
- widgetCateory: This attribute specifies whether widget is to be displayed on home screen, lock screen or both. Default value is “home_screen”. It is introduced in 4.2
Let us create our App Widget Layout. Create a xml file and name it widget.xml. Open it. We are using this as our provider layout. You can create another layout if you wish to do so. Now type the code as shown below:
<LinearLayout xmlns:android="http://schemas.android.com/apk/res/android"
    android:layout_width="fill_parent"
    android:layout_height="fill_parent"
    android:orientation="vertical" >
<TextView
       android:id="@+id/tvconfiginput"
       android:layout_width="wrap_conten
       android:layout_height="wrap_content"
       android:text="TextView" />

    <Button
       android:id="@+id/bwidgetopen"
       android:layout_width="wrap_conten
       android:layout_height="wrap_content"
       android:text="Button" />

    <TextView
       android:id="@+id/tvwidgetupdate"
       android:layout_width="wrap_content"
       android:layout_height="wrap_content"
       android:text="TextView" />

</LinearLayout>
Figure - Android App Widget provider layout file
The graphical layout of file would be similar to the snapshot shown below:
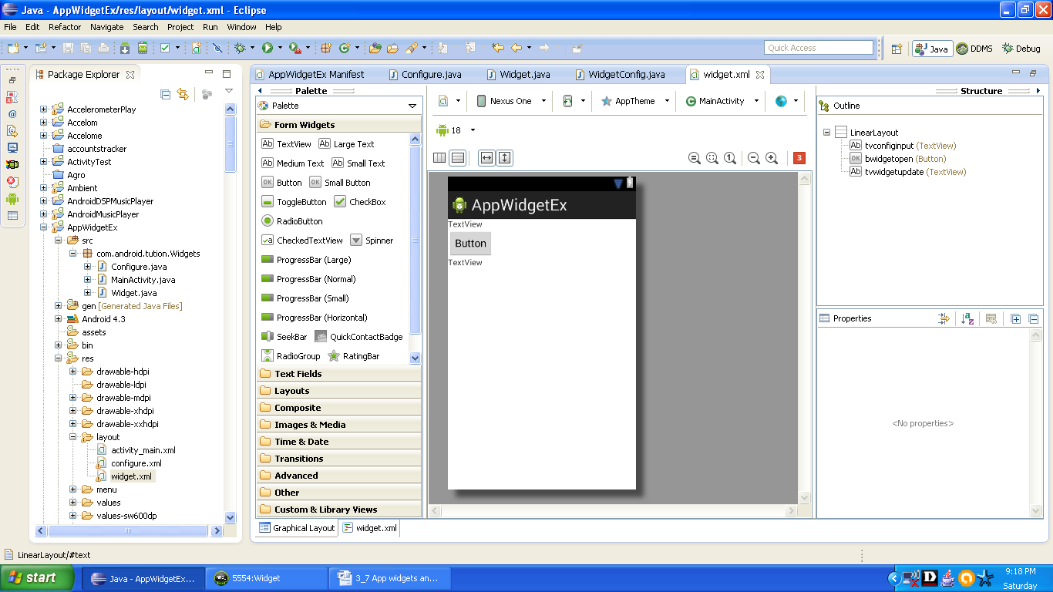
Figure Graphical layout of widget.xml
We have to define an initial layout for Android App widget in xml and it should be stored in res/layout/ directory. There is one important thing about initial layouts and that is app widgets layout is based on remote views. Remote Views doesn’t support all type of layouts or view widgets. Remote view object supports following layouts
- FrameLayout
- LinearLayout
- GridLayout
- RelativeLaout
RemoteViews object support following widget classes:
- AnalogClock
- Button
- Chronometer
- ImageButton
- ImageView
- ProgressBar
- TextView
- ViewFlipper
- ListView
- GridView
- StackView
- AdapterViewFlipper
Remote Views also support ViewStub. It is an invisible, sized zero view.
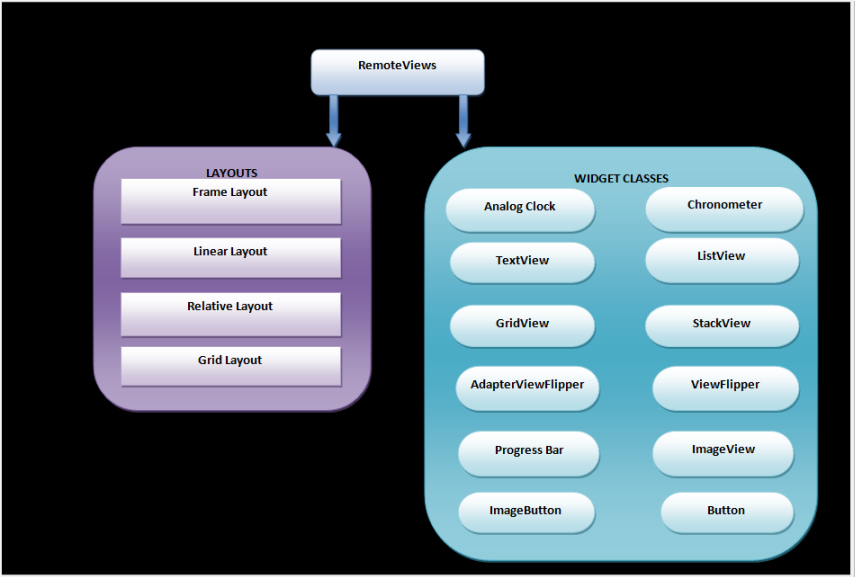
Figure - Layouts and widget classes supported by RemoteViews object
AppWidgetProvider class extends the BroadcastReceiver to handle the broadcasts of App Widget. The AppWidgetProvider is going to receive the updates which are related to app widget’s event like when it is deleted or gets updated, etc. AppWidgetProvider receives one of the following methods:
- onUpdate():This method is called to update the App Widget at regular intervals defined by the updatePeriodMillis attribute in the AppWidgetProviderInfo metadata. In our example example_widget xml is our AppProviderInfo xml and widget.xml is our initial layout file. This is called when the first time user adds the widget on screen. However if there is a configuration activity then this method is not called, In that case it would call this method only when update is required. The configuration activity then performs the update for first time.
- onAppWidgetOptionsChanged(): This is called every time you resize the widget and it is also called when widget is placed for the first time.
- onDeleted(Context, int[]): This method is called every time App Widget is deleted from the App Widget host.
- onEnabled(Context): This is called when the first instance of App Widget is created for the first time.
- onDisabled(Context): This is called when last instance of App widget is deleted from App Widget host. All the temporary work done on onEnabled(context) method should be deleted here.
- onReceive(Context, Intent): We don’t have to implement this method as it is automatically called every time a broadcast is received or any of the above listed methods gets called.
Open your provider class and type the code as shown in the following listing:
import java.util.Random;

import android.appwidget.AppWidgetManager;
import android.appwidget.AppWidgetProvider;
import android.content.Context;
import android.widget.RemoteViews;
import android.widget.Toast;

public class Widget extends AppWidgetProvider {
       @Override
       public void onUpdate(Context context, AppWidgetManager appWidgetManager,
                  int[] appWidgetIds) {
              // TODO Auto-generated method stub
              super.onUpdate(context, appWidgetManager, appWidgetIds);
              Random r = new Random();
              int randomInt = r.nextInt(1000000000);
              String rand = String.valueOf(randomInt);

              final int N = appWidgetIds.length;

              for (int i = 0; i < N; i++) {
                  int awID = appWidgetIds[i];
                  RemoteViews v = new RemoteViews(context.getPackageName(),
                        R.layout.widget);
                  v.setTextViewText(R.id.tvwidgetupdate, rand);
                  appWidgetManager.updateAppWidget(awID, v);
              }
       }
       @Override
       public void onDeleted(Context context, int[] appWidgetIds) {
            // TODO Auto-generated method stub
            super.onDeleted(context, appWidgetIds);
            Toast.makeText(context, "See ya !!!", Toast.LENGTH_SHORT).show();
       }
}
Figure - AppWidgetProvider class
Create another activity and corresponding xml file for it. Let us create them. Open the java class and name it Configure and type the code as shown below:
public class Configure extends Activity implements OnClickListener {
       EditText info;
       AppWidgetManager awm;
       Context c;
       int awId;

       @Override
       protected void onCreate(Bundle savedInstanceState) {
                 // TODO Auto-generated method stub
                 super.onCreate(savedInstanceState);
                 setContentView(R.layout.configure);
                 Button b = (Button) findViewById(R.id.bwidgetconfig);
                 b.setOnClickListener(this);
                 c = Configure.this;
                 info = (EditText) findViewById(R.id.etwidgetconfig);

                 // getting info about the widget that launched this activity
                 Intent i = getIntent();
                 Bundle extra = i.getExtras();

                 if (extra != null) {
                     awId = extra.getInt(AppWidgetManager.EXTRA_APPWIDGET_ID,
                            AppWidgetManager.INVALID_APPWIDGET_ID);

                  } else {
                    finish();
                  }
                  // bridge for relating the above thing with the activity

                  awm = AppWidgetManager.getInstance(c);
          }
          @Override
          public void onClick(View v) {
                 // TODO Auto-generated method stub

                 String e = info.getText().toString();
                 RemoteViews rv = new RemoteViews(c.getPackageName(), R.layout.widget);
                 rv.setTextViewText(R.id.tvconfiginput, e);

                 Intent in = new Intent(c, MainActivity.class);
                 PendingIntent pin = PendingIntent.getActivity(c, 0, in, 0);
                 rv.setOnClickPendingIntent(R.id.bwidgetopen, pin);

                 awm.updateAppWidget(awId, rv);

                 Intent result = new Intent();
                 result.putExtra(AppWidgetManager.EXTRA_APPWIDGET_ID, awId);
                 setResult(RESULT_OK, result);

                 finish();
             }
}
Figure - Configuration Activity